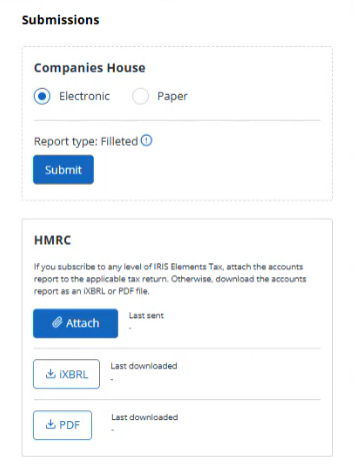
Once the accounts have been approved and signed, you're ready to submit them.
You must have previously entered your Companies House credentials before you can submit the accounts. Only filleted accounts can currently be filed.
- From the Clients menu, select Clients list.
- Change the client list view to either Active clients or a custom view that includes all relevant clients.
- From the Accounts production widget on the Dashboard, select the required accounting period. Ideally, select the latest / newest period.
If a relevant account period does not exist, you must create and set up one first.
- Select the Submission tab.
A date for approval must be entered on the Approval tab for both the client and the accountant before the Submissions tab is available.
The report type defaults to Filleted.

- If you are submitting these accounts with a tax return, either:
- Select Attach to automatically attach them to a tax return created in IRIS Elements Tax.
- Download a copy in either iXBRL or PDF format and attach to the tax return.
- If these accounts are being submitted separately, select Submit then Continue.
You must have previously entered the company authentication code. If you haven't, select client record, enter the code, save, then return to the Submissions tab.
- If you've submitted a paper copy, select A paper copy to Companies House, then select Confirm.
The accounts are then submitted to Companies House and marked as completed.
Learn how to submit your client's accounts to Companies House in IRIS Elements Accounts Production
More videos and playlists available in our library.