Classes
Use the Student View tab in the Curriculum Manager module to manage class details for each student.
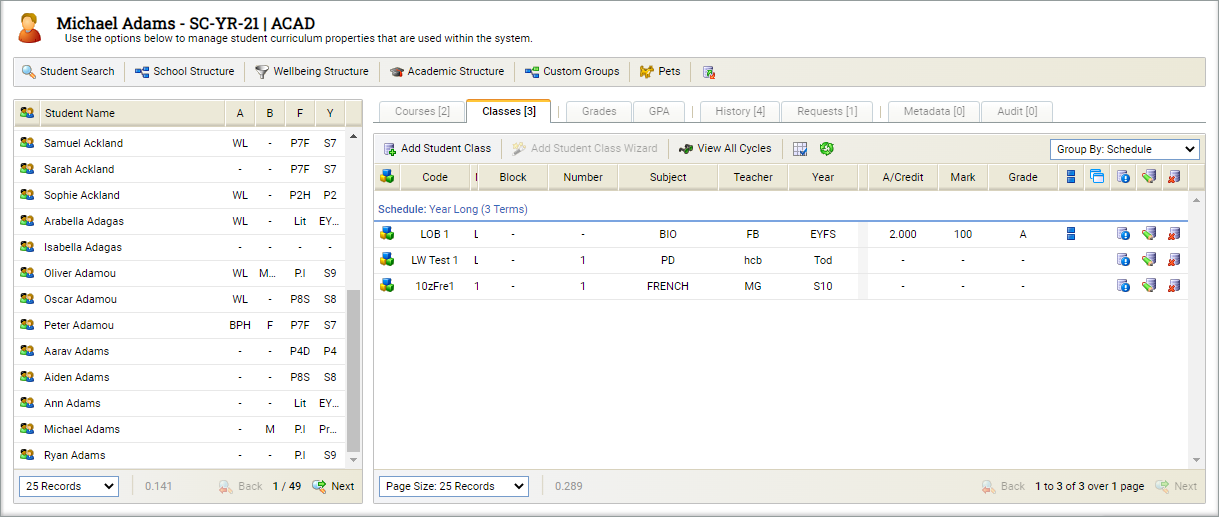
- Once you have selected the student that you want to work with, select the Classes tab:
- All of the classes that the student is currently enrolled in for the selected cycle are listed on the right.
- Select View All Cycles to see the classes that the student is enrolled in across all cycles.
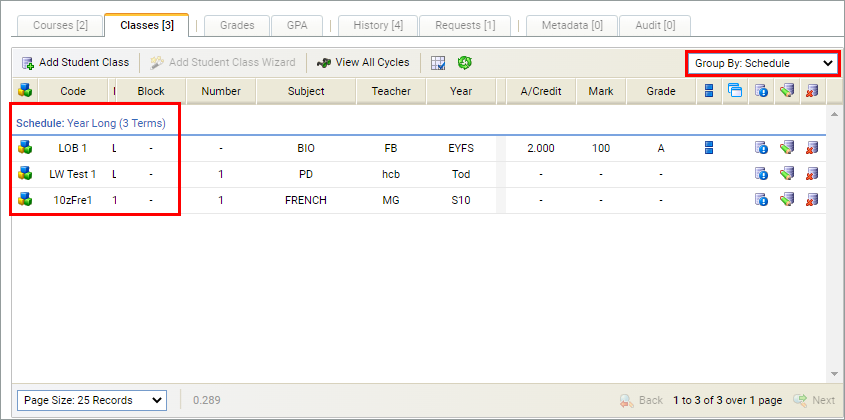
- Use the Group By drop-down on the right to group the classes displayed by a selected course property.
- Use the navigation tools at the bottom of the Classes tab to locate the class details that you want to view.
-
Choose to:
- Add the student to another class.
- Update classes tab entity preferences.
- Edit the grade set linked to the class.
- View and adjust student course information (individual grading and course status properties for the student).
- View and amend the course and class that the student is enrolled in.
- Remove the student from the listed course/class (choosing the appropriate status) and award credit as required for the course taken to date.
Add student class
- Select Add Student Class. A popup window is displayed:
-
Use the tools available to display the classes that you want to work with:
- Select the filters available. Hold Ctrl to select more than one option in a filter.
- Type a search term in the Quick Search Classes field and press enter on your keyboard.
- Use the Group By drop-down in the right of the header to group the classes displayed by a selected property.
- Navigation tools are available at the bottom of the screen.
- Use the checkboxes on the left to select the classes that you want to add the student to.
- Select Save & Close. The classes are listed for the student.
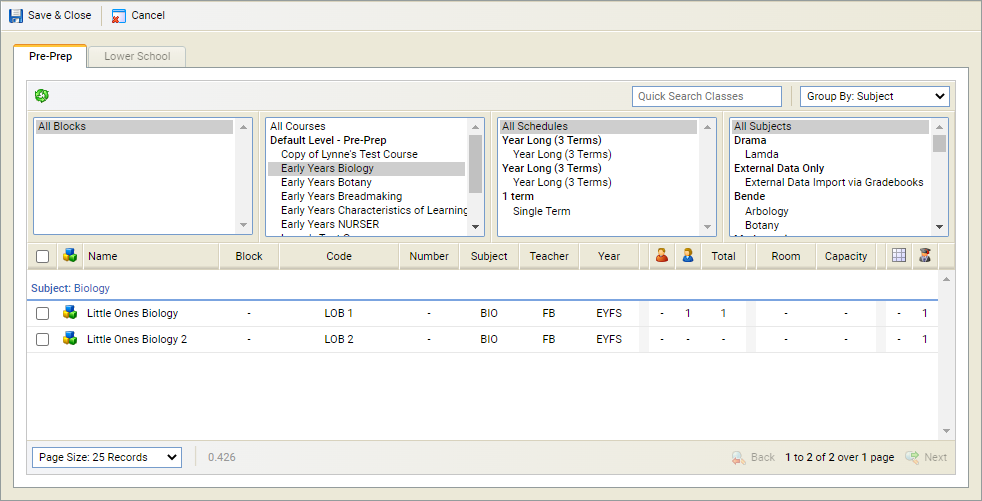
Classes are split across tabs by level. Only classes available to the selected student are available to select.
The classes available to select are determined by the level (and subsequent curriculum and school division) that the class course has been linked to.
No selections are available here if the student you are working with is associated with a level that has no class courses linked to.
Update Classes tab entity preferences
Update the entities displayed for classes. For example, choose to display class Codes in the Classes tab grid.
Your entity preferences can also be configured centrally from the Manage Module Entities option.
-
Select the table icon in the header to display the Edit Module Entity window:
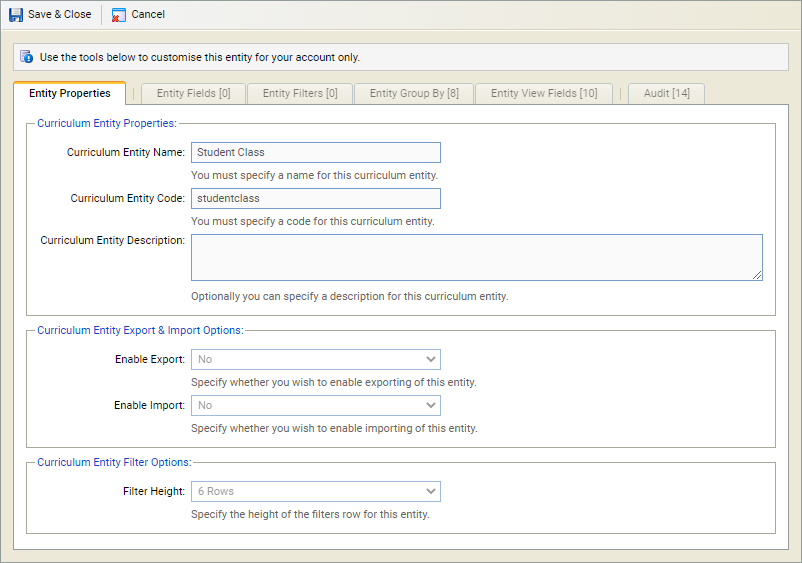
- The Entity Properties tab displays an overview of your entity preferences.
- The four following tabs hold property details for the entity. A count next to the tab title indicates the number of selections made in the tab.
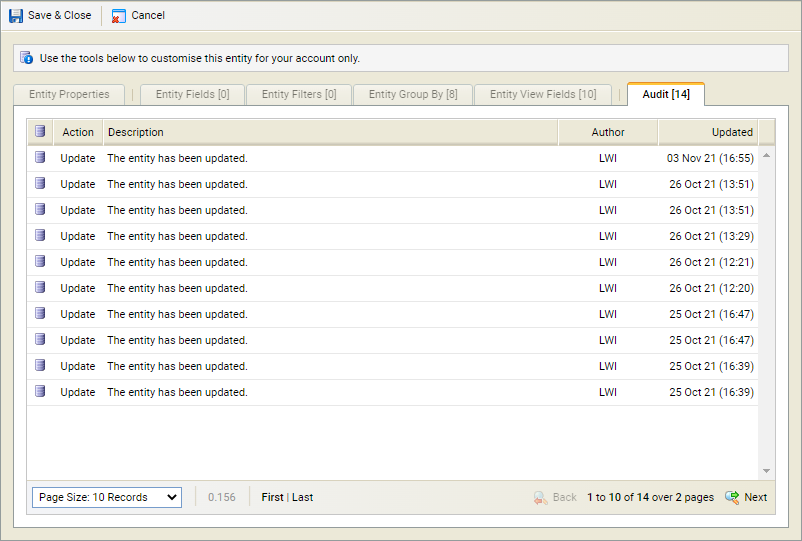
- The Audit tab lists any amendments that have been made to the entity.
-
In the Entity Properties tab:
- Entity Properties cannot be changed.
- It is not recommended that you make any changes to Export & Import Options.
Filter Options indicate the number of rows displayed if filters are used for the entity. The example below has 6 rows in the filter:

-
Work through the tabs shown to set details for the entity:
 Entity Fields
This tab is not currently being used in the Classes tab.
 Entity Filters
This tab is not currently being used in the Classes tab.
 Entity Group By
All of the group by selections that can be made for the entity are listed.
Use the checkboxes to select the group by selections that you want to include for the entity:
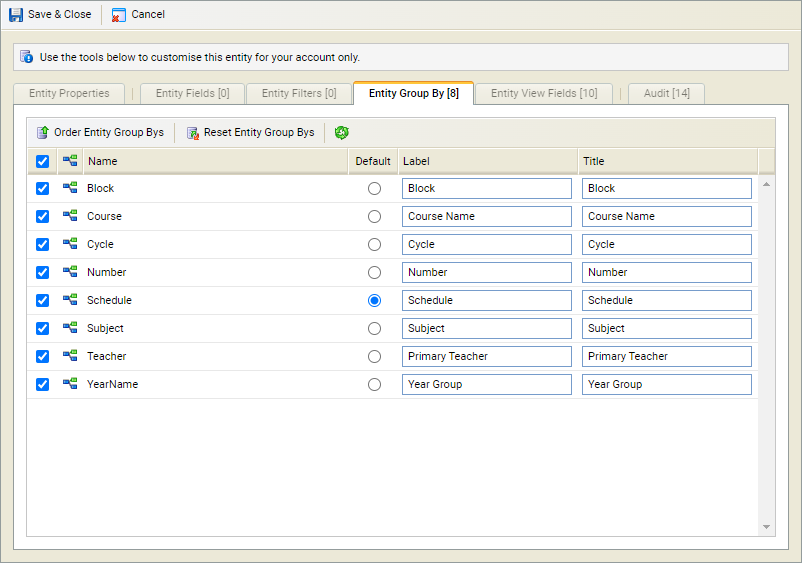
- Select a default if required.
-
Change the Labels and Titles as
required:
- The Label name is displayed in the Group By drop-down menu.
The Title name is displayed in the screen where data is grouped. An example of how your selections are displayed for the selected entity is shown below:
 Entity View Fields
All of the information that can viewed for the entity is listed.
Use the checkboxes on the left to select the columns that you want to display:
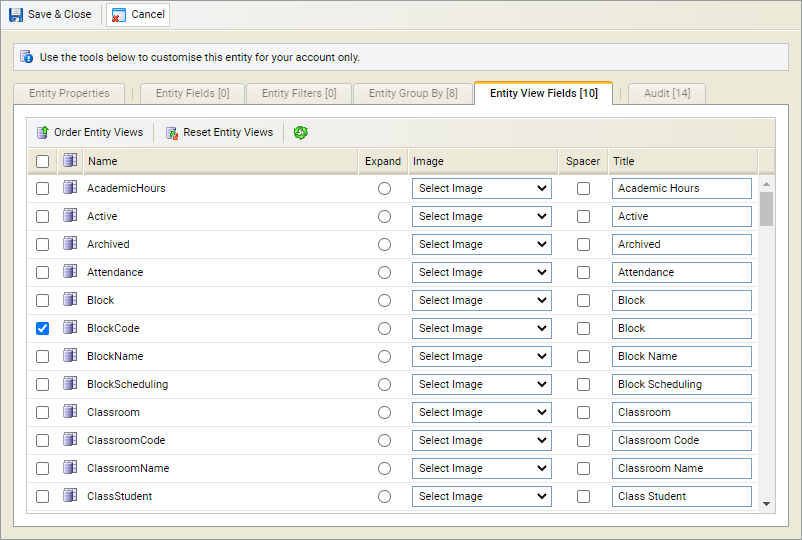
Be aware that the selections made in Manage Module Settings can determine the fields that are displayed regardless of whether they are selected here.
-
Select whether an Image or a Title
are displayed in the header bar for the entity. Either:
-
Use the Select Image drop-down to select an image for the entity. An icon is
used instead of a column title.
or - Enter a Title for the entity and check the box to the left of the Title. This is useful if you want to customise titles to suit you.
-
Use the Select Image drop-down to select an image for the entity. An icon is
used instead of a column title.
- Use the Spacer checkbox to add grey space to the right of columns. This is useful for dividing up the information displayed in the Courses tab.
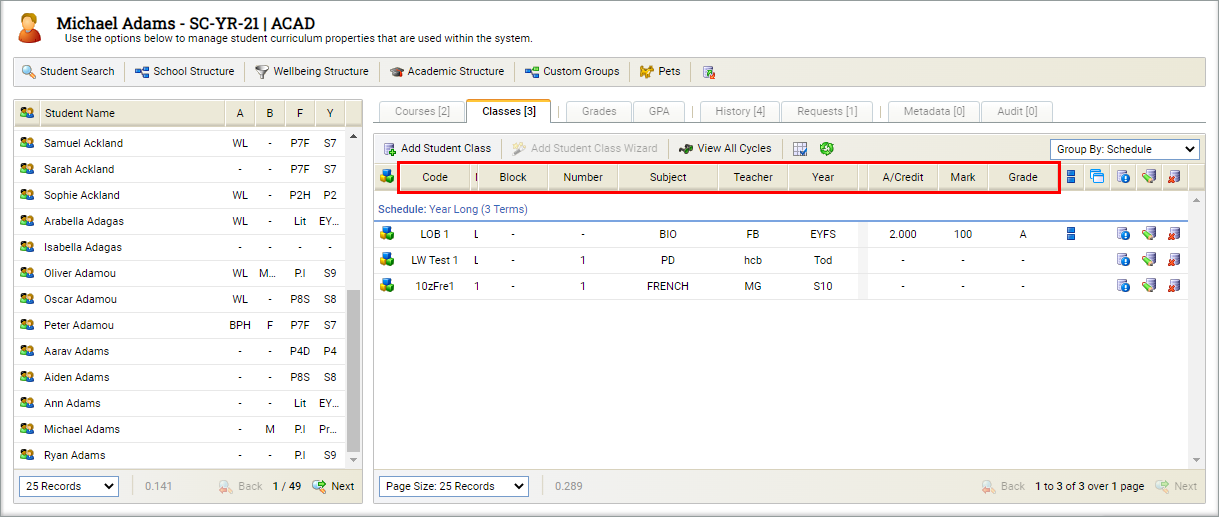
Your selections determine the columns displayed for the selected entity:
-
Choose to change the order that any of your entity selections are displayed
in the module.
Select Order Entity xxx in your selected tab. A popup window is displayed, an example is shown below:
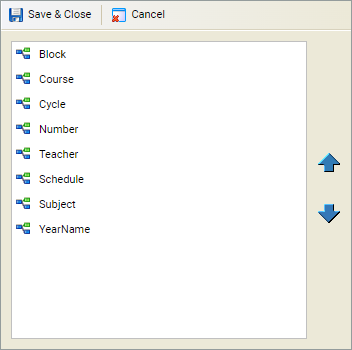
- Select to make a selection and use the arrows to move it up or down the list.
- Select Save & Close to close this window and return to the Edit Module Entity window.
-
Any changes made to entities are listed under the Audit tab in the window:
- Select Save & Close to close the Edit Module Entity window. Your preferences are displayed in the Classes tab.
Edit the grade set linked to the class
This provides a useful shortcut to amending grade set information. This option is only available if a grade set has been linked to the course that the class is held in.
Any action taken here updates the grade set information held in the Certification tab.
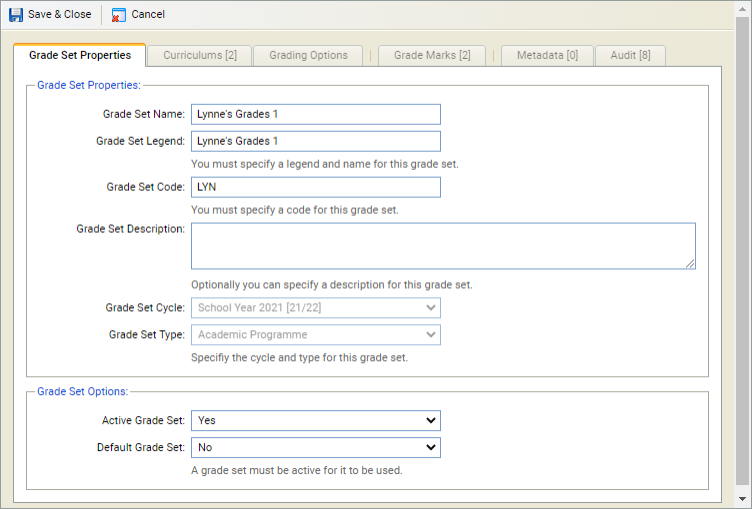
- Select the edit grade set icon in your selected class to display the Manage Grade Sets window:
-
Select the Grade Set Properties tab and complete the fields displayed:
Section Explanation Grade Set Properties - Enter a name (this can be customised to suit your school), legend (this is shown in reports), code and description for the set.
- Grade Set Cycle/Type. This cannot be amended.
Grade Set Options Use the drop downs to:
- Set the status of the set. Selecting 'No' marks the set as 'Inactive'.
- Set this set as the default. Only one grade set can be marked as the 'Default'. This is preselected when working with grade sets.
- Select the Curriculums tab and select the curriculums that are to be linked to the set.
-
Select the Grading Options tab
and select the field type displayed when a grade value is entered:
- 'Grade'. A grade drop-down field is displayed and a grade ('A') selected.
- 'Mixed'. Grades can be entered as selected grades or individual values, so 'A' or '97'.
- 'Value'. A value can be entered and this will be transposed to a grade, so '97' which will be transposed to an 'A'.
- Select the Grade Marks tab and select the grade marks that are to be linked to the set. Each grade mark can be allocated to multiple grade sets.
-
Two other tabs are available, these are explained as follows:
- Metadata. Any metadata fields set up for grade sets are listed here. Add values for the metadata fields as required.
- Audit. Any changes made to the grade set are listed here.
- Select Save & Close.
View and adjust student course information
Information held here refers to the course that the selected class is held in.
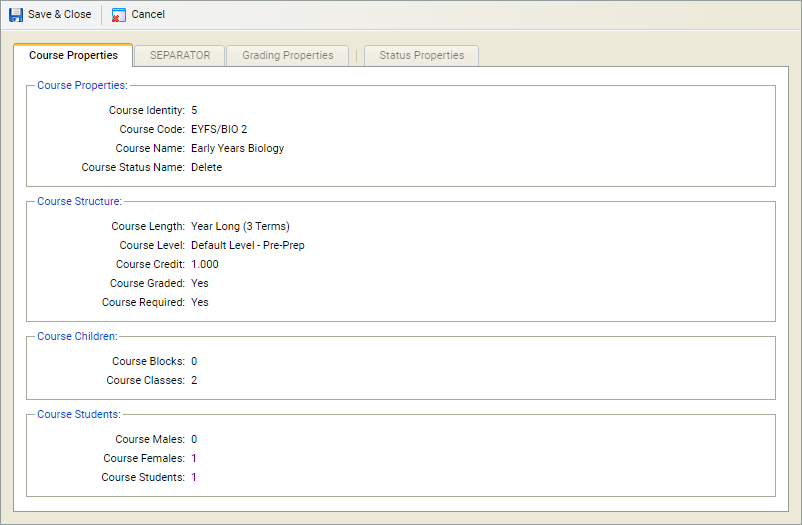
- Select the student course information icon in your selected class. A popup window is displayed:
- The Course Properties tab shows the details for the course that the class is held in. These are configured in the Course View tab.
- The SEPARATOR tab is not currently in use.
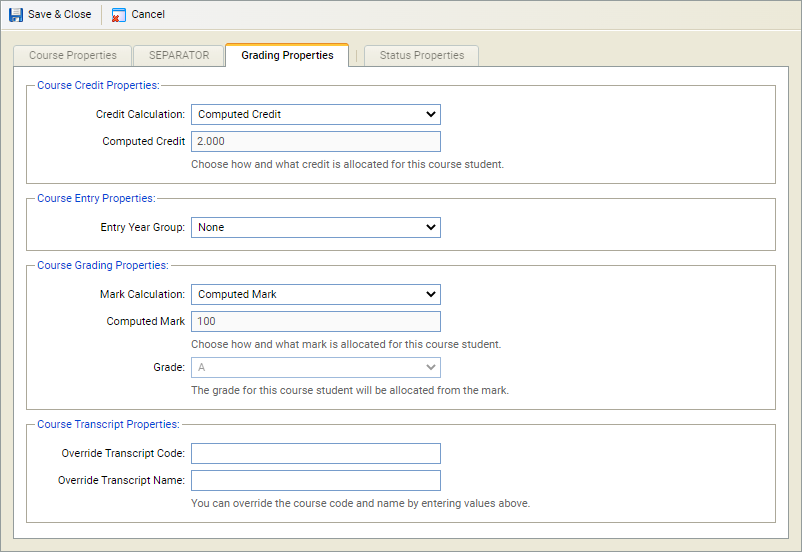
- Select the Grading Properties tab and complete the fields shown as required:
- Credit Calculation. Select whether the credit for the course is to be computed or added manually.
-
Computed/Manual Credit:
- If 'Computed Credit' is selected above, the credit value equates to the value configured for the course in the Course View tab.
- If 'Manual Credit' is selected above, you can add your own credit value here.
- Mark Calculation. Select whether the mark for the course is to be computed or added manually.
-
Computed/Manual Mark:
- If 'Computed Mark' is selected above, the mark value equates to the value configured for the course in the Course View tab.
- If 'Manual Mark' is selected above, you can add your own mark value here.
-
Grade:
- If 'Computed Mark' is selected above, the grade equates to the value configured for the course in the Course View tab.
- If 'Manual Mark' is selected above, you can select your own grade value here. The options available are pulled in from the Certification tab.
-
Select the Status Properties tab and adjust the status of the course for the student if required:
- Active. The student is on the course. The course will be listed under the Courses tab.
- Advice. The student has been advised to take the course but is not yet on the course. The course will be listed under the Requests tab.
- Delete. The student has been deleted from the course. A record is still kept. The course will be listed under the History tab.
- Elective. The student has chosen (elected) to take the course. The course will be listed under the Requests tab.
- Request. The student has requested to take the course but is not yet on the course. The course will be listed under the Requests tab.
- Removed. The student has been removed from the course by the school. The course will be listed under the History tab.
- Withdrawn. The student has withdrawn themselves from the course. The course will be listed under the History tab.
- Add any Course Status Notes to explain the reason for the change in course status.
- Select Save & Close. All classes within the course are updated with the new course information. Course information is shown in the Courses tab.
| Section | Field |
|---|---|
| Course Credit Properties |
|
| Course Entry Properties |
Entry Year Group. If the student has started the course in an earlier year group than usual, select the starting year from the list. This is useful for the system to calculate an accurate GPA. |
| Course Grading Properties |
|
| Course Transcript Properties |
Choose to override the transcript code and name if required. |
View and amend the student's class/course
If you want to change the student to a different course, choose to delete the course and add a new one.
-
Select the edit icon in your selected class.
A popup window is displayed:
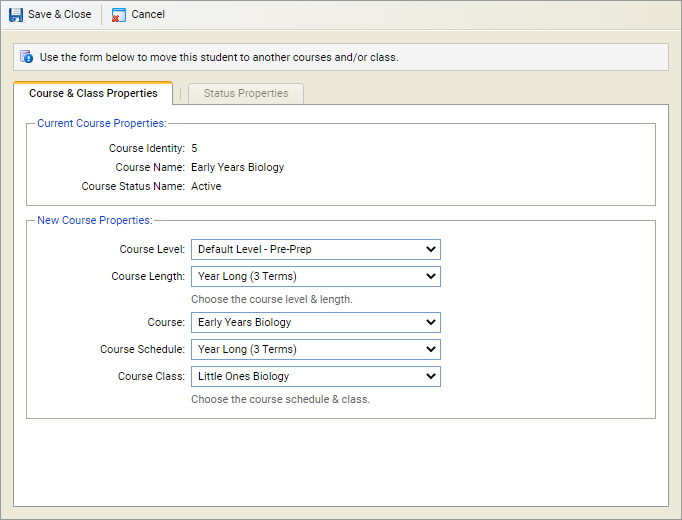 The Course & Class Properties tab shows the details
for the selected course. These are configured in the
Course View tab.
- In the Course Class field, change the student to a different class in the course.
-
Select the Status Properties tab and adjust the status of the course for the student if required:
- Active. The student is on the course. The course will be listed under the Courses tab.
- Advice. The student has been advised to take the course but is not yet on the course. The course will be listed under the Requests tab.
- Delete. The student has been deleted from the course. A record is still kept. The course will be listed under the History tab.
- Elective. The student has chosen (elected) to take the course. The course will be listed under the Requests tab.
- Request. The student has requested to take the course but is not yet on the course. The course will be listed under the Requests tab.
- Removed. The student has been removed from the course by the school. The course will be listed under the History tab.
- Withdrawn. The student has withdrawn themselves from the course. The course will be listed under the History tab.
- Add any Course Status Notes to explain the reason for the change in course status.
- Select Save & Close.
The classes available to select are determined by the level (and subsequent curriculum and school division) that the course has been linked to. No selections are available here if the student you are working with is not associated with the level that the course is linked to or no classes are listed for the course.
Remove the student from a class
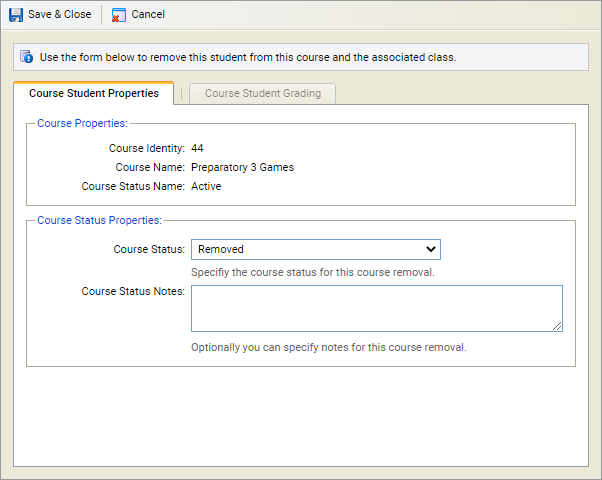
Your selections remove the student from the course that the selected class is linked to. This also removes the student from all other classes in the associated course.
-
Select the delete icon in your selected class. A popup window is displayed:
-
Select the Course Status:
- Delete. The student has been deleted from the course. A record is still kept.
- Removed. The student has been removed from the course by the school.
- Withdrawn. The student has withdrawn themselves from the course.
-
Select the Course Student Grading tab and apply a credit and mark for the course that has been taken to date if required:
Section Field Course Credit Properties - Credit Calculation. Select whether the credit for the course is to be computed or added manually.
-
Computed/Manual Credit:
- If 'Computed Credit' is selected above, the credit value equates to the value configured for the course in the Course View tab.
- If 'Manual Credit' is selected above, you can add your own credit value here.
Course Grading Properties - Mark Calculation. Select whether the mark for the course is to be computed or added manually.
-
Computed/Manual Mark:
- If 'Computed Mark' is selected above, the mark value equates to the value configured for the course in the Course View tab.
- If 'Manual Mark' is selected above, you can add your own mark value here.
-
Grade:
- If 'Computed Mark' is selected above, the grade equates to the value configured for the course in the Course View tab.
- If 'Manual Mark' is selected above, you can select your own grade value here. The options available are pulled in from the Certification tab.
- Select Save & Close. Any classes within the course which were listed under the Classes tab are removed.
- A log is kept under the History tab.