Course View
Use the Course View tab in the Curriculum Manager module to manage the courses in your curriculum.
The Curriculum Manager module must be fully configured for the course function to operate as expected.
If you have migrated data from the Teaching Manager module, the Course View tab is populated for you. The classes shown within each course are the classes/sets currently held within Teaching Manager.
Courses feed into the Gradebooks module. Students and teachers associated with a course in the Curriculum Manager module are automatically pulled through to the Gradebooks module.
- Open the Curriculum Manager module and select the Course View tab:
- Use the drop downs in the top right of the screen to select the programme and cycle that you want to work with:
-
Use the tools available to display the courses that you want to work with:
- Select Course Filters/Course Management/Course Properties and use the filters available. Hold Ctrl to select more than one option in a filter.
- Type a search term in the Quick Search Courses field and press enter on your keyboard.
- Use the Group By drop-down in the right of the header to group the courses displayed by a selected property.
- Navigation tools are available at the bottom of the screen.
- Choose to:
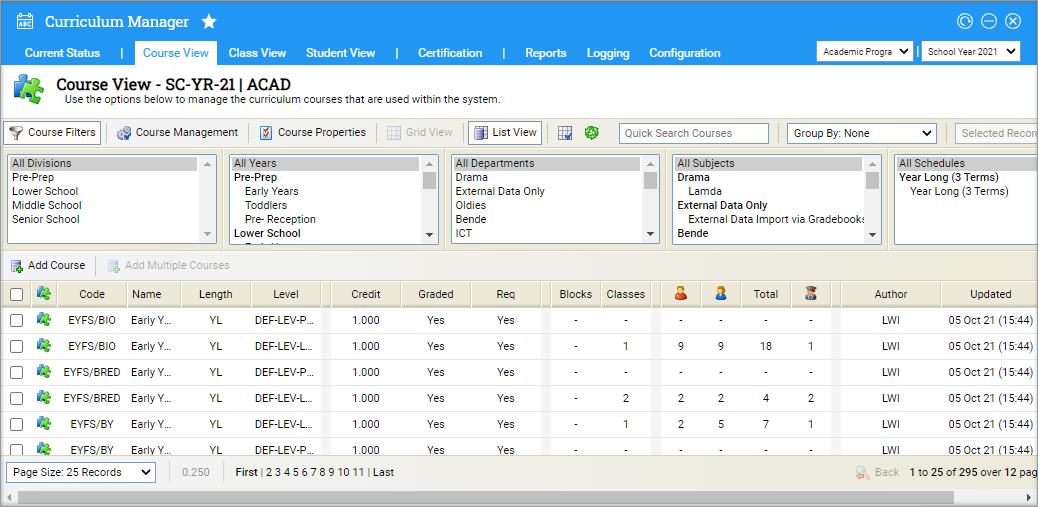
All courses for your selected programme and cycle are displayed with the number of classes within each course shown.
Update Course View entity preferences
Update the entities displayed for courses. For example, choose to display course length Description in the Course View screen grid.
Your entity preferences can also be configured centrally from the Manage Module Entities option.
-
Select the table icon in the header to display the Edit Module Entity window:
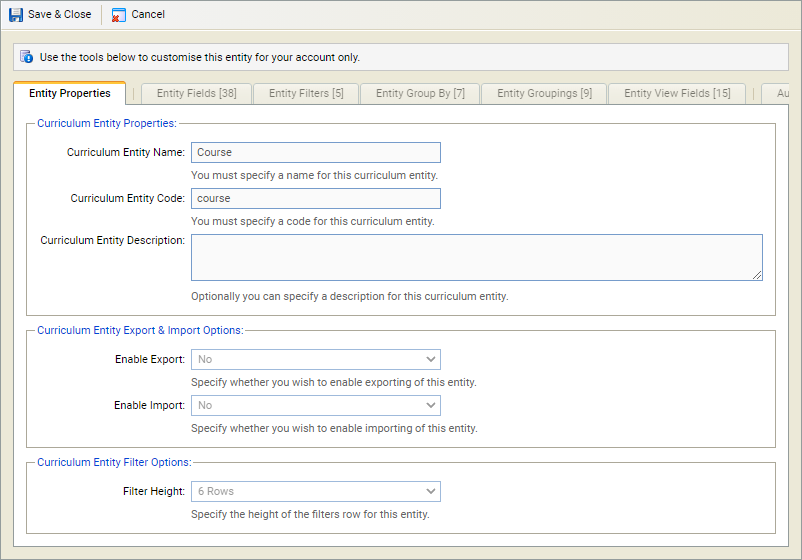
- The Entity Properties tab displays an overview of your entity preferences.
- The five following tabs hold property details for the entity. A count next to the tab title indicates the number of selections made in the tab.
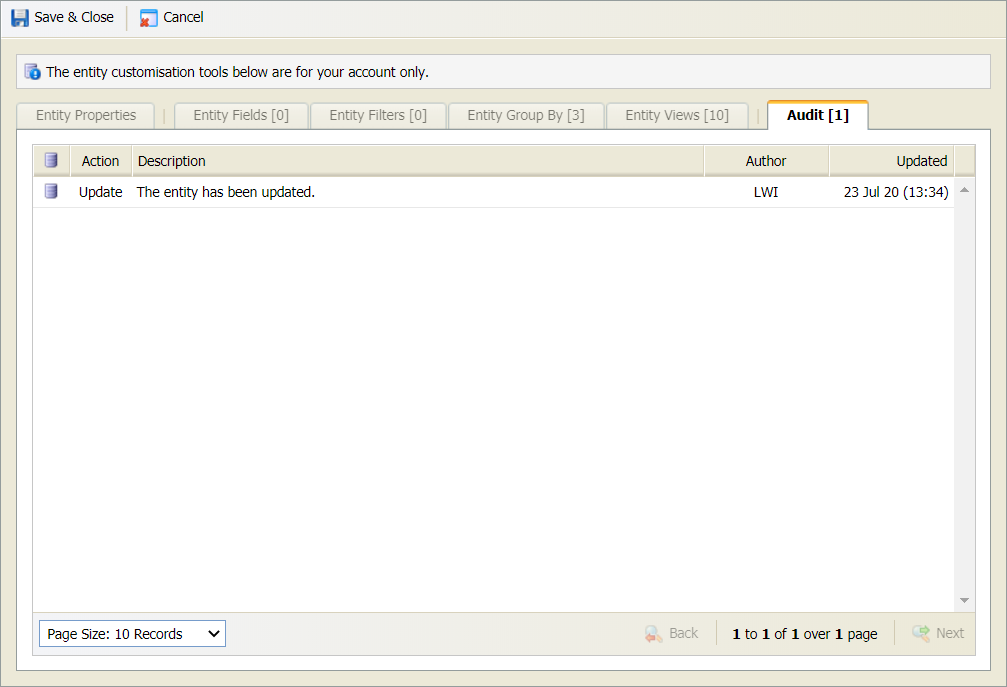
- The Audit tab lists any amendments that have been made to the entity.
-
In the Entity Properties tab:
- Entity Properties cannot be changed.
- It is not recommended that you make any changes to Export & Import Options.
Filter Options indicate the number of rows displayed if filters are used for the entity. The example below has 6 rows in the filter:

- Work through the tabs shown to set details for the entity:
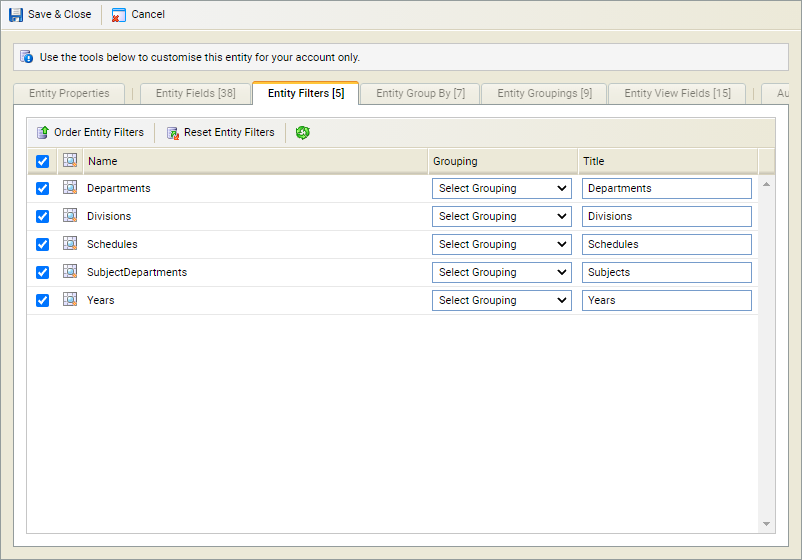
- Use the checkboxes to select the filters that you want to include for the entity:
- Change the Titles used for the filters as required.Your selections determine how filters are displayed for the selected entity:
-
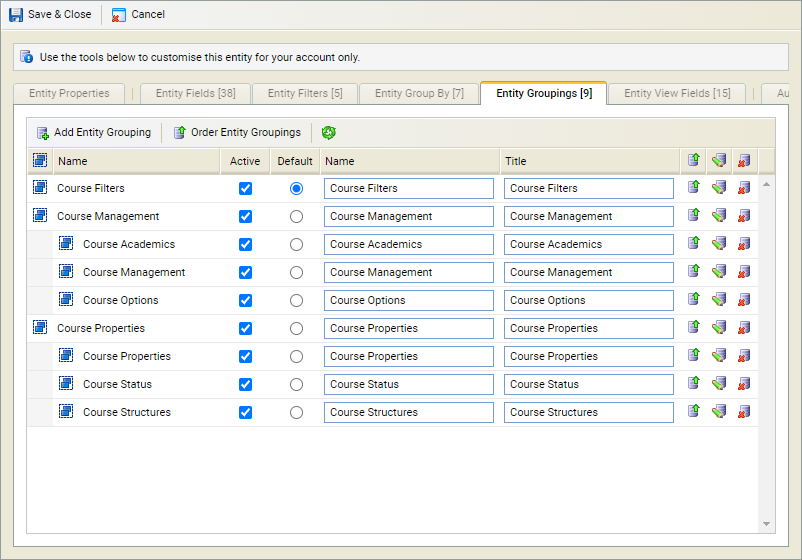
Use the checkboxes to select the group by selections that you want to include for the entity:
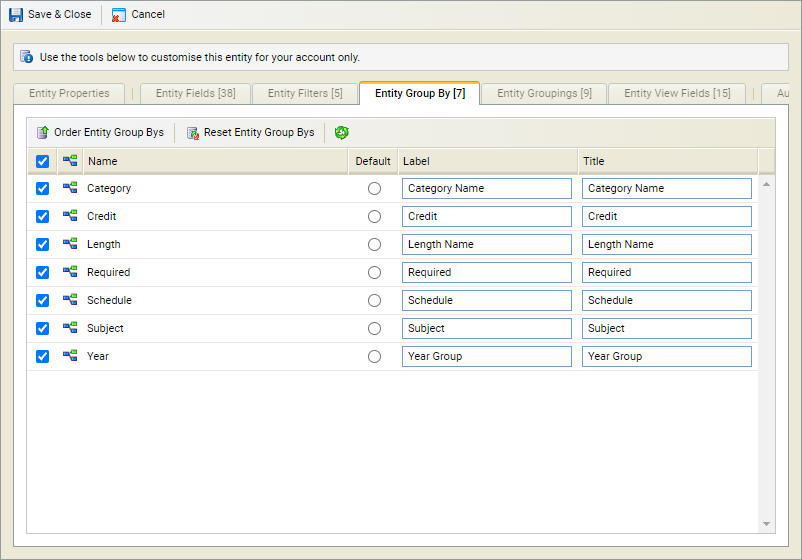
- Select a default if required.
-
Change the Labels and Titles as
required:
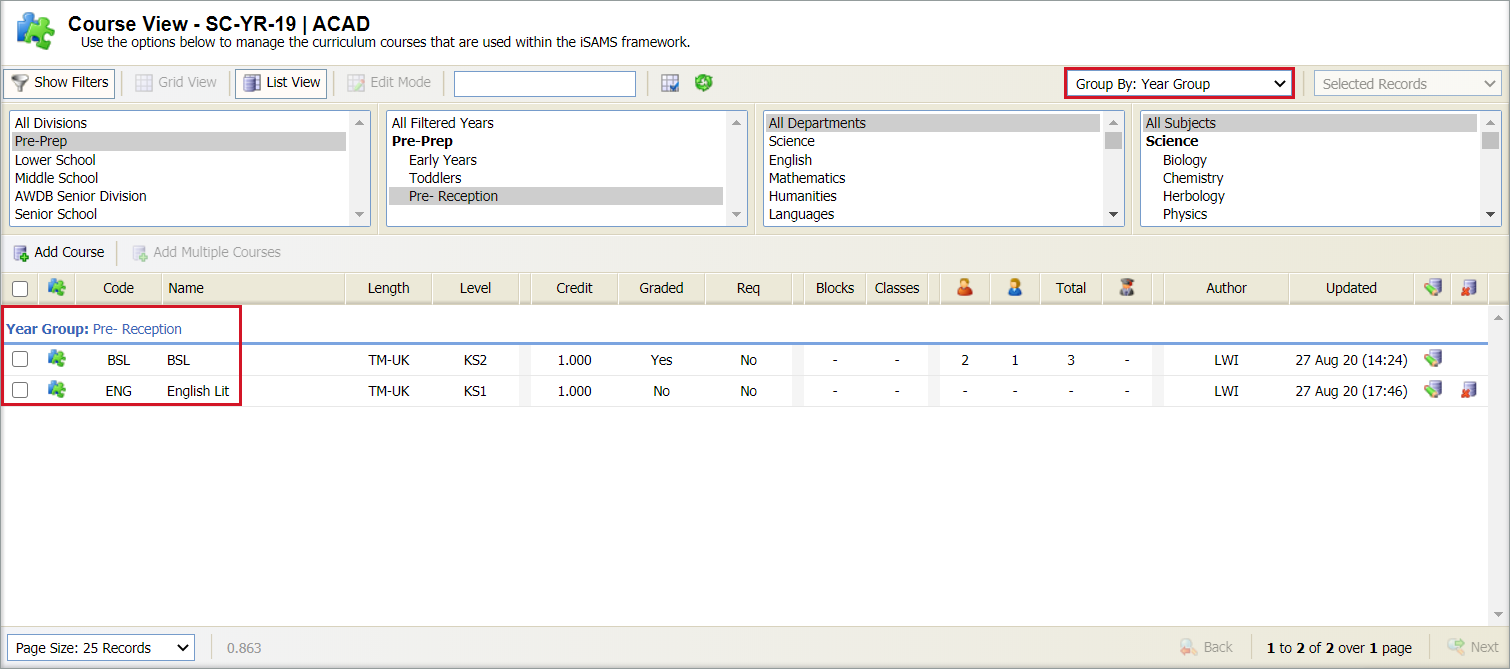
- The Label name is displayed in the Group By drop-down menu.
The Title name is displayed in the screen where data is grouped. An example of how your selections are displayed for the selected entity is shown below:
-
Use the checkboxes on the left to select the columns that you want to display:
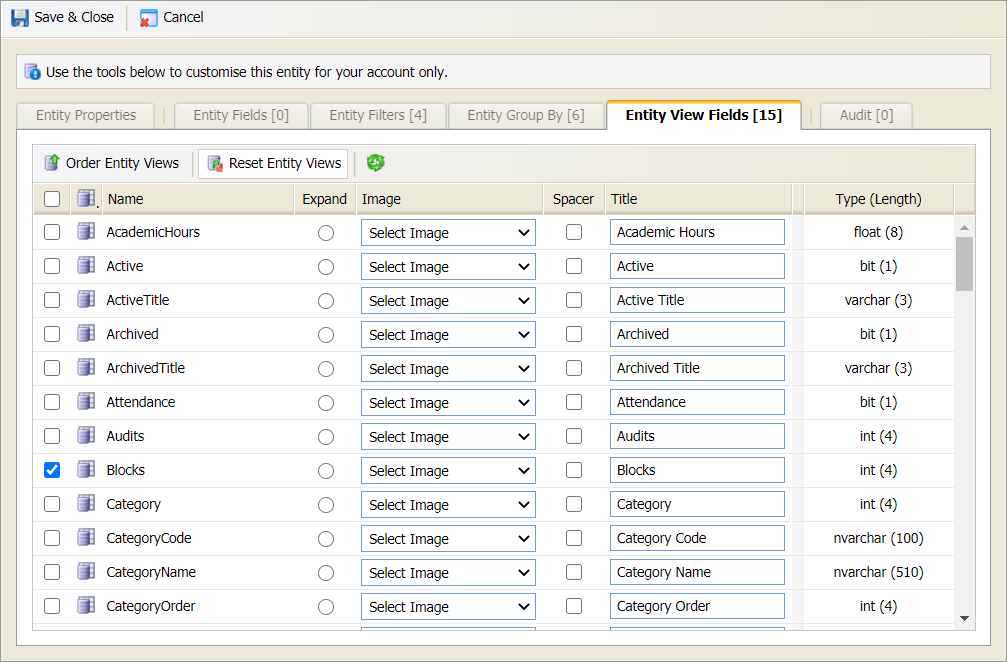
Be aware that the selections made in Manage Module Settings can determine the fields that are displayed regardless of whether they are selected here.
-
Select whether an Image or a Title
are displayed in the header bar for the entity. Either:
-
Use the Select Image drop-down to select an image for the entity. An icon is
used instead of a column title.
or - Enter a Title for the entity and check the box to the left of the Title. This is useful if you want to customise titles to suit you.
-
Use the Select Image drop-down to select an image for the entity. An icon is
used instead of a column title.
- Use the Spacer checkbox to add grey space to the right of columns. This is useful for dividing up the information displayed in the Course View screen.
-
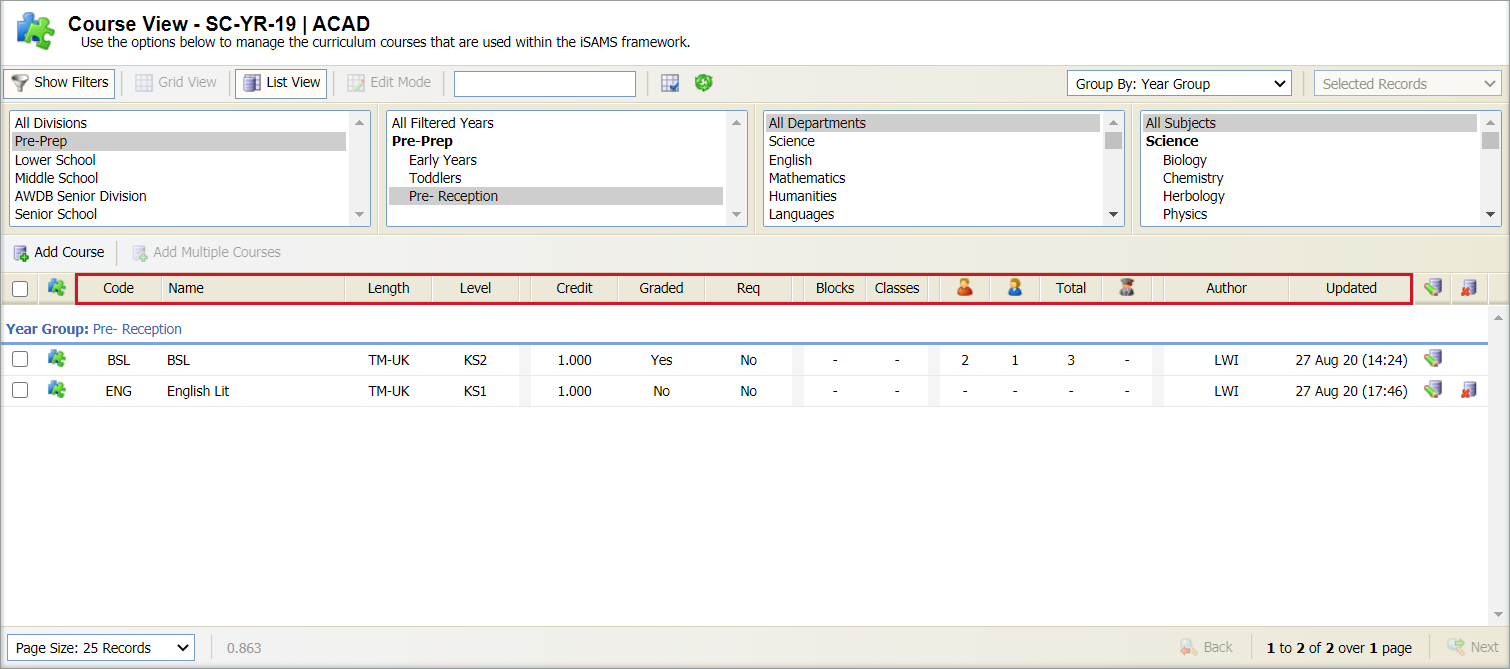
Your selections determine the columns displayed for the selected entity:
-
Choose to change the order that any of your entity selections are displayed
in the module.
Select Order Entity xxx in your selected tab. A popup window is displayed, an example is shown below:
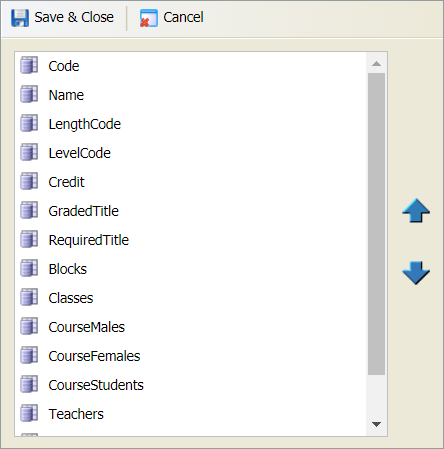
- Select to make a selection and use the arrows to move it up or down the list.
- Select Save & Close to close this window and return to the Edit Module Entity window.
-
Any changes made to entities are listed under the Audit tab in the window:
- Select Save & Close to close the Edit Module Entity window. Your preferences are displayed in the Course View screen.
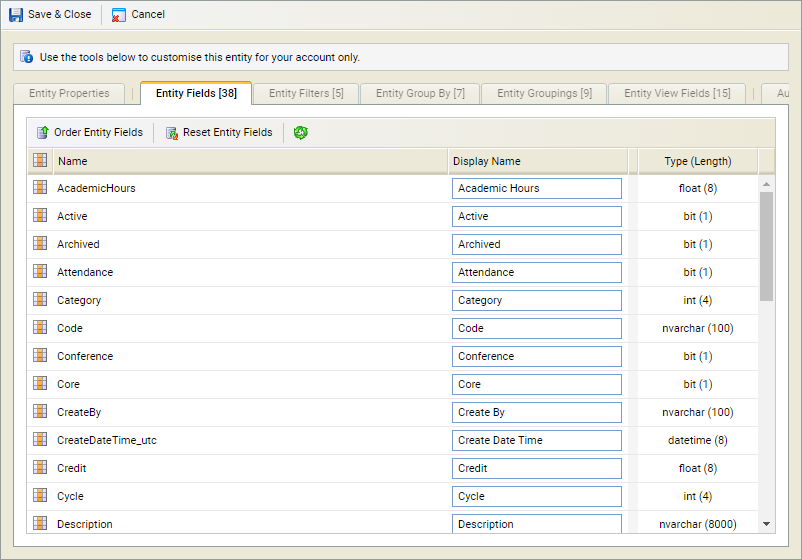
All of the fields that are available for the entity are listed.
Change the Display Names for the fields as required:
All of the filters that can be used for the entity are listed.

All of the group by selections that can be made for the entity are listed.
All of the information that can viewed for the entity is listed.
Add a course
- Select Add Course on the left of the screen. A popup window is displayed:
-
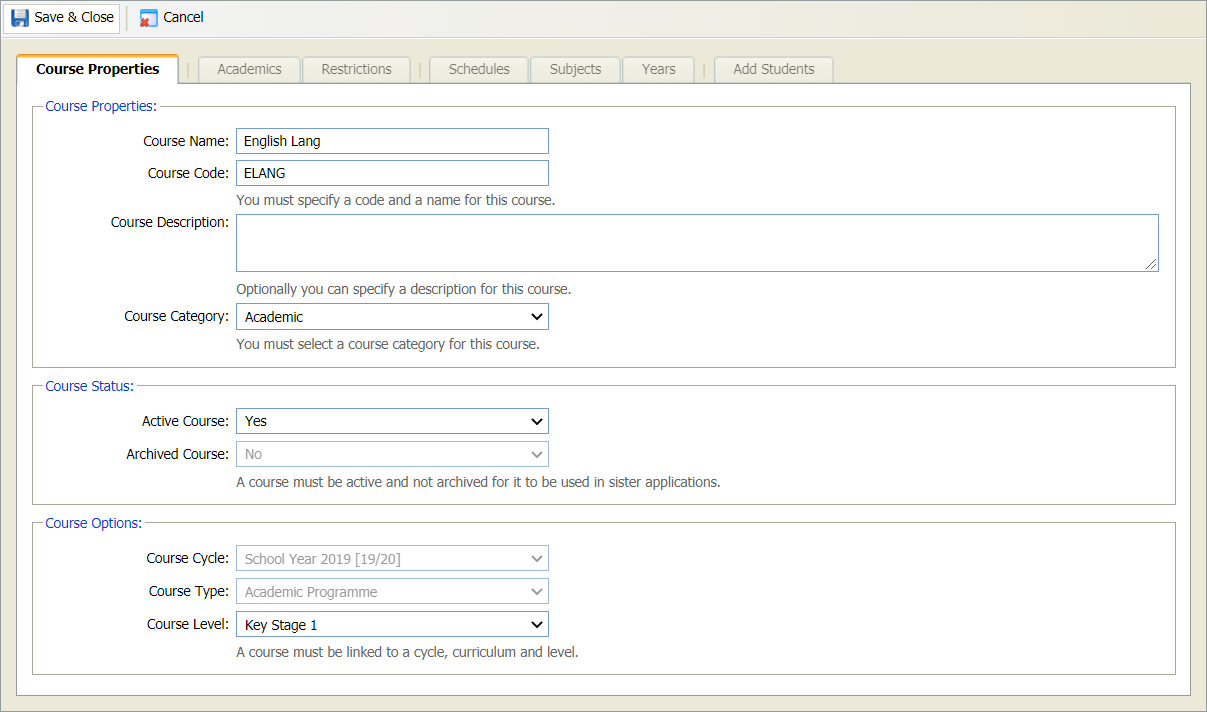
Complete the fields displayed in the Course Properties tab:
Section Explanation Course Properties - Enter a clear and concise name, code and description for the course.
- Course Category. Use the drop-down list to select a course category to associate the course with.
Course Status Use the drop downs to set the status of the department. Selecting 'Yes' for either of the options disables the drop-down for the other. Selecting 'No' for both options causes the department to be listed as 'Future'. Course Options Use the drop downs to select the:
- Course Cycle. Cycle for this course.
- Course Type. Programme for this course.
- Course Level. Academic level for this course.
-
Select the Academics tab and complete the fields displayed as required:
Section Explanation Academic Options - Academic Hours. Specify a number of hours for the course.
- Course Attendance. Use the drop-down list to select whether the course is linked to the Attendance module.
- Course Conference. Use the drop-down list to select whether the course can be allocated in PTA meetings.
- Course Core. Use the drop-down list to select whether the course is a core part of the curriculum.
- Course Graded. Use the drop-down list to select whether the course uses the certification system. Selecting 'Yes' causes the Certification tab to be displayed in the Course View window. Details of how the course is to be graded are set in this tab.
- Course Credit. Specify the credit allocation for this course.
Management Options - Course Droppable. Use the drop-down list to select whether the course can be dropped by students.
- Course Payment Profile. Specify whether the course has a fee or not and how the fee is paid. For example, you can set up a payment profile which allows a course fee to be paid off over time. This is useful for school trips which are set up as courses; the trip can be paid off using a deposit and four payments. Payment profiles are set up in the Configuration tab.
- Course Fee. Specify a fee for the course.
- Course Length. Use the drop-down list to select the course length.
- Course Required. Use the drop-down list to select whether the course is a required and included by default.
- Course Repeatable. Use the drop-down list to select whether the course can be repeated by students.
Course Publication Options Enter an email address and website URL for the course. - Select the Restrictions tab and set any restrictions on the course, if required. For example, the number of places on the course and the number of the classes in the course.
- Work through the Schedules, Subjects and Years tabs to select the course schedules, subjects and year groups to associate with the course.
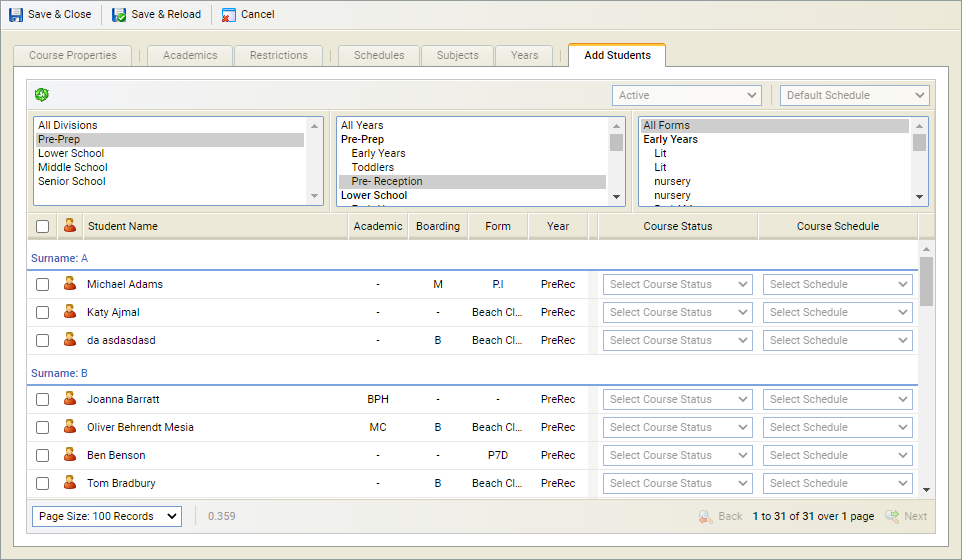
- Use the Add Students tab to add students to the course:
- Use the filters to select the groups of students that you want to work with. Filters are preselected according to the course level and year groups you have selected in the previous tabs. You can select other options in the filters as required.
- Use the navigation tools at the bottom of the window as required.
- Use the checkboxes on the left to select students.
- Select Save & Close. The new course is displayed in the Course View screen.
Copy a course
Choose to copy either the outline of a course with all the selected entities or a complete course including all students and teachers.
- Use the checkboxes on the left to select the course/s that you want to copy.
-
Open the drop-down in the top right and select either:
- Empty Copy Courses. Copies just the course outlines.
- Full Copy Courses. Copies all course detail, including students and teachers.
- Confirm your selection in the popup window displayed.
- The copied courses are displayed.
Edit a course
Update the details of a course if required. For example, change the status of a course currently marked as 'Active'.
-
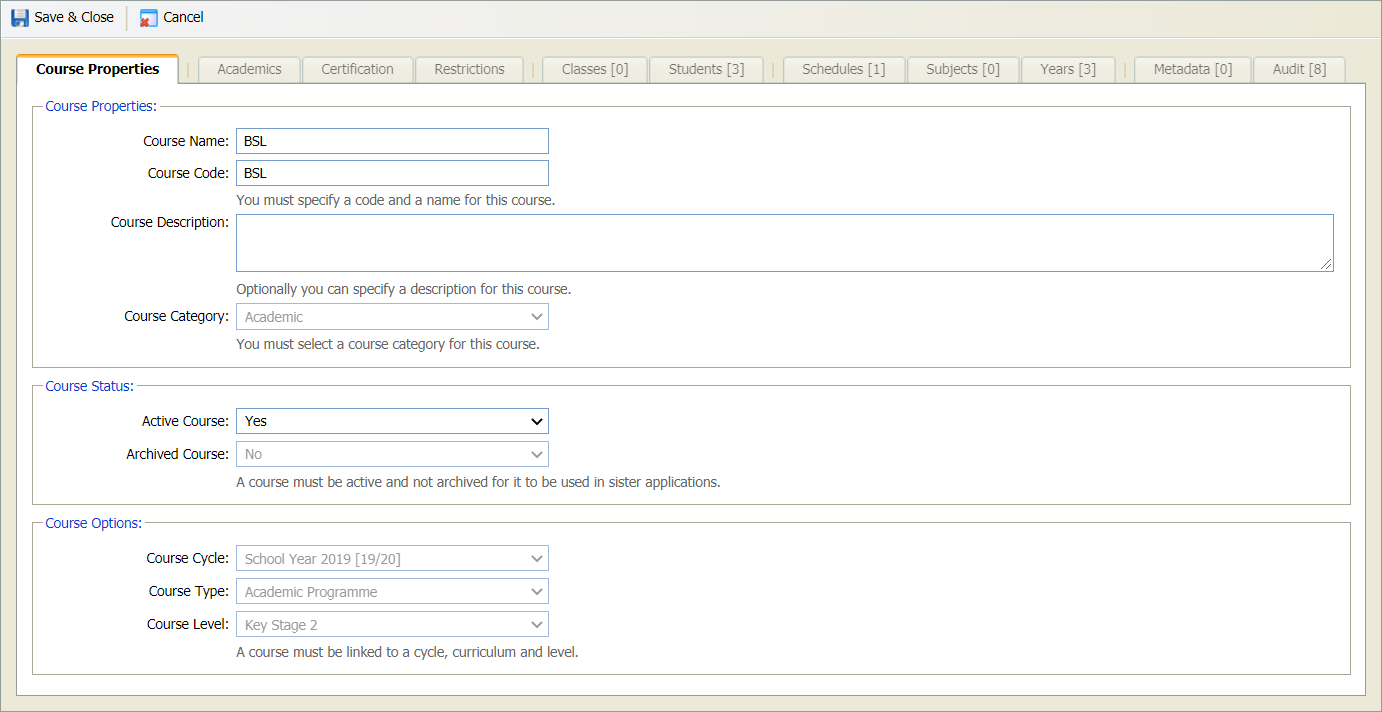
Scroll to the course that you want to edit and click the edit icon. A popup window is displayed:
-
Complete the fields displayed in the Course Properties tab:
Section Explanation Course Properties - Enter a clear and concise name, code and description for the course.
- Course Category. Use the drop-down list to select a course category to associate the course with.
Course Status Use the drop downs to set the status of the department. Selecting 'Yes' for either of the options disables the drop-down for the other. Selecting 'No' for both options causes the department to be listed as 'Future'. Course Options Use the drop downs to select the:
- Course Cycle. Cycle for this course.
- Course Type. Programme for this course.
- Course Level. Academic level for this course.
-
Select the Academics tab and complete the fields displayed as required:
Section Explanation Academic Options - Academic Hours. Specify a number of hours for the course.
- Course Attendance. Use the drop-down list to select whether the course is linked to the Attendance module.
- Course Conference. Use the drop-down list to select whether the course can be allocated in PTA meetings.
- Course Core. Use the drop-down list to select whether the course is a core part of the curriculum.
- Course Graded. Use the drop-down list to select whether the course uses the certification system. Selecting 'Yes' causes the Certification tab to be displayed in the Course View window. Details of how the course is to be graded are set in this tab.
- Course Credit. Specify the credit allocation for this course.
Management Options - Course Droppable. Use the drop-down list to select whether the course can be dropped by students.
- Course Payment Profile. Specify whether the course has a fee or not and how the fee is paid. For example, you can set up a payment profile which allows a course fee to be paid off over time. This is useful for school trips which are set up as courses; the trip can be paid off using a deposit and four payments. Payment profiles are set up in the Configuration tab.
- Course Fee. Specify a fee for the course.
- Course Length. Use the drop-down list to select the course length.
- Course Required. Use the drop-down list to select whether the course is a required and included by default.
- Course Repeatable. Use the drop-down list to select whether the course can be repeated by students.
Course Publication Options Enter an email address and website URL for the course. -
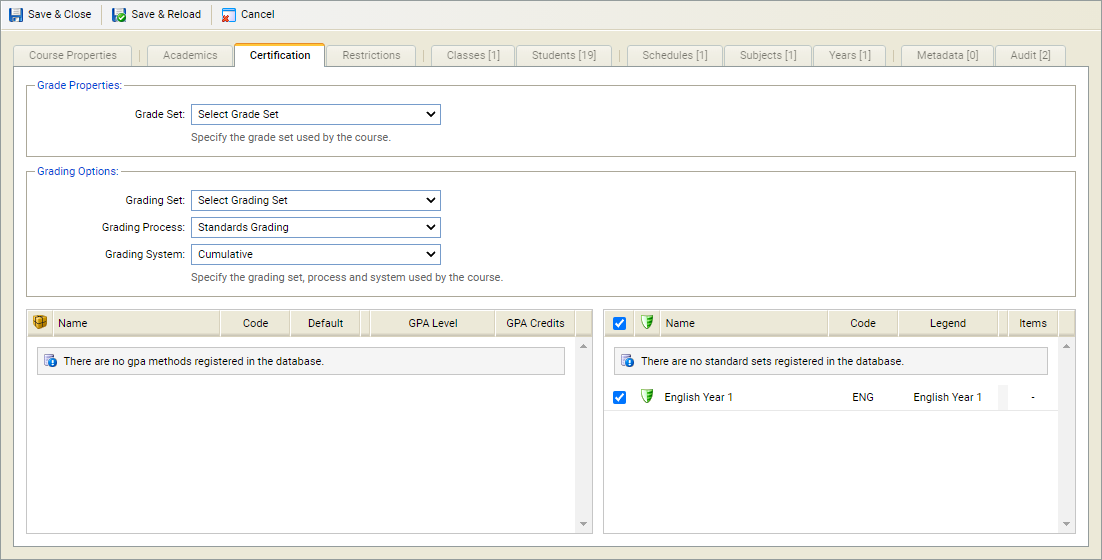
Select the Certification tab, if displayed, and set grading properties and options using the drop-down lists available. This includes the:
- Grade Set to be used for the course. This determines the grades which can be awarded for the course, for example 'A', 'B', 'C'.
- Grading Set to determine when grades are applied.
- Grading Process. The selection made determines the fields available in the remainder of the tab:
 Manual
Grades are to be entered manually for this course; no gradebooks are to be created. GPA sets and the associated methods are listed.
- Select the GPA level to associate with each GPA method listed for the course.
- Amend the default GPA credit value listed for each GPA method listed for the course.
 Standards
These are grade standards set by the school; each part of a course can be graded as required. For example, basic skills such as 'holding a pen' can be awarded a grade. If 'Standards Grading' is selected, details are pulled into the Gradebooks module.
A standard set must be linked to a subject before it can be selected in a course.
- Select the GPA level to associate with each GPA method listed for the course.
- Amend the default GPA credit value listed for each GPA method listed for the course.
- Use the checkboxes on the right to select the standard sets to associate with the course:
 Traditional
These are the grades used in traditional gradebooks where grades are awarded for assignments in the course, these are added up and an average calculated.
- Select the GPA level to associate with each GPA method listed for the course.
- Amend the default GPA credit value listed for each GPA method listed for the course.
- Grading System. Only 'Cumulative' is available at this time. This is where assignments are added up throughout the course; there is equal weight for assignments marked at the beginning and end of a course.
- Select the Restrictions tab and set any restrictions on the course, if required. For example, the number of places on the course and the number of the classes in the course.
- Select the Classes tab to review the classes within the course. You can also add, edit or delete classes from here:
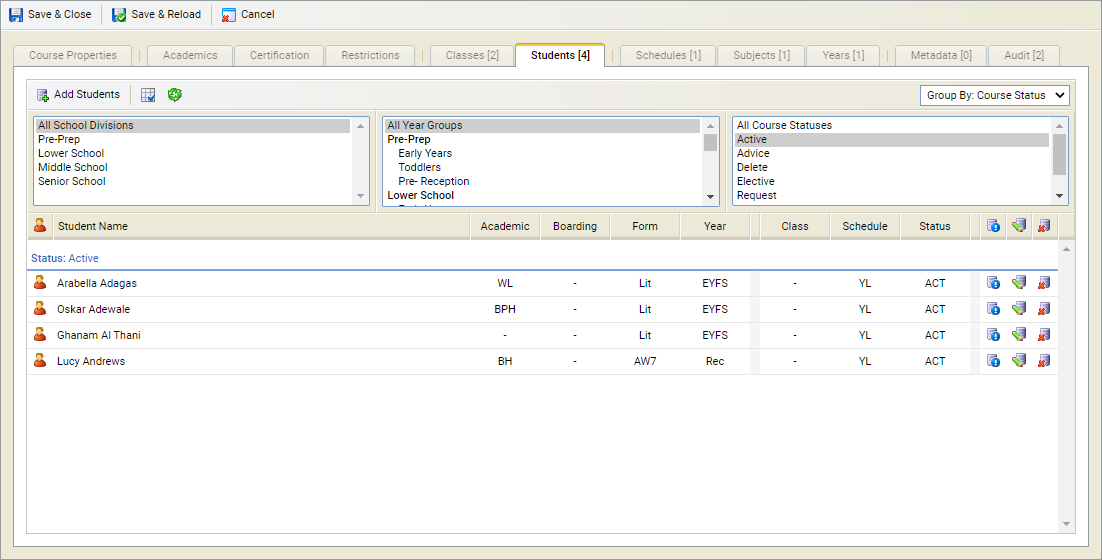
- Use the Students tab to review the students within the course. You can also add, edit or remove students to and from the course from here:
- Use the filters and Group By function to view the groups of students that you want to work with.
- See Student View for more help with working with course students.
- Work through the Schedules, Subjects and Years tabs to select the course schedules, subjects and year groups to associate with the course.
-
Two other tabs are available, these are explained as follows:
- Metadata. Any metadata fields set up for courses are listed here. Add values for the metadata fields as required.
- Audit. Any changes made to the course are listed here.
- Select Save & Close. The amended course is listed.
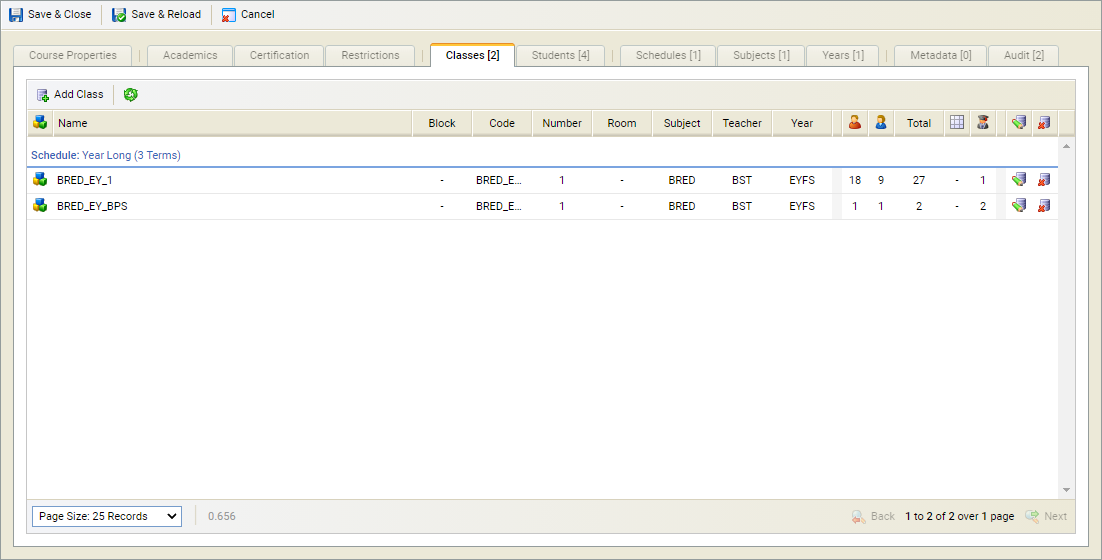
See Class View for more help with working with classes.
Delete a course
Remove a course that has been added in error.
You cannot delete a course which has students assigned to it.
- Scroll to the course that you want to delete and click the delete icon. You are prompted Are you sure you want to delete this course ?
- Select Yes.
- The course >is removed. A log is kept under the Logging tab for auditing purposes.
