Manage Grading Periods
Use the Certification tab in the Curriculum Manager module to configure the timeframes (periods) for gradings. Specify the dates when grade values can be added in Gradebooks.
Grading types and sets must be configured before you can add grading periods.
- Open the Curriculum Manager and select the Certification tab.
- Select Manage Grading Periods from the right hand menu:
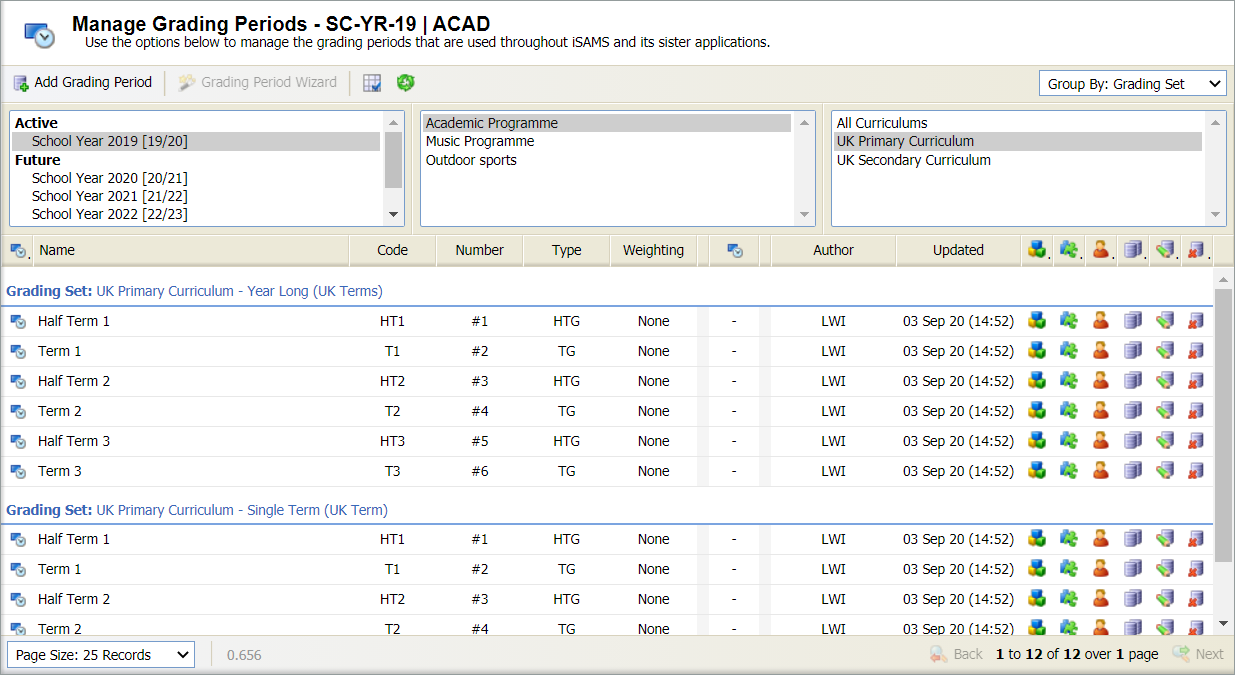
- All grading periods are listed here.
- The details displayed and how they are displayed is determined by the settings in entity preferences. See Update Grading Management entity preferences for more help with this.
- Use the drop-down in the top right of the screen to change the Group By setting if required.
- Use the navigation tools at the bottom of the screen to display the grading periods that you want to work with.
- Choose to:
Add a grading period
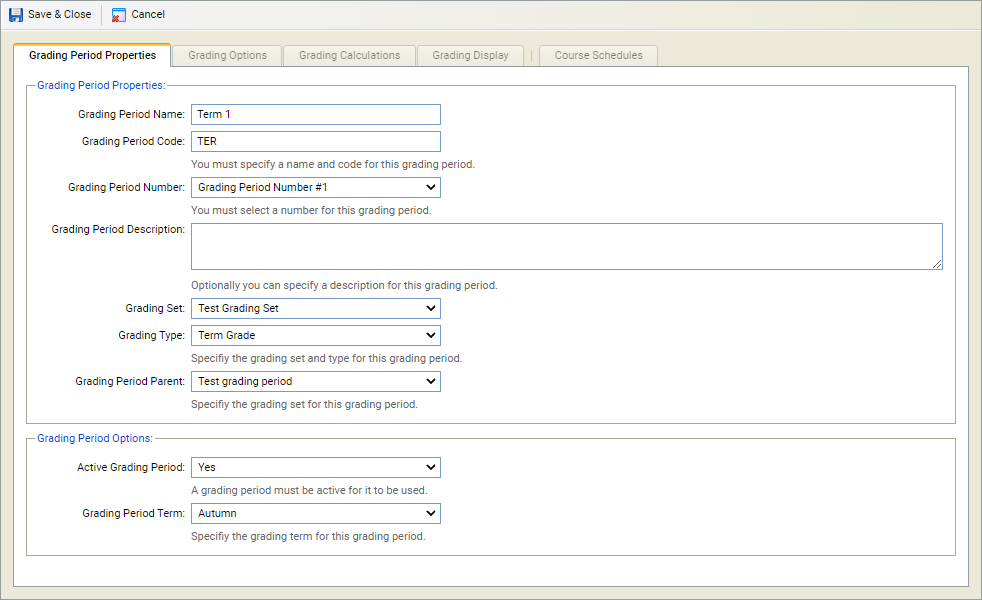
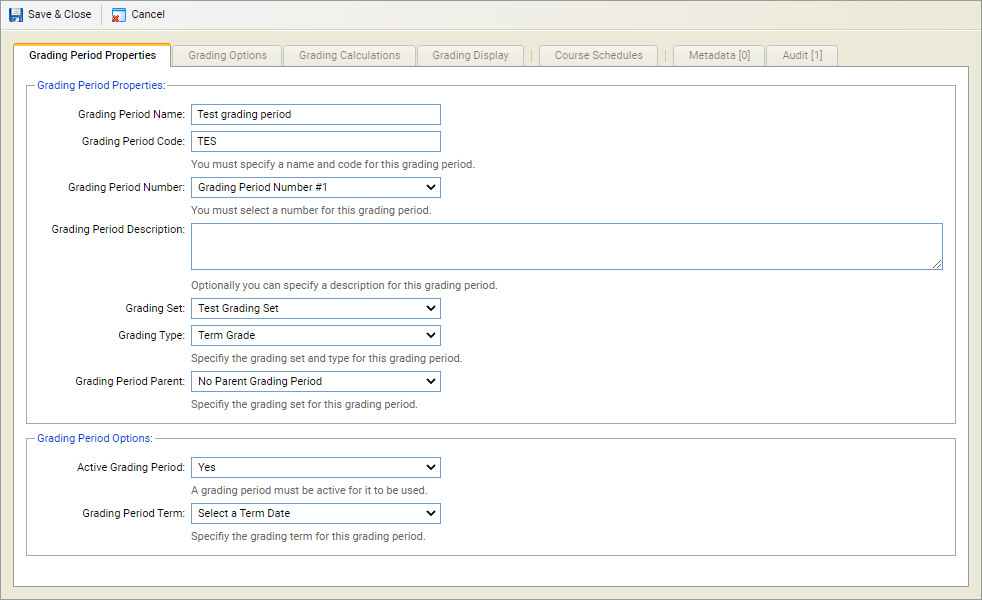
- Select Add Grading Period in the header to display the Manage Grading Periods window:
-
Complete the fields displayed in the Grading Period Properties tab:
Section Explanation Grading Period Properties - Enter a clear and concise name, code, number and description for the grading period.
- Grading Set. Select a grading set to link to the period.
- Grading Type. Select a grading type to link to the period.
- Grading Period Parent. Select a parent period if using a parent/child structure.
Grading Period Options Use the drop downs to:
- Set the status of the period. Selecting 'No' marks the period as 'Inactive'.
- Select a term to link to the period.
-
Select the Grading Options tab and set the:
Section Explanation Grading Dates Specify the time period when grade values can be entered in the gradebook. These are populated automatically when the Grading Period Term is selected in the Grading Period Properties tab. Choose to amend these if required. Period Dates Specify the length of the grading period for display and reporting purposes only. These are populated automatically when the Grading Period Term is selected in the Grading Period Properties tab. Choose to amend these if required. Certification Options Set how the calculation for the period is to work across the terms it is linked to. This is done by setting weighting for the period.
-
Weighting As Percentage:
- Select 'Percentage weighting' and set the percentage in the Grading Period Weighting field. This is useful if the period is linked to two semesters; set the weighting as '50%'. You can also choose 'No Weighting' in Grading Period Weighting.
- If 'Custom Weighting' is selected, set the dividend and divisor options.
- Weighting Dividend/Divisor. Use this for 'Custom Weighting'. For example, if the period is linked to three terms and percentage weighting is not suitable. Select '3' in Weighting Dividend and '1' in Weighting Divisor. This ensures that weighting is equally split for the period in each of the three terms it is linked to.
Portal Publication Parent/Student Portal Options Specify when the period data is published to the Parent and Student Portals. Standard Options Choose to switch grading standards on or off for the period. Style & Template Options - Select the style for the data entered for the period. The selections are pulled in from the Gradebooks module. This is useful for highlighting very high or very low grades.
- Select the template for the period. This determines how data is displayed when pulled in to the Gradebooks module.
-
Weighting As Percentage:
-
Select the Grading Calculations tab and set the:
Section Explanation Calculation Column Options - Select whether the column is hidden in the gradebook.
- Enter a column code and name.
Calculation Column Display & Logic - Calc Column Format Rule. Select the styling rule that you want to apply to the column. Any cells with values which meet the styling rule have the corresponding style design applied.
- Calculation Column Formula. Select how the value in the column is to be calculated.
- Calculation Column Style. Select a style to apply to the column. This is the default style design that is applied to cells in the column. If the value in the cell does not meet the styling rule selected, this style is applied.
- Cal Column Transpose. Select the transpose element that can be applied to this column. Your selection enables you to toggle between original values and transposed values when working in Workbook View.Columns with transposable values are identified by the transposable icon in the gradebook header.
Historic Calculation Options - Enter a code and name for historic calculations in the period to be used in gradebooks.
- Enter the date used for this calculation.
This provides a useful snapshot of data at a set time in the period.
-
Select the Grading Display tab and set the:
Section Explanation Class Display Options Use the drop downs to specify the display of the grading set in the Class View tab.
Course Display Options Use the drop downs to specify the display of the grading set in the Course View tab.
Student Display Options Use the drop downs to specify the display of the grading set in the Student View tab.
- Select the Course Schedules tab and select the course schedules to link to the period.
- Select Save & Close.
Change the order of grading periods
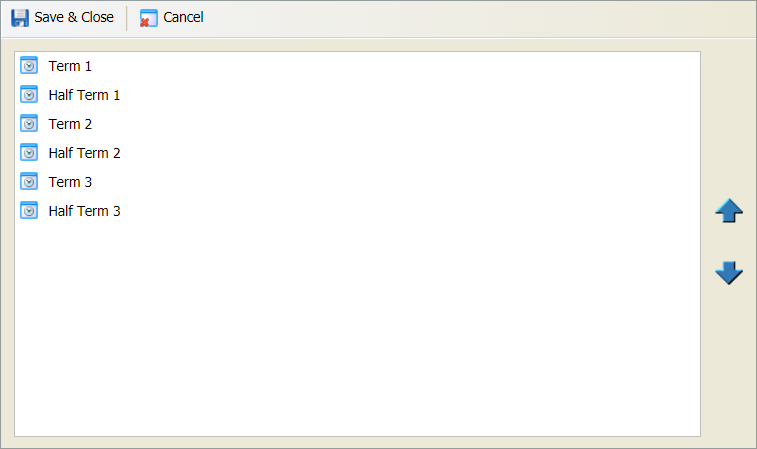
Change the order that grading periods are displayed in in the Class View, Course View and Student View tabs:
- Scroll to the grading period that you want to work with and click on the appropriate icon for the area that you want to order:
- Select a grading period and use the arrows to move it up or down the list.
- Select Save & Close to close this window.
| Icon | Area |
|---|---|
|
|
Class View |
|
|
Course View |
|
|
Student View |
A popup window is displayed:
Copy a grading period
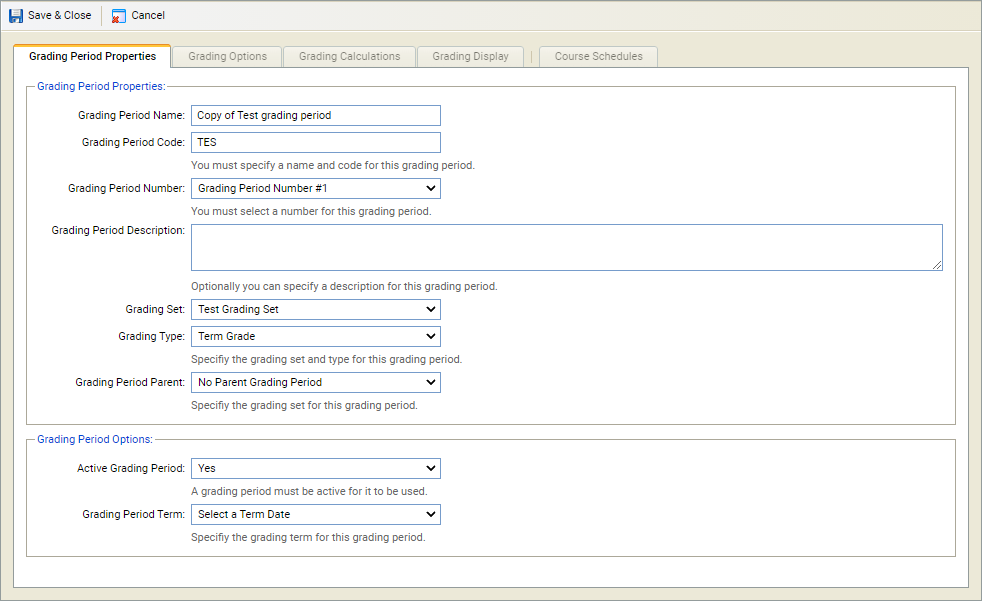
- Scroll to the grading period that you want to copy and click the copy grading periods icon. A popup window is displayed:
-
Complete the fields displayed in the Grading Period Properties tab:
Section Explanation Grading Period Properties - Enter a clear and concise name, code, number and description for the grading period.
- Grading Set. Select a grading set to link to the period.
- Grading Type. Select a grading type to link to the period.
- Grading Period Parent. Select a parent period if using a parent/child structure.
Grading Period Options Use the drop downs to:
- Set the status of the period. Selecting 'No' marks the period as 'Inactive'.
- Select a term to link to the period.
-
Select the Grading Options tab and set the:
Section Explanation Grading Dates Specify the time period when grade values can be entered in the gradebook. These are populated automatically when the Grading Period Term is selected in the Grading Period Properties tab. Choose to amend these if required. Period Dates Specify the length of the grading period for display and reporting purposes only. These are populated automatically when the Grading Period Term is selected in the Grading Period Properties tab. Choose to amend these if required. Certification Options Set how the calculation for the period is to work across the terms it is linked to. This is done by setting weighting for the period.
-
Weighting As Percentage:
- Select 'Percentage weighting' and set the percentage in the Grading Period Weighting field. This is useful if the period is linked to two semesters; set the weighting as '50%'. You can also choose 'No Weighting' in Grading Period Weighting.
- If 'Custom Weighting' is selected, set the dividend and divisor options.
- Weighting Dividend/Divisor. Use this for 'Custom Weighting'. For example, if the period is linked to three terms and percentage weighting is not suitable. Select '3' in Weighting Dividend and '1' in Weighting Divisor. This ensures that weighting is equally split for the period in each of the three terms it is linked to.
Portal Publication Parent/Student Portal Options Specify when the period data is published to the Parent and Student Portals. Standard Options Choose to switch grading standards on or off for the period. Style & Template Options - Select the style for the data entered for the period. The selections are pulled in from the Gradebooks module. This is useful for highlighting very high or very low grades.
- Select the template for the period. This determines how data is displayed when pulled in to the Gradebooks module.
-
Weighting As Percentage:
-
Select the Grading Calculations tab and set the:
Section Explanation Calculation Column Options - Select whether the column is hidden in the gradebook.
- Enter a column code and name.
Calculation Column Display & Logic - Calc Column Format Rule. Select the styling rule that you want to apply to the column. Any cells with values which meet the styling rule have the corresponding style design applied.
- Calculation Column Formula. Select how the value in the column is to be calculated.
- Calculation Column Style. Select a style to apply to the column. This is the default style design that is applied to cells in the column. If the value in the cell does not meet the styling rule selected, this style is applied.
- Cal Column Transpose. Select the transpose element that can be applied to this column. Your selection enables you to toggle between original values and transposed values when working in Workbook View.Columns with transposable values are identified by the the transposable icon in the gradebook header.
Historic Calculation Options - Enter a code and name for historic calculations in the period to be used in gradebooks.
- Enter the date used for this calculation.
This provides a useful snapshot of data at a set time in the period.
-
Select the Grading Display tab and set the:
Section Explanation Class Display Options Use the drop downs to specify the display of the grading set in the Class View tab.
Course Display Options Use the drop downs to specify the display of the grading set in the Course View tab.
Student Display Options Use the drop downs to specify the display of the grading set in the Student View tab.
- Select the Course Schedules tab and select the course schedules to link to the period.
- Select Save & Close.
Edit a grading period
Update the details of a grading period if required. For example, change the status of a grading period currently marked as 'Active'.
- Scroll to the grading period that you want to edit and click the edit icon. The Manage Grading Periods window is displayed:
Complete the fields displayed in the Grading Period Properties tab:
Section Explanation Grading Period Properties - Enter a clear and concise name, code, number and description for the grading period.
- Grading Set. Select a grading set to link to the period.
- Grading Type. Select a grading type to link to the period.
- Grading Period Parent. Select a parent period if using a parent/child structure.
Grading Period Options Use the drop downs to:
- Set the status of the period. Selecting 'No' marks the period as 'Inactive'.
- Select a term to link to the period.
Select the Grading Options tab and set the:
Section Explanation Grading Dates Specify the time period when grade values can be entered in the gradebook. These are populated automatically when the Grading Period Term is selected in the Grading Period Properties tab. Choose to amend these if required. Period Dates Specify the length of the grading period for display and reporting purposes only. These are populated automatically when the Grading Period Term is selected in the Grading Period Properties tab. Choose to amend these if required. Certification Options Set how the calculation for the period is to work across the terms it is linked to. This is done by setting weighting for the period.
-
Weighting As Percentage:
- Select 'Percentage weighting' and set the percentage in the Grading Period Weighting field. This is useful if the period is linked to two semesters; set the weighting as '50%'. You can also choose 'No Weighting' in Grading Period Weighting.
- If 'Custom Weighting' is selected, set the dividend and divisor options.
- Weighting Dividend/Divisor. Use this for 'Custom Weighting'. For example, if the period is linked to three terms and percentage weighting is not suitable. Select '3' in Weighting Dividend and '1' in Weighting Divisor. This ensures that weighting is equally split for the period in each of the three terms it is linked to.
Portal Publication Parent/Student Portal Options Specify when the period data is published to the Parent and Student Portals. Standard Options Choose to switch grading standards on or off for the period. Style & Template Options - Select the style for the data entered for the period. The selections are pulled in from the Gradebooks module. This is useful for highlighting very high or very low grades.
- Select the template for the period. This determines how data is displayed when pulled in to the Gradebooks module.
-
Weighting As Percentage:
Select the Grading Calculations tab and set the:
Section Explanation Calculation Column Options - Select whether the column is hidden in the gradebook.
- Enter a column code and name.
Calculation Column Display & Logic - Calc Column Format Rule. Select the styling rule that you want to apply to the column. Any cells with values which meet the styling rule have the corresponding style design applied.
- Calculation Column Formula. Select how the value in the column is to be calculated.
- Calculation Column Style. Select a style to apply to the column. This is the default style design that is applied to cells in the column. If the value in the cell does not meet the styling rule selected, this style is applied.
- Cal Column Transpose. Select the transpose element that can be applied to this column. Your selection enables you to toggle between original values and transposed values when working in Workbook View.Columns with transposable values are identified by the transposable icon in the header.
Historic Calculation Options - Enter a code and name for historic calculations in the period to be used in gradebooks.
- Enter the date used for this calculation.
This provides a useful snapshot of data at a set time in the period.
Select the Grading Display tab and set the:
Section Explanation Class Display Options Use the drop downs to specify the display of the grading set in the Class View tab.
Course Display Options Use the drop downs to specify the display of the grading set in the Course View tab.
Student Display Options Use the drop downs to specify the display of the grading set in the Student View tab.
- Select the Course Schedules tab and select the course schedules to link to the period.
- Two other tabs are available, these are explained as follows:
- Metadata. Any metadata fields set up for grading periods are listed here. Add values for the metadata fields as required.
- Audit. Any changes made to the grading period are listed here.
- Select Save & Close. The amended grading period is listed.
Delete a grading period
Remove a grading period that has been added in error.
You cannot delete a grading period which is active.
- Scroll to the grading period that you want to delete and click the delete icon. You are prompted Are you sure you want to delete this grading period?
- Select Yes. The grading period is removed. A log is kept under the Logging tab for auditing purposes.