Manage Grading Templates
Use the Certification tab in the Curriculum Manager module to define templates which determine how data is displayed when pulled in to the Gradebooks module.
For example, select for grades to display in columns and set colour styling so that grades are displayed in a standard way in gradebooks.
- Open the Curriculum Manager and select the Certification tab.
- Select Manage Grading Templates from the right hand menu:
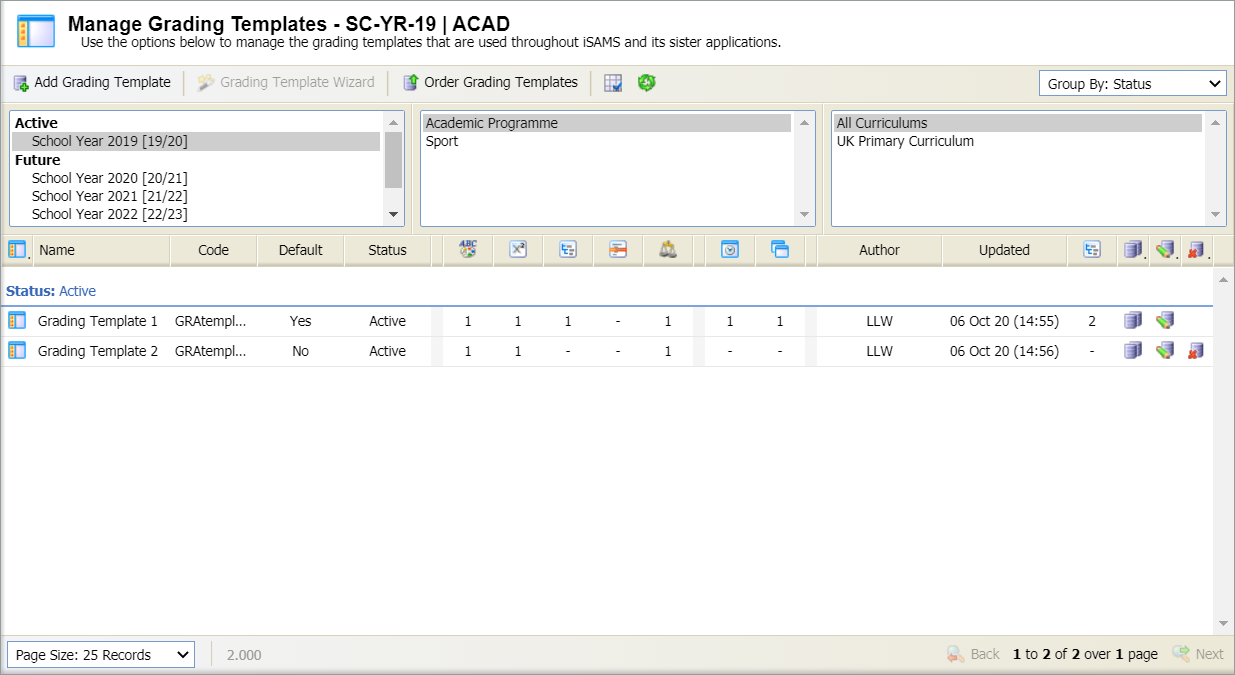
- All grading templates are listed here.
- The details displayed and how they are displayed is determined by the settings in entity preferences. See Update Grading Management entity preferences for more help with this.
- Use the drop-down in the top right of the screen to change the Group By setting if required.
- Use the navigation tools at the bottom of the screen to display the grading templates that you want to work with.
-
Choose to:
- Add a grading template.
- Change the order of grading templates.
- Copy a grading template.
- Edit a grading template. Add columns, column groups and metadata to templates.
- Delete a grading template.
Add a grading template
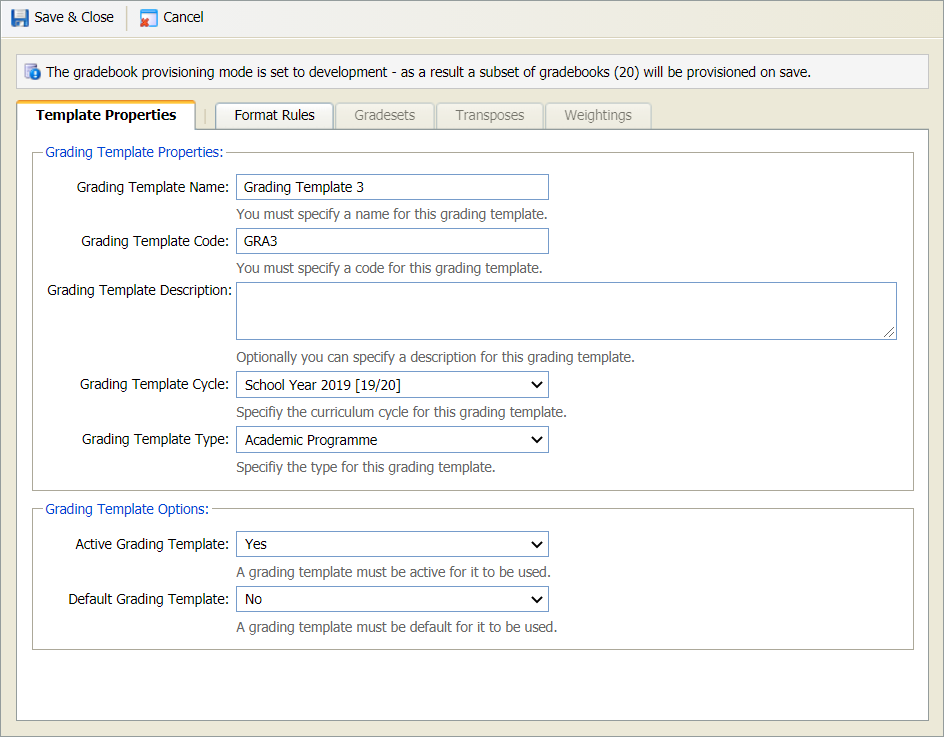
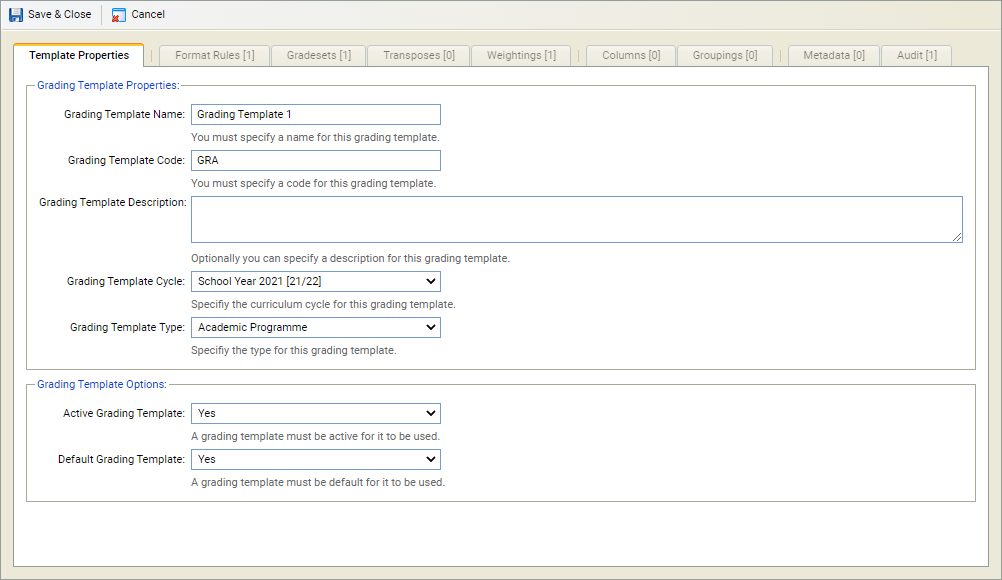
- Select Add Grading Template in the header to display the Manage Grading Templates window:
-
Complete the fields displayed in the Template Properties tab:
Section Explanation Grading Template Properties Grading Template Options Use the drop downs to:
- Set the status of the template. Selecting 'No' marks the template as 'Inactive'.
- Set this template as the default. Only one grading template can be marked as the 'Default'.
-
Work through the other tabs available to set the properties for the template.
Your selections act as a filter for the options available when teachers are
using gradebooks (the selections available in each of the tabs are pulled
in from the
Gradebooks module):
- Format Rules.
- Gradesets.
- Transposes.
- Weightings.
- Select Save & Close.
Change the order of grading templates
Change the order that grading template are displayed.
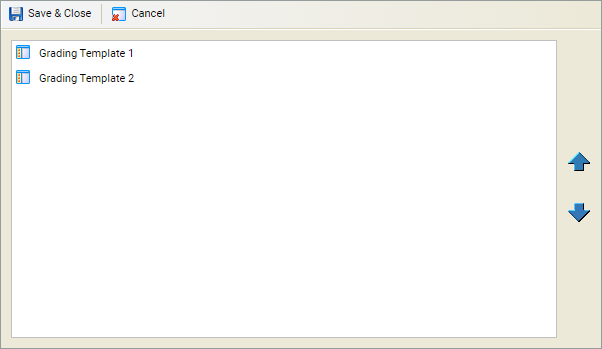
- Select Order Grading Templates. The Arrange Grading Templates window is displayed:
- Select a grading template and use the arrows to move it up or down the list.
- Select Save & Close to close this window and return to the Manage Grading Templates screen.
Copy a grading template
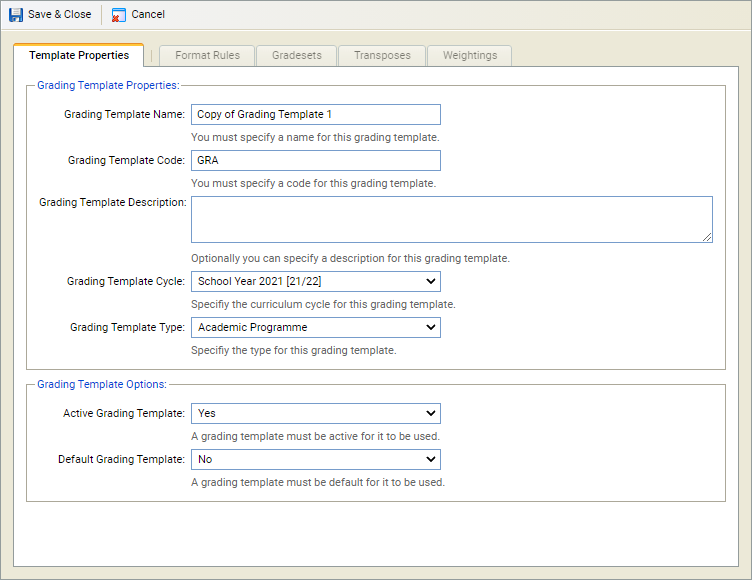
- Scroll to the grading template that you want to copy and click the copy grading templates icon. A popup window is displayed:
-
Complete the fields displayed in the Template Properties tab:
Section Explanation Grading Template Properties Grading Template Options Use the drop downs to:
- Set the status of the template. Selecting 'No' marks the template as 'Inactive'.
- Set this template as the default. Only one grading template can be marked as the 'Default'.
-
Work through the other tabs available to set the properties for the template.
Your selections act as a filter for the options available when teachers are
using gradebooks (the selections in each of the tabs available are pulled
in from the
Gradebooks module):
- Format Rules.
- Gradesets.
- Transposes.
- Weightings.
- Select Save & Close.
Edit a grading template
Update the details of a grading template if required. For example, change the status of a grading template currently marked as 'Active'.
- Scroll to the grading template that you want to edit and click the edit icon. The Manage Grading Templates window is displayed:
-
Complete the fields displayed in the Template Properties tab:
Section Explanation Grading Template Properties Grading Template Options Use the drop downs to:
- Set the status of the template. Selecting 'No' marks the template as 'Inactive'.
- Set this template as the default. Only one grading template can be marked as the 'Default'.
-
Work through the next four tabs to set the properties for the template. Your
selections act as a filter for the options available when teachers are using
gradebooks (the selections in each of the tabs available are pulled in from
the
Gradebooks module):
- Format Rules.
- Gradesets.
- Transposes.
- Weightings.
-
Select the Columns tab and configure columns for gradebooks:
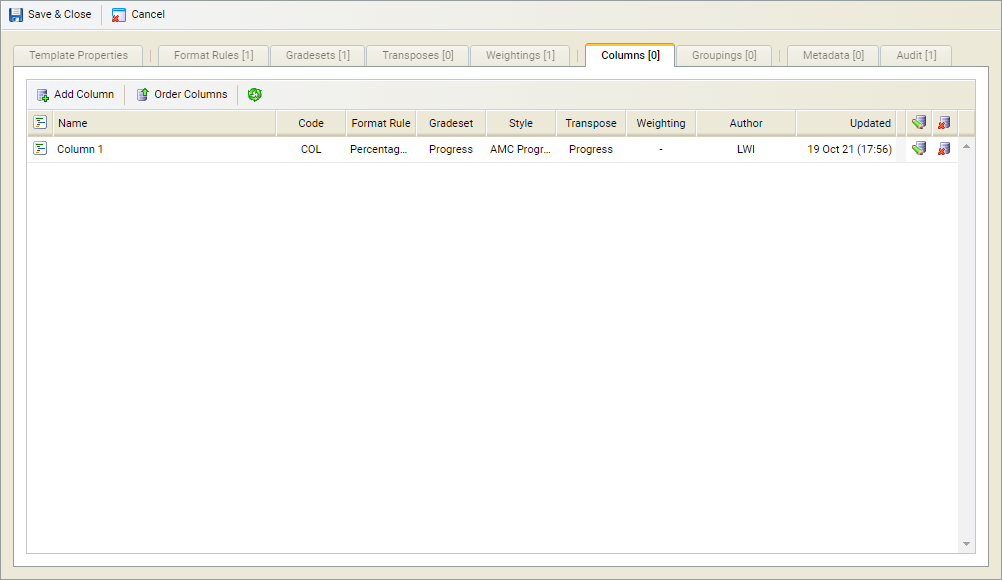
Choose to:
 Add a column
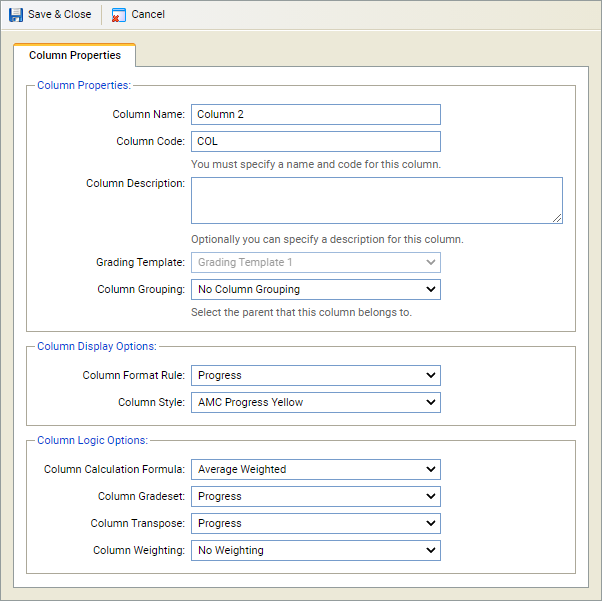
- Select Add Column in the header to display a popup window:
-
Complete the fields as required:
Section Explanation Column Properties - Enter a clear and concise name for the column. A code is created for you.
- Add a brief description for the column if required.
- You cannot change the template you are working in.
- Select a Grouping position for the column in the gradebook if required. This is a parent group for this column to sit under. Groupings must be configured for any selections to display here.
Column Display Options - Column Format Rule. Select the styling rule that you want to apply to the column. Any cells with values which meet the styling rule have the corresponding style design applied.
- Column Style. Select a style to apply to the column. This is the default style design that is applied to cells in the column. If the value in the cell does not meet the styling rule selected, this style is applied.
Column Logic Options - Column Calculation Formula. Select how the value in the column is to be calculated.
- Column Gradeset. Select the gradeset element to be used in the column.
- Column Transpose. Select the transpose element that can be applied to this column. Your selection enables you to toggle between original values and transposed values when working in Workbook View.Columns with transposable values are identified by the transposable icon in the gradebook header.
- Column Weighting. Enter a weighting to be applied to values in the column.
- Select Save & Close.
 Edit a column
-
Select the edit icon in your selected column and amend the fields as required:
Section Explanation Column Properties - Enter a clear and concise name for the column. A code is created for you.
- Add a brief description for the column if required.
- You cannot change the template you are working in.
- Select a Grouping position for the column in the gradebook if required. This is a parent group for this column to sit under. Groupings must be configured for any selections to display here.
Column Display Options - Column Format Rule. Select the styling rule that you want to apply to the column. Any cells with values which meet the styling rule have the corresponding style design applied.
- Column Style. Select a style to apply to the column. This is the default style design that is applied to cells in the column. If the value in the cell does not meet the styling rule selected, this style is applied.
Column Logic Options - Column Calculation Formula. Select how the value in the column is to be calculated.
- Column Gradeset. Select the gradeset element to be used in the column.
- Column Transpose. Select the transpose element that can be applied to this column. Your selection enables you to toggle between original values and transposed values when working in Workbook View.Columns with transposable values are identified by the the transposable icon in the gradebook header.
- Column Weighting. Enter a weighting to be applied to values in the column.
- Select Save & Close.
 Delete a column
Select the delete icon in the column that you want to delete.
 Arrange columns
- Select Order Columns in the header bar.
- Select a column and use the arrows to move it up or down the list.
- Select Save & Close.
-
Select the Groupings tab and configure column parent groupings for gradebooks:
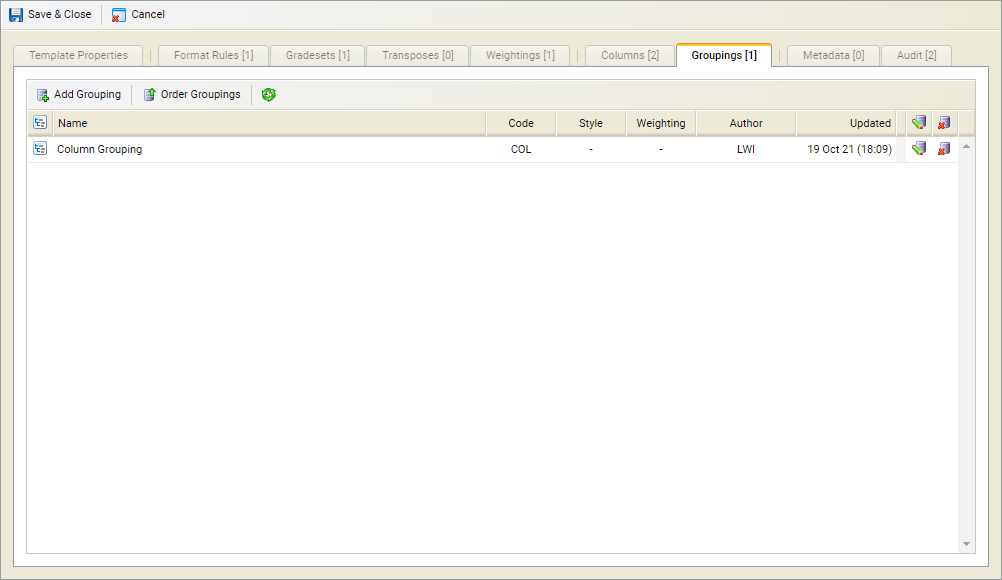
Choose to:
 Add a grouping
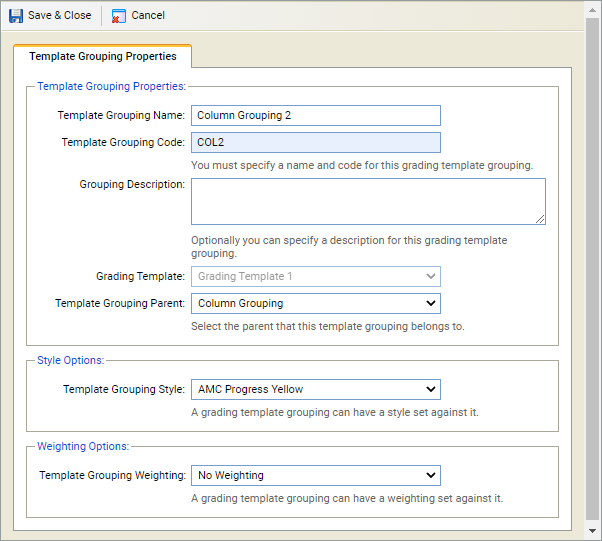
- Select Add Grouping in the header to display a popup window:
-
Complete the fields as required:
Section Explanation Template Grouping Properties - Enter a clear and concise name for the grouping. A code is created for you.
- Add a brief description for the grouping if required.
- You cannot change the template you are working in.
- Select a Grouping position for the grouping in the gradebook if required. This is a parent group for this grouping to sit under.
Style Options Select a style to apply to the grouping. This is the default style design that is applied to cells in the grouping. If the value in the cell does not meet the styling rule selected, this style is applied.
Weighting Options Enter a weighting to be applied to values in the grouping.
- Select Save & Close.
 Edit a grouping
-
Select the edit icon in your selected grouping and amend the fields as required:
Section Explanation Template Grouping Properties - Enter a clear and concise name for the grouping. A code is created for you.
- Add a brief description for the grouping if required.
- You cannot change the template you are working in.
- Select a Grouping position for the grouping in the gradebook if required. This is a parent group for this grouping to sit under.
Style Options Select a style to apply to the grouping. This is the default style design that is applied to cells in the grouping. If the value in the cell does not meet the styling rule selected, this style is applied.
Weighting Options Enter a weighting to be applied to values in the grouping.
- Select Save & Close.
 Delete a grouping
Select the delete icon in the grouping that you want to delete.
 Arrange groupings
- Select Order Groupings in the header bar.
- Select a grouping and use the arrows to move it up or down the list.
- Select Save & Close.
- Select Save & Close.
Delete a grading template
Remove a grading template that has been added in error.
You cannot delete a grading template which is active.
- Scroll to the grading template that you want to delete and click the delete icon. You are prompted Are you sure you want to delete this grading template?
- Select Yes. The grading template is removed. A log is kept under the Logging tab for auditing purposes.