Process purchase invoices
Add invoices to the system when you receive a physical invoice from the applicable supplier. This process generates an invoice from an authorised purchase order, which can then be checked against the supplier invoice and amended as required. This process also automatically creates a POIN in IRIS Financials.
You can process an invoice only if:
- The purchase order has been produced and authorised.
- You generate a GRN to confirm that you received the goods or that the supplier carried out the services.
- An invoice has been received from the supplier.
If Invoice icon or any other settings mentioned in this article are not available, the System Administrator needs to review the settings as described in Give users access to IRIS Financials Purchasing.
Process a purchase order invoice
- From the IRIS Purchasing Home page, select the Invoice icon.
- By default, a list of suppliers with goods received notes appears in the Select your Supplier window.
-
Either scroll through the list, or search for the required supplier via the Search Criteria field. You can enter any element of the supplier's account code or name/title. The list reduces based on the criteria you enter.
The system selects the Load Indices checkbox by default to improve search performance. It should be left selected. For maximum efficiency, suppliers are loaded 20 at a time. As you scroll through the list, the system loads more suppliers. A slight delay might be noticeable on slower internet connections.
-
Select the required supplier to select them. The Select your details lines window opens.
The list is ordered by the date that the GRN was added to the system. It is therefore important to note that if multiple GRNs were produced for the same order, they may not appear sequentially in the list (and may not appear in the initial display if the list is long).

If the required order is not listed, enter the order number in the Filter detail lines section.If the list does not show the required purchase order items, check that you have created a goods received note (GRN). Only purchase orders that you have processed to goods received appear. If any items have not arrived or have been damaged, refer to the Handle missing or damaged items article.
- Lines from any purchase orders for the selected supplier appears. In the earlier example, there are several purchase orders for exercise books as we have produced several orders to demonstrate the various invoicing scenarios.
-
Select the order item lines required for the invoice then select Progress. In this example, all the goods have arrived, and the invoice matches the purchase order.
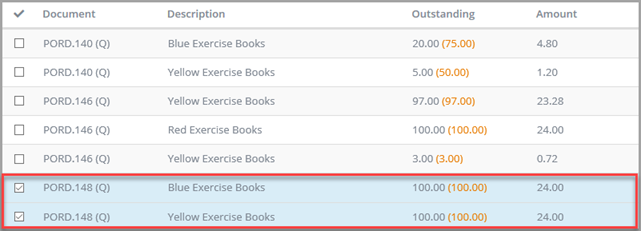
- The details from the selected orders/GRNs are then progressed to the invoice
Check the invoice details as follows: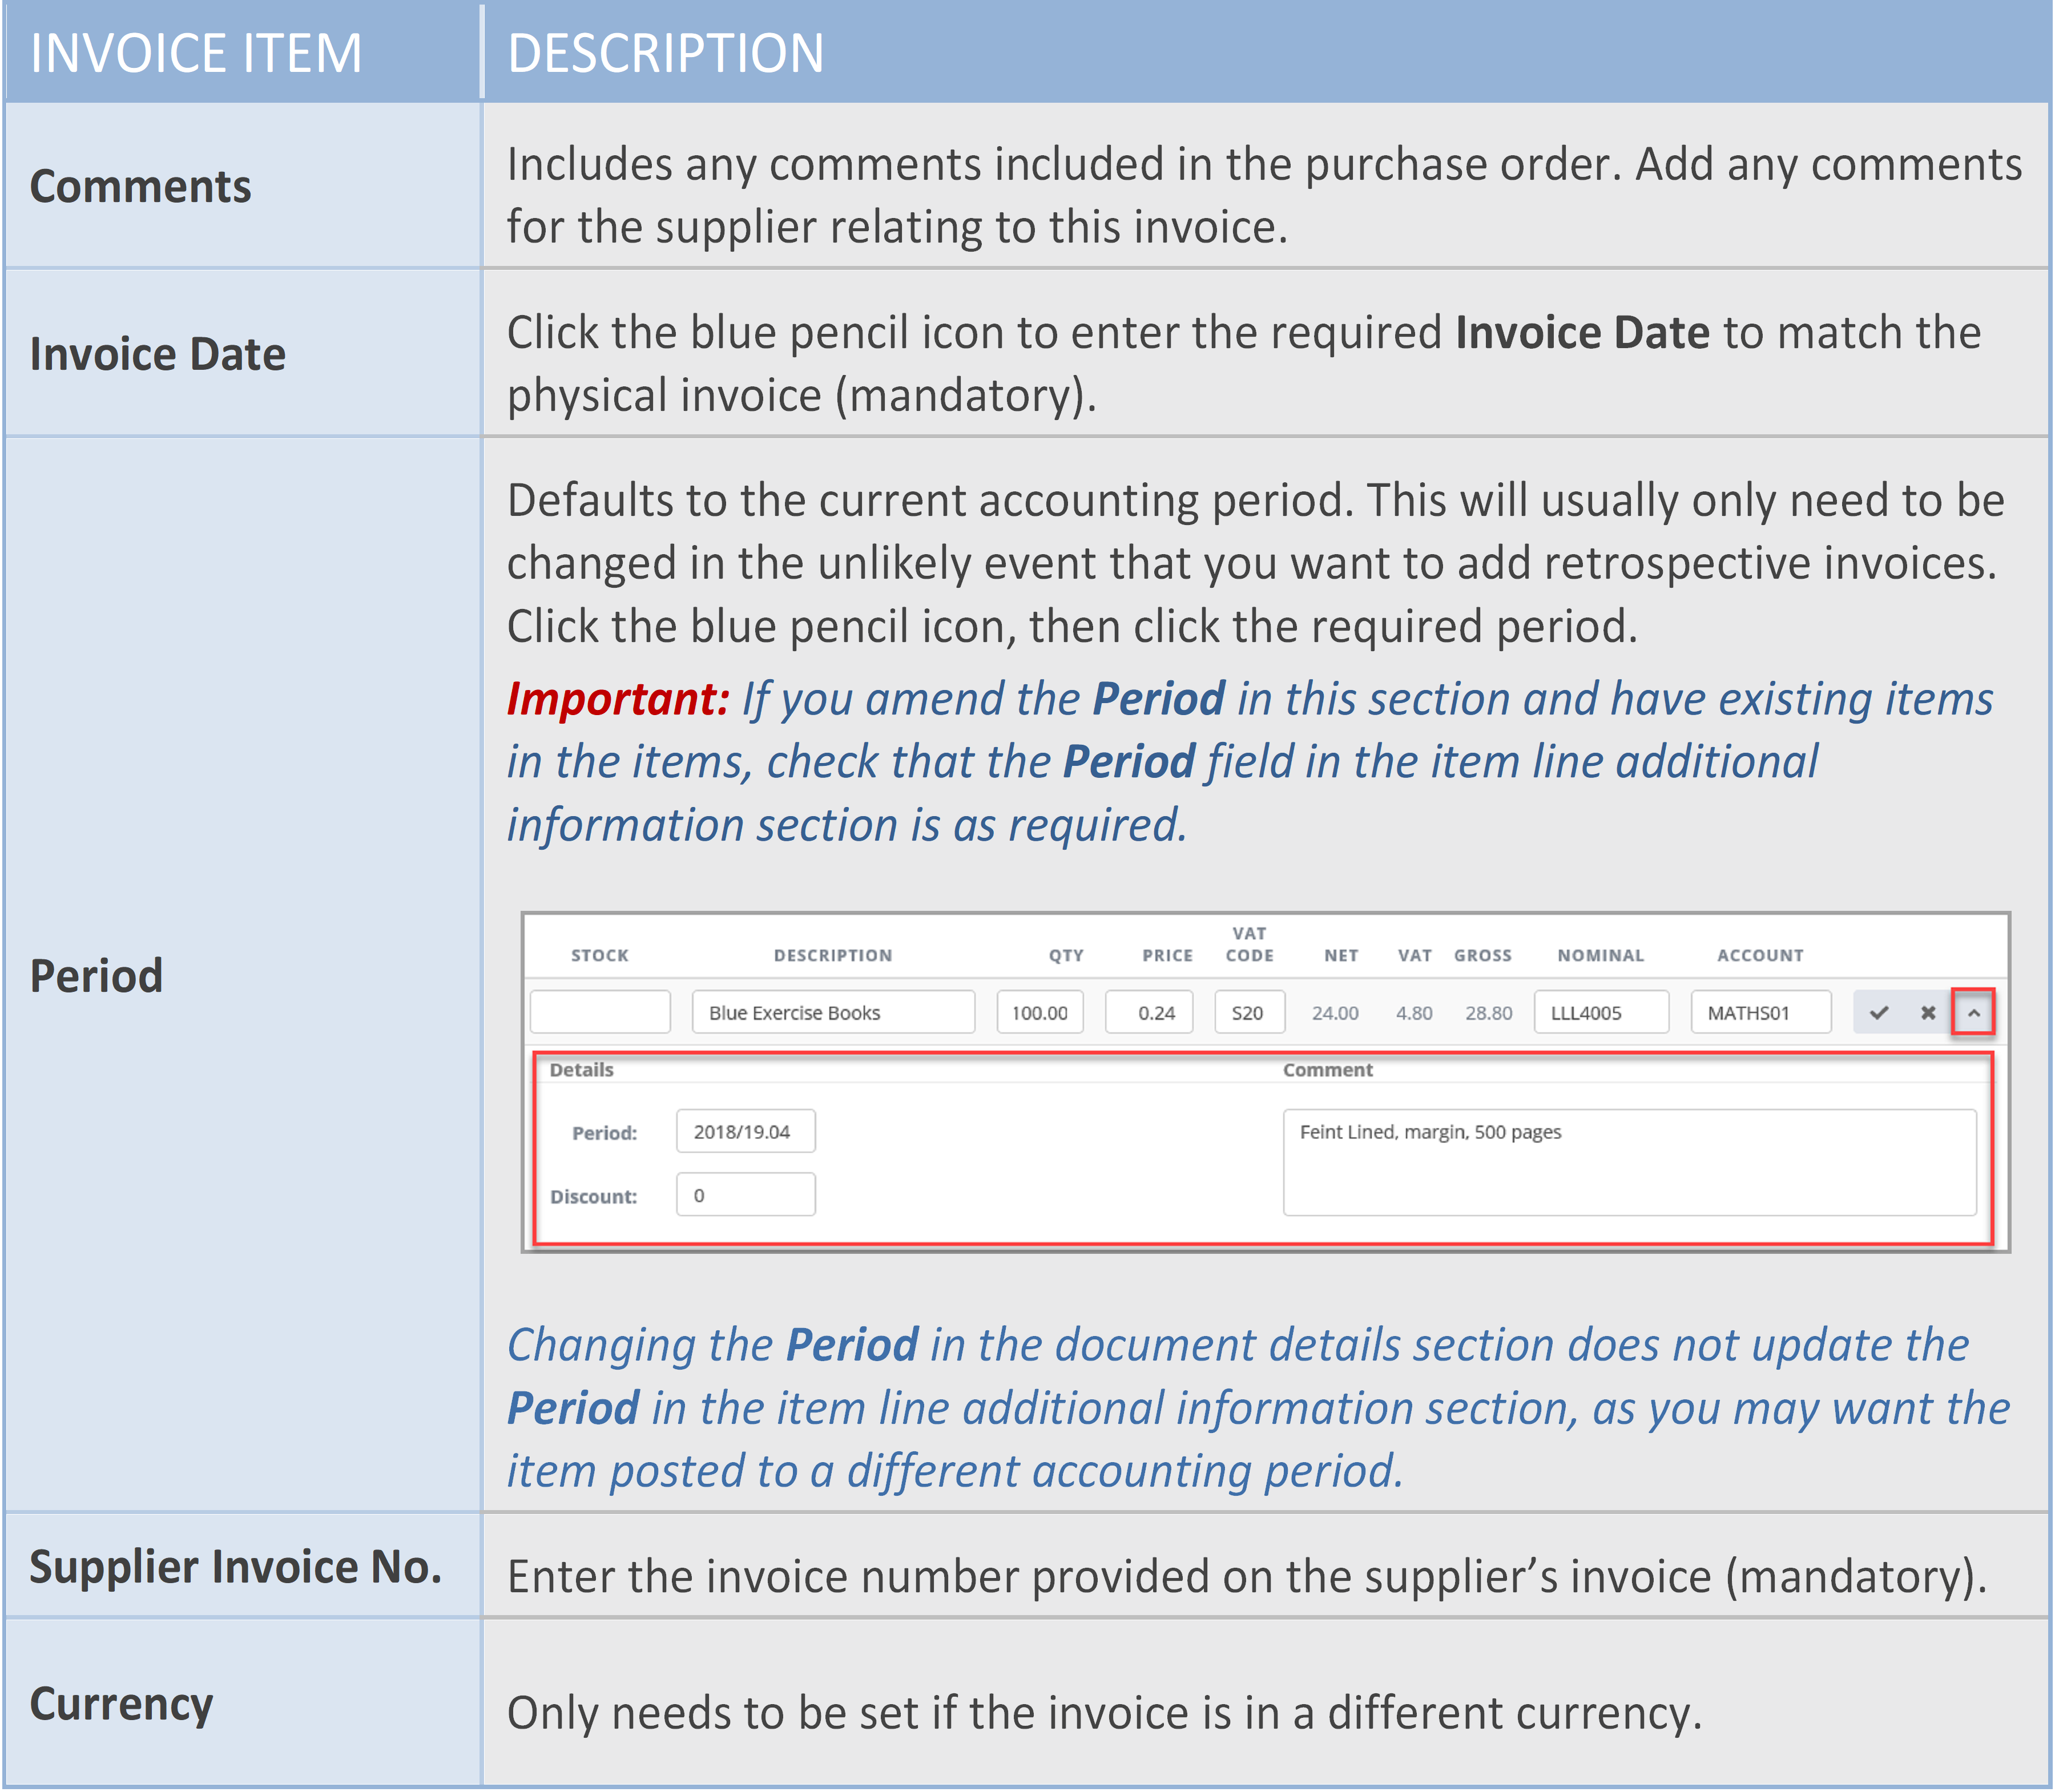
- Next review the individual items. Use the icons for each item to make amendments as follows:
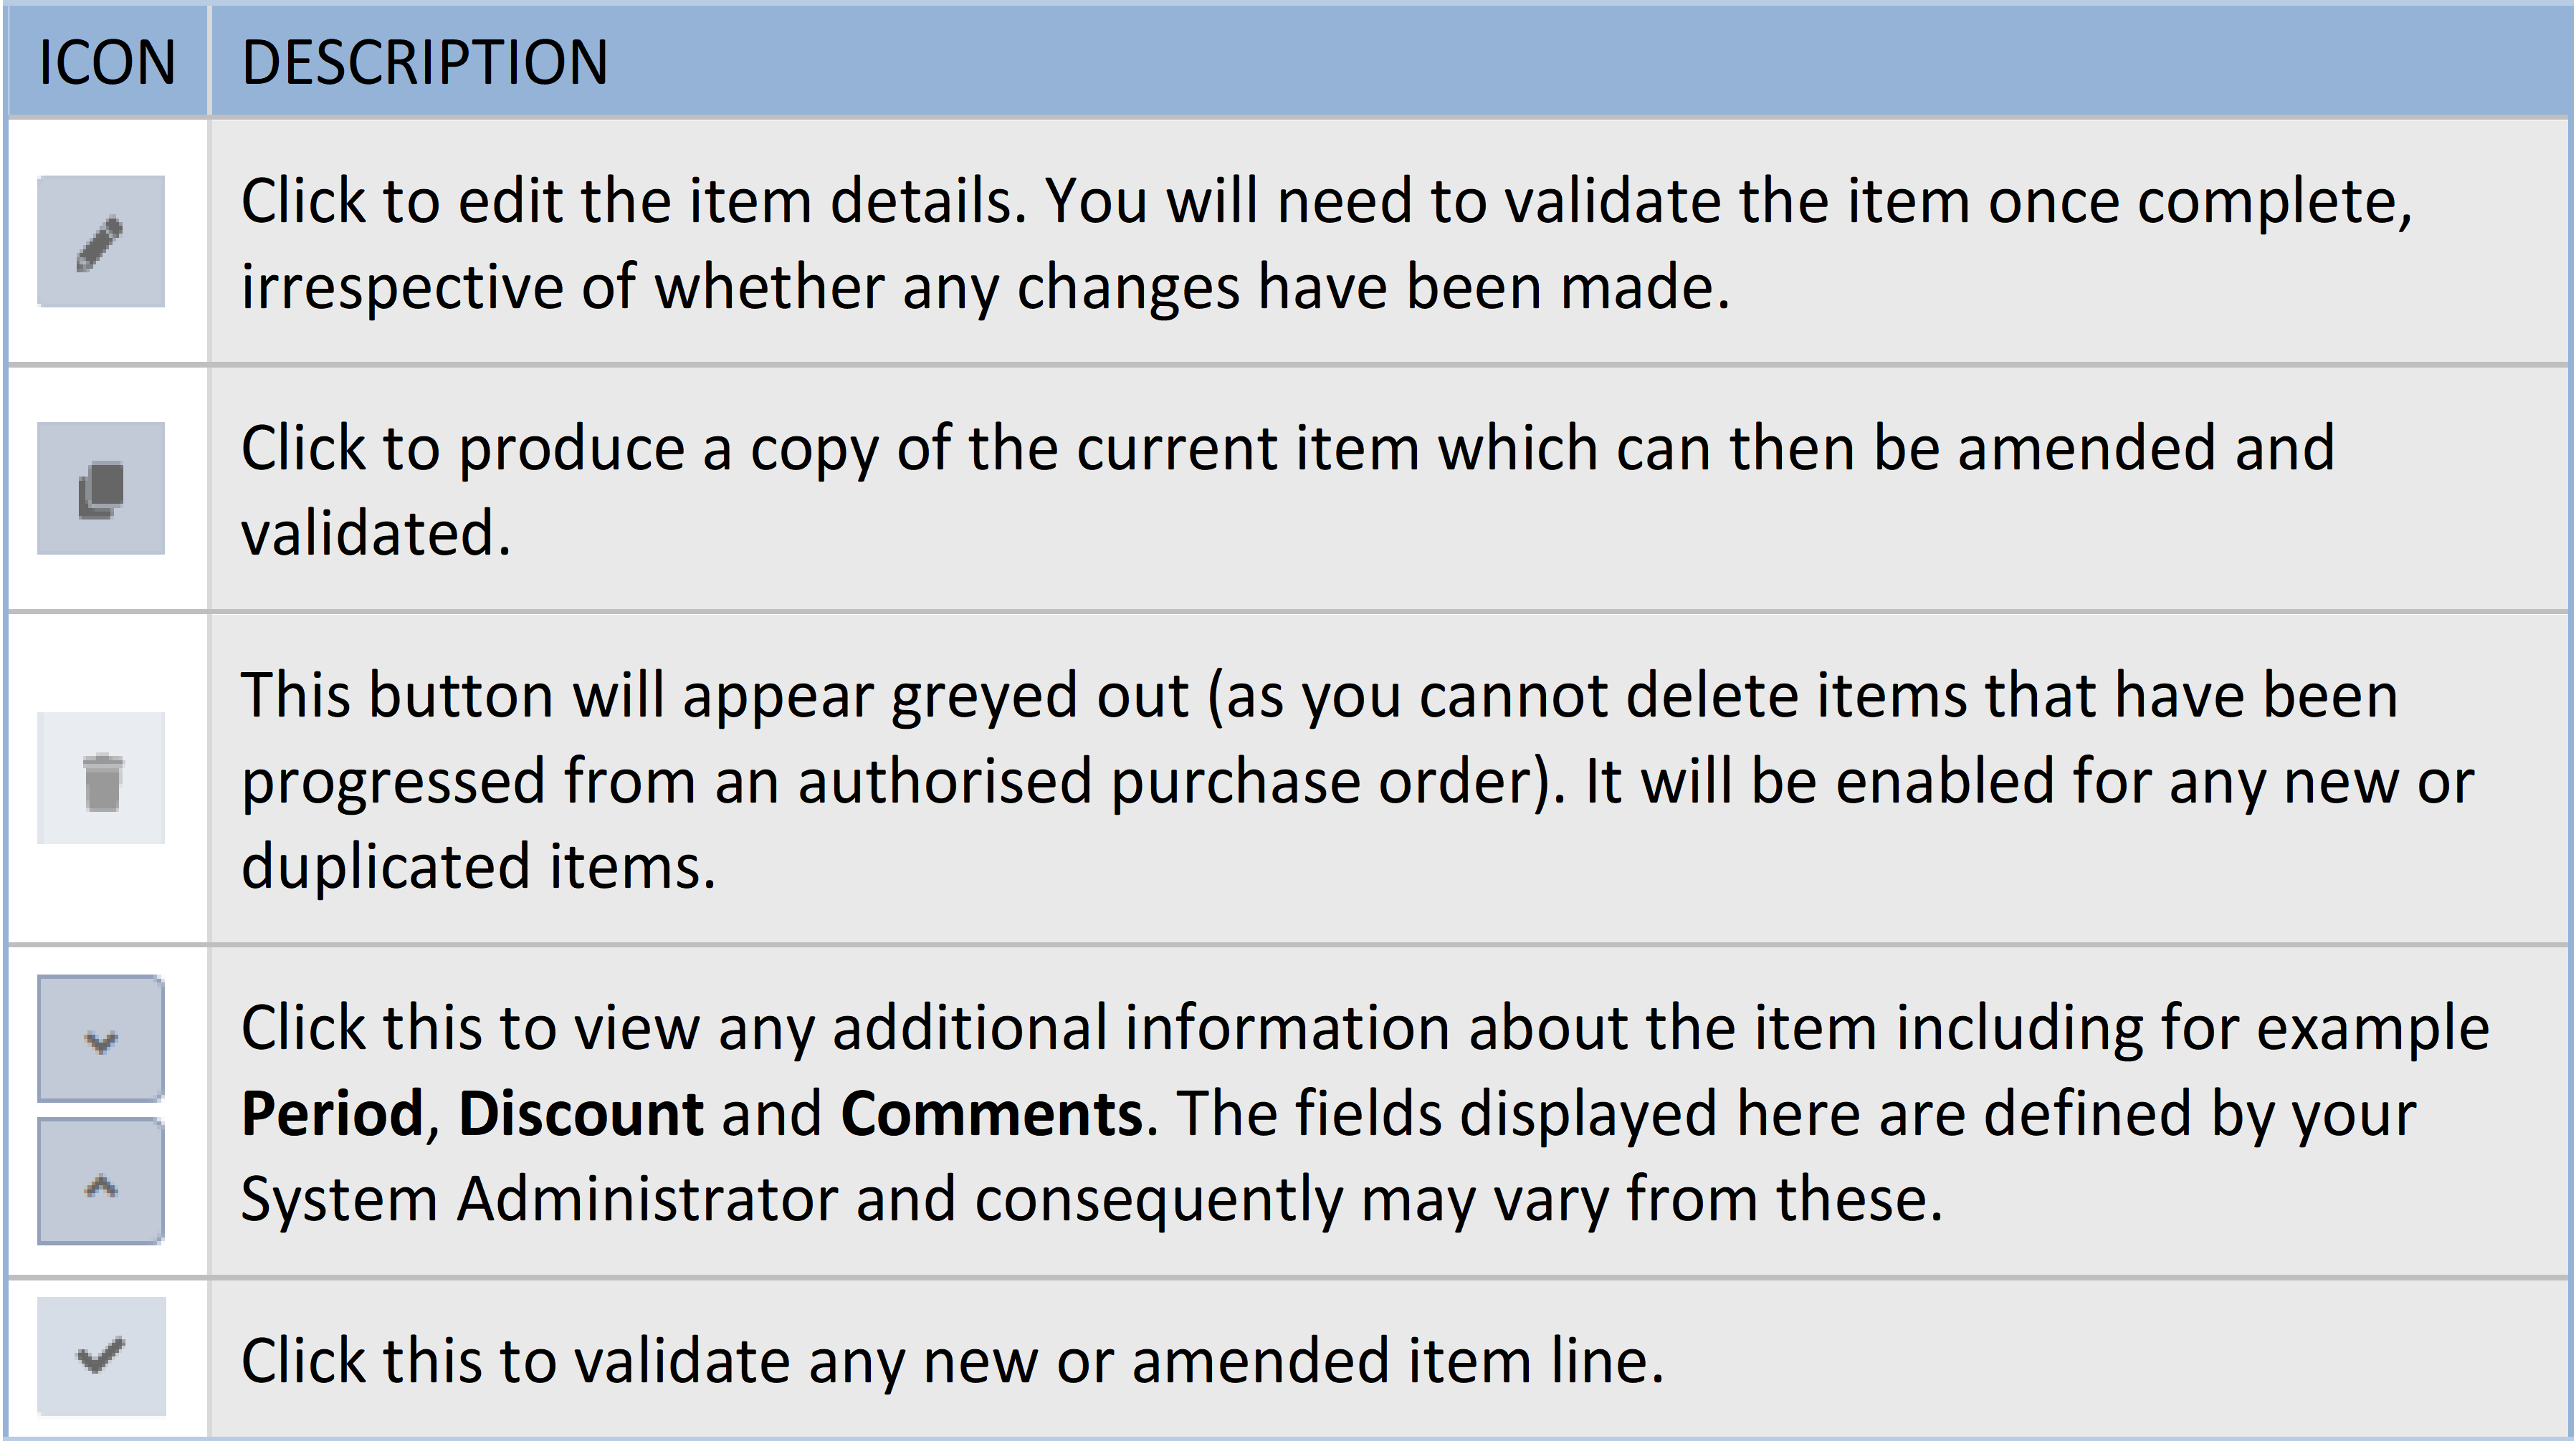
- Check the quantity and price match the supplier's invoice. Select the Edit icon if you need to make any changes.
- If any items have not arrived/been damaged, refer to Handle missing or damaged items.
- If there are delivery charges on the supplier invoice that have not been accounted for in the purchase order, or you want to apply delivery charges to a different nominal/account, refer to Deal with delivery charges.
- If any items have not arrived/been damaged, refer to Handle missing or damaged items.
- Next, check the VAT code to make sure the goods are invoiced correctly. To change the rate, point to the VAT CODE field, select the magnifying glass then select the required VAT code.
From time to time, there may be rounding differences where the supplier's finance system has rounded the amount differently to IRIS Purchasing. If this is the case, you need to amend the NET and VAT values (by selecting the pencil icon) to match the supplier's invoice values.
-
Check that the nominals to which the items relate are correct. You can change this by pointing to the Nominal field, selecting the magnifying glass, then selecting the required nominal from the Select window.
- Alternatively, enter a relevant word for example, books in the Nominal field. The system displays any matching nominals. Select the required nominal from the list.
- Also check that the correct cost centre account appears in the Account field. If required, you can amend this using the same process as for nominals.
Deal with prepayment invoices
You may need to create invoices for subscriptions or insurances, for example, that the supplier invoices annually, but you need to split the expenditure across the relevant accounting periods. For more information, see the Process prepayments in IRIS Financials Purchasing article.
Check or apply discounts
Discounts may have been included in the requisition or purchase order, if for example, the person placing the order knew that a discount had been offered. At invoice stage, you can apply discounts only to individual lines.
Check that any existing discounts are correct and that any discounts from the supplier invoice are included.
If the discount was not applied at the purchase order stage, apply it using the process described in the Apply discounts in IRIS Financials Purchasing article.
Deal with delivery charges
Supplier delivery charges are not usually known at the order stage or if they are known, the person creating the order may not have access to apply the delivery charge to the applicable nominal/account.
- If the invoice correctly includes the delivery charge, check that it uses the correct nominal/account. The invoice can then move to the next stage.
- If a delivery charge has not been included in the order, create a new line in the invoice, add the delivery details and cost applying to the applicable nominal/account. The invoice can then move to the next stage. The delivery cost correctly shows as a discrepancy for audit purposes.
- If the delivery charge has been included in the order, but is a higher amount in the invoice, you must amend this amount to make sure the supplier is paid. Check that the delivery charge uses the correct nominal/account. The invoice can then move to the next stage. The difference in delivery cost correctly shows up as a discrepancy for audit purposes.
Deal with supplier split invoices
If the supplier has split the order across several invoices (for example, four invoices for 25 blue and 25 yellow exercise books), use the process outlined in the Handle split invoices in IRIS Financials Purchasing article.
Deal with invoices where items are missing/damaged
The process for dealing with missing or damaged items very much depends on what has been agreed with the supplier or what has been recorded in the goods received note (GRN). See the Handle missing or damaged items article.
Open or add attachments
For more information, see the Add attachments to documents topic.
- To add an attachment, select the Attachment icon and select the required files from the Choose File to Upload Alternatively, drag the required files from Windows Explorer anywhere onto the requisition.

- Once attached, you can open documents by pointing to the Attachment icon, then selecting the required attachment name.