Posting Direct Debit Transactions
Some Of the nominals and ledgers used in this topic may be different to those in your chart of accounts.
You can input direct debit payments made to suppliers using the appropriate document input form. For example, you can record a direct debit payment made to a supplier to clear off an invoice.
The document input form used to record the transaction depends on the purpose of the direct debit.
-
Purchase Payment document input form - is used to record direct debit payments made against the supplier account to clear off an invoice.
-
Miscellaneous Payment document input form - is used to post the payment directly to the expense nominal, where there is no invoice involved.
Posting direct debits consists of the following:
Selecting the Required Document Input Form
Recording the Direct Debit Payment
Editing a Posted Direct Debit Document
Selecting the Required Document Input Form
Firstly, to record a Direct Debit, you need to select the applicable document input form based on the type of payment that was made.
-
Select Documents, then select Document Input from the menu.
-
The Document Input dialog is displayed. To select the document type, select Drill (...) in Document type, then double-select to select ASDD - Direct Debit or Standing Order (where AS represents the location code of the document type) from the Select a document type dialog.
-
Next, to select the document input form required for the type of payment you are recording select Drill (...) in Input form, then double-select to select the required input form from the Select an input form dialog.
-
The Number defaults to the next available number for the document type and you are unable to change this.
-
The Date defaults to the date that you are entering the information, i.e. today's date. The date must be the same date as the date the direct debit was taken from the bank account. To change the date, select the Date drop-down arrow and select the required date from the calendar. Alternatively you can, select the up-down buttons, or over-type the date using a DD Month YYYY format, for example, 18 January 2021.
-
The Period defaults to the current accounting period. The document period needs to be the accounting period in which the direct debit was taken. If the required accounting period is now closed and no longer available, select the next open accounting period by selecting Drill (...) in Period, then double-select to select the required period from the Select a period dialog.
-
Select OK to confirm your selections. The applicable document input form is then displayed.
Recording the Direct Debit Payment
The previously selected document input form is displayed, populated with the details entered in the Document Input dialog.
Please follow the instructions for the applicable document input form:
Recording a Direct Debit Payment to Pay Off an Invoice
Recording a Direct Debit Payment with No Invoice
Recording a Direct Debit Payment to Pay Off an Invoice
-
The Purchase Payment document input form is displayed populated with the details entered in the Document Input dialog.
-
Firstly, enter the details of the bank account from which the direct debit payment was made. Double-select Bank, then double-select to select the required bank account from the Select account dialog.
You are not able to move to the next field if the required data has not been entered. -
Next, select the supplier that received the direct debit payment. Double-select Account, then double-select to select the required supplier from the Select PURCHASE account dialog.
-
The Document Date defaults to the date entered in the Document Input dialog. The date must be the same as the date the direct debit was taken from the bank account. If required, you can change the date by selecting the Document Date drop-down arrow, then selecting the required date from the calendar.
If the date of the direct debit payment on the bank statement is different to the date entered on the document input form, the bank reconciliation report may not balance. -
Enter the value of the direct debit payment in Value. This amount must exactly match the amount that left the bank account.
-
Enter a description to help identify the purpose of the direct debit payment in Description.
-
The Account Summary on the right-hand side of the form displays the Creditor Balance, the Document Balance, and the New Creditor Balance.
If the Account Summary shows negative balances, it may mean that the supplier account is in credit, or that there are invoices missing. Continue to record the payment, and check the supplier account as necessary. The Creditor Balance displays the overall balance across all locations.
-
When all the required payment information has been entered, press F5 or select POST to post the payment.
If you want to allocate the payment after posting, select ALLOCATE to enable the allocation function before selecting POST, to display the Allocation window (Alternatively, press and hold Shift and press F5 when posting). For more information, please see Allocating and Unallocating Documents. -
A blank document input form is displayed with the posted document displayed in Documents Posted. Enter the details for an additional direct debit payment or select X to close the document input form.
To view, edit, or cancel the posted transaction, select the link to the required document from Documents Posted. For more information, please see Document Enquiry Functions.
Recording a Direct Debit Payment with No Invoice
-
The Miscellaneous Payment document input form is displayed populated with the details entered in the Document Input dialog.
-
Firstly, enter the details of the bank account from which the direct debit payment was made. Double-select Bank, then double-select to select the required bank account from the Select account dialog.
You are not able to move to the next field if the required data has not been entered. -
The Document Date defaults to the date entered in the Document Input dialog. The date must be the same as the date the direct debit was taken from the bank account. If required, you can change the date by selecting the Document Date drop-down arrow, then selecting the required date from the calendar.
If the date of the direct debit payment on the bank statement is different to the date entered on the document input form, the bank reconciliation report may not balance. -
Enter the value of the direct debit payment in Amount. This amount must exactly match the amount that left the bank account.
-
Enter a description to help identify the purpose of the direct debit payment in Description e.g. Office Supplies.
-
Next, add the item details for the direct debit payment. Double-select in Nominal, then double-select to select the required expense nominal from the Select a nominal dialog.
-
Next, select the account to which the direct debit payment relates. Double-select Account, then double-select to select the required account from the Select account dialog.
-
Next, enter the total amount for the direct debit payment in Gross, for example, 50.00 (do not enter any currency symbols £, $, etc.)
If the direct debit payment is inclusive of VAT then the amount entered in Gross should include VAT. The Net value is automatically calculated when the applicable VAT Rate is selected. -
To select the applicable VAT rate for the direct debit payment, double-select VAT Rate, then double-select to select the required VAT rate from the Select VATRATES key dialog. The VAT £ and Net are then automatically populated.
-
Enter a description to help identify the purpose of the direct debit payment in Description, e.g. Printer Ink.
If you need to provide a more detailed description for the payment, press and hold the Ctrl key and the F8 key. The Detail Line 1 Comment dialog is displayed, as shown in the following graphic. Enter the details you want to include in the item description, then select Date Stamp to add the user details, time, and date to your comment, then select OK to save your comment.
-
-
If the direct debit payment covers several items/payments (for example, printer ink and printer paper refills) you need to insert an additional payment row to the document input form for each item. To create a new item row, select in the blank space adjacent toSupplier VAT Number, then press the Tab key, or select INSERT ROW. Complete the details of the inserted payment row as per Steps 6 - 12.
If you insert a payment row that is not required, select anywhere in the payment row to be removed, then select DELETE ROW.
If the new inserted payment row is to be coded to the same nominal and account as the previous payment row, enter a Period(full stop .) in the column on the inserted payment row, then press the Tab key. The information in the previous payment row is copied to the inserted payment row.
-
If the Amount and Gross Total do not match, the Gross Total Does Not Match Document Amount message is displayed in red in the bottom left-hand corner of the window. You are not able to post the payment until this has been corrected.
-
To correct the error, check the Gross Total is the same as the amount in Amount. If these are different you need to make sure that the correct individual amounts and that all items of the payment have been entered. Also check that the correct VAT rate has been selected. When the Gross Total and Amount equal the same amount, the Gross Total Does Not Match Document Amount message is removed.
-
When all the required direct debit payment information has been entered, press F5 or select POST to post the payment.
If you want to allocate the payment after posting, select ALLOCATE to enable the allocation function before selecting POST to display the Allocation window (Alternatively, press and hold Shift and press F5 when posting). For more information, please see Allocating and Unallocating Documents. -
A blank document input form is displayed, with the posted document displayed in Documents Posted. Enter the details for an additional direct debit payment or select X to close the document input form.
To view, edit, or cancel the posted transaction, select the link to the required document from Documents Posted. For more information, please see Document Enquiry Functions.
Editing a Posted Direct Debit Document
-
Select Enquiries, then select Document Enquiry from the menu.
-
The Document Enquiry Criteria dialog is displayed. To search for the required direct debit document to be cancelled, select Equals from the Document Type drop-down list. To select the required document type, select Drill (...) in Value 1, then double-select to select ASDD - Direct Debit or Standing Order (where AS represents the location code of the document type) from the Select a document type dialog.
-
If the document number of the document to be edited is known, select Equals from the Document Number drop-down list, enter the document number in Value 1, e.g. 5, then select OK to confirm the selections.
-
The Document Enquiry window is displayed. If a document number was not specified in the criteria, a list of all documents of the document type are displayed. Find and select the required document, check the status of the document is Open in the Status column, then select EDIT. If the status of the document is Paid, you need to remove the allocation from the document before it can be edited. For more information, please see Allocating and Unallocating Documents.
Before editing the direct debit document, ensure that the document is only posted against a single location's nominals (location can be identified by the 3 digit alpha code in the nominal column). If you want to view the individual transactions included in the document, select Expand (+) adjacent to the Document Type column for the selected document to display the details panel. -
The PSFJournal document input form is displayed populated with the details of the original document. Amend the required details of the direct debit payment, then press F5 or select POST to confirm and save the changes.
If an error message is displayed when editing a document, a list of possible error messages and how to resolve the issues are detailed in the Troubleshooting section of this topic.
Troubleshooting
The following issues may arise regarding direct debit payments. Please follow the instructions for the applicable issue:
Document Not Posted Error Messages when Trying to Edit the Posted Direct Debit Document
The following error messages may be displayed when editing a journal document for a posted direct debit payment:
The Tax Account in the VAT Ledger is Closed
The Accounting Period is Closed
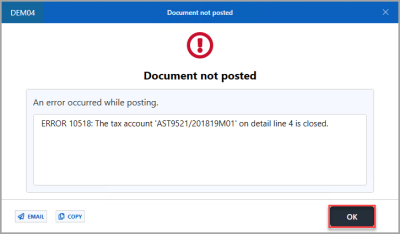
The Tax Account in the VAT Ledger is closed
If the tax period to which you are posting the edited direct debit payment document is closed, you are unable to post the document until the tax period has been set to the next available open period.
-
On the Document not posted dialog, select OK to return to the PSFJournal document input form.
-
On the PSFJournal document input form, double-select in the Account field on the closed VAT period, double-select to select the next available open VAT period from the Select VAT account dialog, then select OK.
If the VAT line is allocated, then please speak to the user in your establishment/organisation who completes the VAT return as the period should not be re-opened after it has been closed down. Documents that include an allocated VAT line can be edited or reversed (cancelled). -
When the VAT Period has been updated, press F5 or select POST to confirm and save the changes.
The Accounting Period is Closed
If the accounting period to which you are posting the edited direct debit payment document is closed, you are unable to post the document until the tax period has been set to the next available open period. For more information, please see, Open and Close Accounting Periods.
-
On the Document not posted dialog, select OK to return to the PSFJournal document input form.
-
On the PSFJournal document input form, select in Period, then enter the details of the next available accounting period. In the following example, 2020/21 05, has been entered.
-
When the accounting period has been updated, press F5 or select POST.