Document Enquiry Functions
Some Of the nominals and ledgers used in this topic may be different to those in your chart of accounts.
A document enquiry is used to view documents that have been added to IRIS Financials to record your establishment/organisation's transactions. From the Document Enquiry window you can copy, edit, and cancel documents. You can also set the criteria to assist in exporting lists of documentation data or create reports. For more information, please see Running a Document Enquiry.
To select a document on the Document Enquiry window, select anywhere on the required document row. If you want to view and select the individual items on the document (detail lines), select Expand (+) adjacent to the document row. 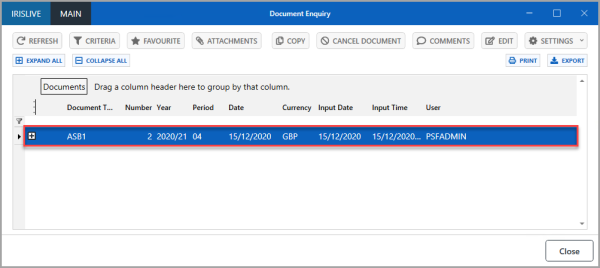
To select an individual item, select anywhere on the required detail line.
Document Enquiry functions consists of the following:
Document Enquiry Function Buttons
Personlising the Document Enquiry
Document Enquiry Function Buttons
The function buttons are located at the top of the Document Enquiry window. Select the required document or detail line, then select the required function button to display the additional windows/dialogs or menus.
If a button is greyed out it means that option is not available for the selected document or detail line.
-
REFRESH - refreshes the data in the document panel, where any new documents that have been added since you ran the criteria are displayed.
-
CRITERIA - displays the Document Enquiry Criteria dialog, where you can update the criteria for the enquiry.
-
FAVOURITE - displays the Add Favourite dialog, where you can save the enquiry to run again in future rather than having to select the criteria each time.
-
ATTACHMENTS - displays the Attachments for window, where you can view and maintain any attachments for that particular document.
-
COPY - displays the Document Input dialog, where you can create, amend and then post a copy of the document in journal format.
-
CANCEL DOCUMENT - displays the Cancel Document message. For more information, please see Cancelling/Reversing a Document/Transaction.
-
COMMENTS - displays the Document Comment dialog, where you can add or view a comment or additional information, i.e. a more detailed description or information about a discrepancy to the overall document.
-
EDIT - displays the PSFJournal document input form window, where you can amend and post an updated version of the document. For more information, please see Editing and Reposting Documents.
-
SETTINGS - displays a drop-down menu from which you can save or rename column selections to personalise the Detail Enquiry window, or you can reset the columns and layout to default settings. For more information, please see Personlising the Document Enquiry.
-
EXPAND ALL - expands all documents in the Documents panel to display all the individual item (detail) lines for the documents.
-
COLLAPSE ALL - closes all document individual item (detail) lines to only display the list of documents in the Documents panel.
-
PRINT - displays the Print Preview dialog, where you can print a copy of the Document Enquiry results.
-
EXPORT - displays the Save As dialog, where you can save a copy of the Document Enquiry results as a Microsoft Excel format document.
Personalising the Document Enquiry
If you frequently run document enquiries for certain criteria that is displayed in fields that are not displayed in the default settings for the Document Enquiry window, you can select the columns then save the settings to display them automatically when you run a future document enquiry.
The following options are available for personalising a document enquiry:
Selecting and Saving Columns as Default
Renaming Columns
Resetting Default Columns or Layout
Selecting and Saving Columns as Default
-
On the Document Enquiry window, right-select on the column headings to display the column pop-up menu. Select to select the columns you want displayed or to remove a selected column from the display, then when you have all the columns you want displayed, select SETTINGS, then select SAVE AS DEFAULT COLUMNS.
Alternatively, to save the columns as default for all staff members using your organisation database, select SAVE AS SYSTEM DEFAULT COLUMNS.
-
The Save As Default Columns message is displayed. Select OK to return to the Document Enquiry window.
Renaming Columns
If you want to rename a column to something more appropriate, for example one of the user fields that holds an accounts email address, you can rename the column heading in the Document Enquiry. Column headings can be renamed at document row or detail line level.
-
On the Document Enquiry window, select the document or detail line (depending on the column names you want to change), then select SETTINGS, then select RENAME COLUMNS.
-
The Rename Columns dialog is displayed. Select the column you want to rename, then over-type in the Display Title column the name you want displayed in the column heading on the Document Enquiry window, for example, Accounts Email, then select OK.
Resetting Default Columns or Layout
If you have removed or added columns to the document enquiry that you no longer want displayed, you can reset the columns in the document enquiry and the layout (which removes the column headings for the document row).
-
On the Document Enquiry window, select SETTINGS, then select RESET DEFAULT COLUMNS (or to reset columns for all staff members using your database, select RESET SYSTEM DEFAULT COLUMNS).
-
The Reset Default Columns confirmation message is displayed. Select Yes to confirm the reset.
-
The Reset Default Columns success message is displayed. Select OK to return to the Document Enquiry window.
Document Enquiry Pop-Up Menus
The document enquiry pop-up menu is displayed when you right-select on the selected document or detail line within the Document Enquiry window. Select the required document or detail line, right-select, then select the required option from the pop-up menu to display the additional windows/dialogs or menus.
The following options are available for the document enquiry pop-up menus:
Document Row Pop-Up Menu
Detail Line Pop-Up Menu
Document Row Pop-Up Menu
-
Comments - displays the Document Comment dialog, where you can add or view a comment or additional information, i.e. a more detailed description or information about a discrepancy to the overall document.
-
Edit - displays the PSFJournal document input form window, where you can amend and post an updated version of the document. For more information, please see Editing and Reposting Documents.
-
Copy - displays the Document Input dialog, where you can create, amend and then post a copy of the document in journal format.
-
Cancel - displays the Cancel Document message. For more information, please see Cancelling/Reversing a Document/Transaction.
Additional menu items that may be displayed depending on document type or status
-
Show Remittance - displays the Reporting Services Browser window with a copy of the document remittance that can be printed or exported to Microsoft Excel.
-
Cancel Payment - displays the Reporting Services Browser window, which displays a request to cancel document message.
-
Reprint Barcode - displays the Reporting Services Browser window with the document barcode that can be printed.
-
Reprint Journal - displays the Reporting Services Browser window a copy of the journal that can be printed or exported to Microsoft Excel.
-
Cancel Receipt - displays the Reporting Services Browser window with the message that the document has been submitted for cancellation.
-
Reprint Sales Invoice - displays the Reporting Services Browser window with a copy of the sales invoice document that can be printed or exported to Microsoft Excel.
-
Reprint Sales Credit - displays the Reporting Services Browser window with a copy of the sales credit document that can be printed or exported to Microsoft Excel.
-
Reprint Sales Receipt - displays the Reporting Services Browser window with a copy of the sales receipt document that can be printed or exported to Microsoft Excel.
Detail Line Pop-Up Menu
-
Account Details - displays the Detail Enquiry window, where you can carry out different functions for the document. For more information, please see Detail Enquiry Functions.
-
Comments - displays the Detail Comment dialog, where you can add or view a comment or additional information, i.e. a more detailed description or information about a discrepancy to an individual item.
-
Edit - displays the PSFJournal document input form window, where you can amend and post an updated version of the document. For more information, please see Editing and Reposting Documents.
-
Copy - displays the Document Input dialog, where you can create, amend and then post a copy of the document in journal format.
Additional menu items that may be displayed depending on document type or status
-
Show Allocation - displays the Allocation window, where you can remove the allocation if required. For more information, please see Allocating and Unallocating Documents.