Import permanent payments (CSV)

Importing payments by CSV doesn’t offer you a preview. If the file you submit is valid, then it is imported.

You can import just about every field for a new employee using the csv importer.

Importing data will overwrite the regular pay amount for employees with matching codes.

  1. Open the required company.

  2. Go to Employees.

  3. Select Import.

  4. Select Employees.

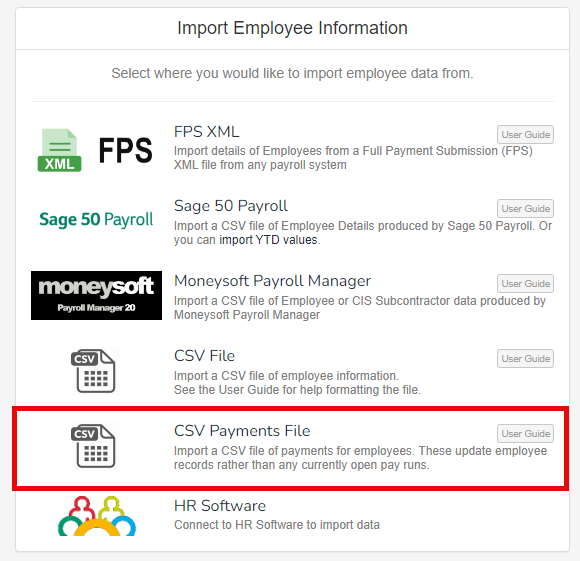
  5. Select CSV File.

  1. Select the required file.

    Once the automatic import process has completed, you receive either a success message, or a failure message. Please review the failure reason, and make any relevant changes to your prepared file before trying again.

  2. Go to Mapping Template and select a previously saved mapping, otherwise complete the information required.

Once the automatic import process has completed, you receive either a success message, or a failure message. Please review the failure reason, and make any relevant changes to your prepared file before trying again.

What are the column headings?

Find out about the column headings when importing payments.

Example...


Mapping fields

Mapping is the process of tying or matching a column on the csv file to the information in payroll. Mapping templates can be saved.

  • Type:

    • Row based: One row per Pay Element. Each row of the file represents a single pay element.

    • Column based: Each row contains multiple pay elements for a single employer.

  • Behaviour:

    • Replace current payments: Values will replace all existing payment, info for matching payroll codes.

    • Replace all lines: Values will replace all existing lines, regular pay wont be changed.

    • Append to existing lines: No data is replaced, Values will be added to existing lines.

    • Update or Append to existing lines: Lines with one (and only one) existing line with a matching pay code will be updated to the new value. All other lines will be appended as new lines.

  • Basis: 

    • Hourly Rate

    • Day Rate

    • Monthly Amount

  • My file has a header row: You can only have a single header row.

  • Has Payline Costings: Select if you wish to assign a Department and a Cost Centre to each payline.

  • Select which column of the CSV file applies to each heading.
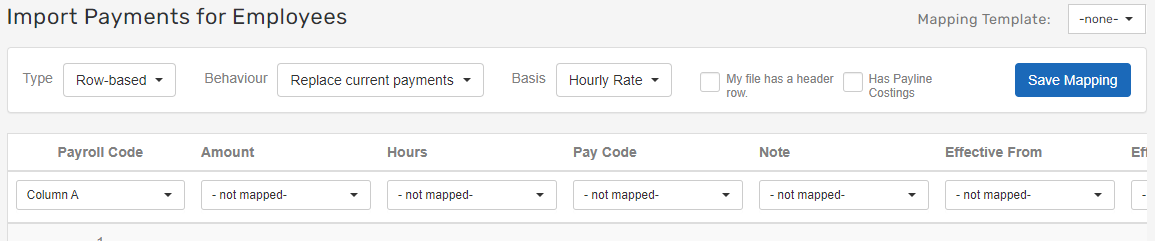
    We will try and map the field to the column automatically.

You must pay all employees in the file using the same basis, i.e., hourly, daily, or a fixed amount for the period.

All Payroll Codes present in the file must also be present in the pay run.

Any employees on the pay run who are not in the file will not be changed.

The software ignores columns on a spreadsheet if you cannot update the fields via import.

Good to know...

  • By default, we assume that whatever you’re importing is for the regular pay amount for the employee and it’ll be assigned to the relevant code if you’ve not specified another pay code.

  • You can also import multiple lines for the employee.

    To do this, you’d just have two (or more) rows in the CSV with the same employee Payroll Code.

    We highly recommend that if you do this. You also use a column to specify what Pay Code you should assign to the payment.

Import payments using a CSV file

To add employee payments, they can be imported in Every Payroll using a CSV file.

The CSV file can be created using the relevant payment fields for import, or downloading and completing the CSV Payments Import Template or CSV Additions and Deductions Payments Import Template.

If importing data for the first time, the Mapping template settings must be set during the process. These can be saved as a template for future imports. If a Mapping template is not saved, the settings need to be set each time an import is done.

To learn more about the importing process, go to How importing payments in Every Payroll using a CSV file works.

Files can also be imported from uAttend, TimeMoto, or People Planner software.

Before importing payments

Before starting a process in Every Payroll, it is important to make sure the right employer is selected.

To select the employer, check the name in the top menu. If the employer needs to be changed, select the current employer name, then select the relevant employer from Other Employers.

If importing a file where each row is used for a single payment, all the payments in the file must be paid on the same Basis as set in the Mapping template.

Import additions and deduction payments for employee records

The headings in the import file, must exactly match the payment field names.

To import addition and deduction payments on employee records for pay runs using a CSV file:

  1. Go to Employees.
  2. Select Import.
  3. Select CSV Payments File.
  1. Upload the file with the payment information.
  2. A preview of the data from the uploaded file displays. The last Mapping template you used is selected automatically. Check the data in the columns matches what you expect. If the matches are not as expected, select different Mapping template settings.
  3. To import all the payments, select Import data.
  4. If there are rows with errors, they are rejected and not imported. Fix the errors, then try to import them again.

Importing payments for a specific pay run

Use this method to import payment amounts directly into an open pay run. If the Import Payments button includes ASYNC in the label, then use the Import payments (Async) steps.

Payments can only be imported for an open pay run. The status of the pay run can be checked on

Import payments

  1. Go to Payroll.
  2. Select the pay run the payments are for.
  3. Select Import Payments.
  4. Select CSV File for Month.
  1. Upload the file with the payment information.
  2. A preview of the data from the uploaded file displays. The last Mapping template you used is selected automatically. Check the data in the columns matches what you expect. If the matches are not as expected, select different Mapping template settings.
  3. To import all the payments, select Import data.
  4. Do not close or leave the page while the data is being imported. When it has been imported, a status message will display to confirm if the import was successful or if some of the data was rejected due to errors.
  5. If there are rows with errors, they are rejected and not imported. Fix the errors, then try to import them again.

Import payments (Async)

  1. Go to Payroll.
  2. Select the pay run the payments are for.
  3. Select Import Payments (Async Beta).
  4. Select CSV File for Month.
  1. Upload the file with the payment information.
  2. A preview of the data from the uploaded file displays. The last Mapping template you used is selected automatically. Check the data in the columns matches what you expect. If the matches are not as expected, select different Mapping template settings.
  3. To import all the payments, select Import data.
  4. The system will import the data. When it has been imported a message will be displayed at the bottom of the page. If you closed the page, or went to another area in the software, the status of the import can be checked in System Tasks.

    The information relates to the Import Overview that shows error reporting for payment imports feature. This is in Beta testing as of August 2026. If you would like to join the Beta group, contact your account manager.

  5. If there are rows with errors, they are rejected and not imported. Fix the errors, then try to import them again.