Importing ScholarPack Data
Do not follow this process if you have the ScholarPack Cloudlink installed as this results in duplicate data. To check your settings, select Imports > Imports. If no Cloudlink imports exist, follow the instructions in this topic.
These instructions should be followed if you are manually importing data from ScholarPack into IRIS ParentMail or you want to view what data has been imported.
We highly recommended installing the ScholarPack Cloudlink for automatic overnight syncing as this prevents the need to manually import data. For more information, go to Set Up ScholarPack MIS Link.
Export Data from ScholarPack
- Log into ScholarPack, then select Admin.
- Select Config, then Data Exports.
- Search for ParentMail, then select SP_ParentMail_Parent_Student.csv.
- Select Generate CSV to produce and downloaded the report to your internet browser.
- When the report has downloaded to your browser, open the report, select File > Save, specify the required location, then select Save.
Export Staff Data from ScholarPack
- Log into ScholarPack, then select Admin.
- Select Config, then Data Exports.
- Search for ParentMail, then select ParentMail SP_ParentMail_Staff.csv.
- Select Generate CSV to produce and downloaded the report to your internet browser.
- When the report has downloaded to your browser, open the report, select File > Save, specify the required location, then select Save.
Import ScholarPack Data in IRIS ParentMail
Data being imported in IRIS ParentMail must not have duplicate IDs. For example, if a person and student both have 100100 as the Student ID and Contact ID, the details in IRIS ParentMail are overwritten and incorrect relationships applied.
Before importing your ScholarPack data, you must check you do not have any duplicate IDs for any person, i.e, students, staff, or a person responsible for a student. If your data has duplicate IDs, you must log a support ticket (a Service Cloud account is required) and attach a password protected version of the import data file. Our Support Team can then assist with the import.
- Select Imports > Create Import.
-
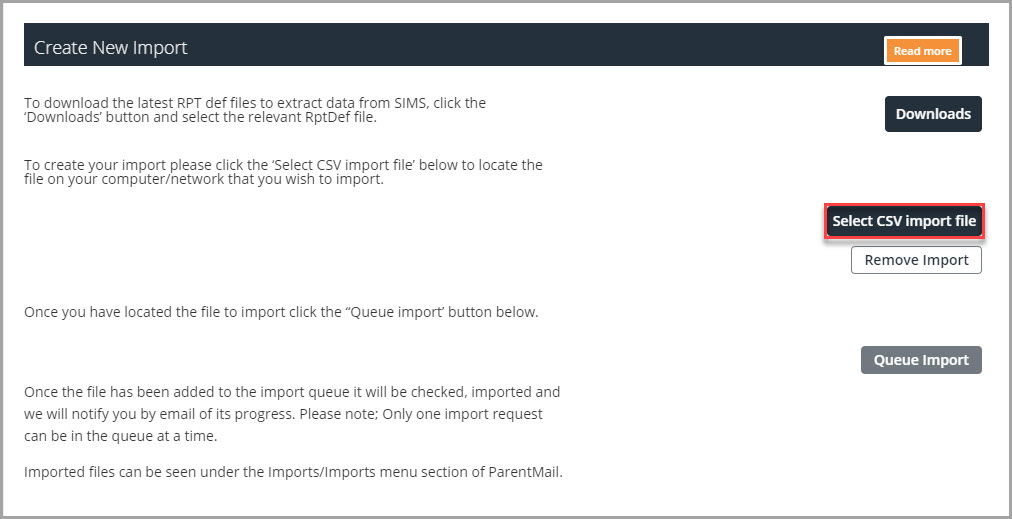
The Create New Import page is displayed. Select Select CSV Import File.

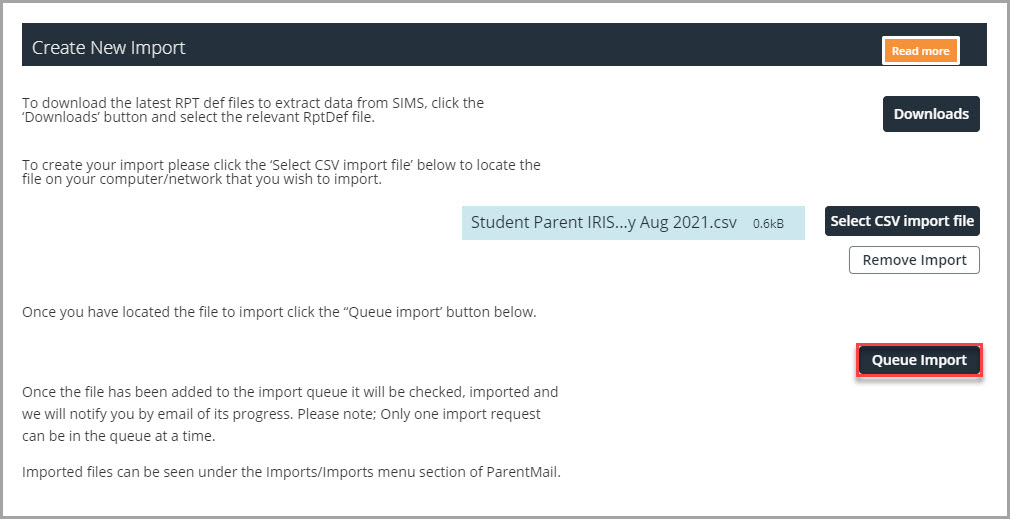
- Find the ScholarPack report, then select Open. The name of the CSV file is displayed.
-
Select Queue Import.

- When the file has been imported you are notified by email of the progress. To view imported file details, select Imports > Imports.
-
When the data has been imported, IRIS ParentMail produces a rejected records report with details of any data that could not be imported and the reasons why. For more information, go to Run Rejected Records Reports .
If you require any assistance with importing, select Live Chat to contact the Technical Support Team.