Process a Non-Order Invoice
IRIS Financials V7 instructions
Non-order invoices are goods or services that have been requested but do not go through the purchase order process in IRIS Purchasing. IRIS Invoice Matcher allows non-order invoices to be processed in a similar way to purchase order invoices.
To process non-order invoices in an efficient manner, suppliers need to send invoices to a dedicated non-order invoice email address, which is set up as part of your onboarding process.
Processing a non-order invoice consists of the following:
- Overview of the Non-Order Invoice Process
- Receiving a Non-Order Invoice in IRIS Invoice Matcher
- Manually Uploading an Invoice to IRIS Invoice Matcher
- Manually Verifying an Invoice
- Coding the EPI (Electronic Purchase Invoice) Document
- Approving/Rejecting the EPI
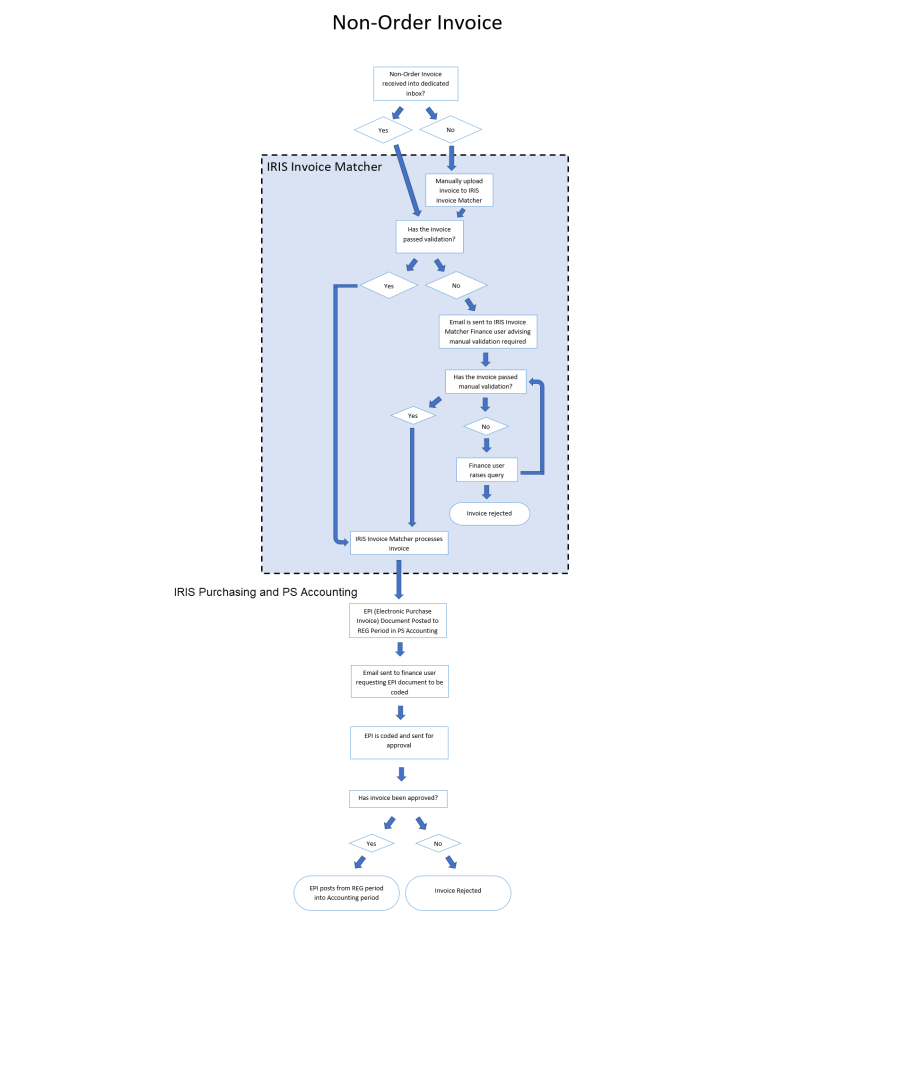
Overview of the Non-Order Invoice Process
The non-order invoice process begins when you receive an invoice from a supplier. If the supplier emails the invoice to the dedicated email address your organisation created as part of the IRIS Invoice Matcher onboarding process, the document automatically goes through the validation process.
If the supplier has posted the invoice or sent it to a different email address, you need to manually upload it to IRIS Invoice Matcher before the validation process begins.
When the invoice has been validated - either automatically or manually, an Electronic Purchase Invoice (EPI) document is posted in PS Accounting to the Register period against a new suspense nominal ready to be coded.
An email is sent to a finance user requesting they code the invoice in PS Accounting, which sends it for authorisation by the applicable authoriser.
Once the document has been authorised, it automatically moves from the Register period into an accounting period. If the document is rejected, you can remove it from the Register period and reverse it within PS Accounting.
The following graphic illustrates the process:
Receiving a Non-Order Invoice in IRIS Invoice Matcher
The most efficient way for non-order invoices to be processed is if the supplier sends their invoices to the dedicated non-order email account that is set up during the onboarding process.
Contact all suppliers and request they email any invoices generated without a purchase order to the dedicated email account. You can extract a list of supplier email address from PS Accounting to assist with this. For more information, please see Obtain a List of Supplier Email Addresses and Globally Email Suppliers in our Knowledge Base.
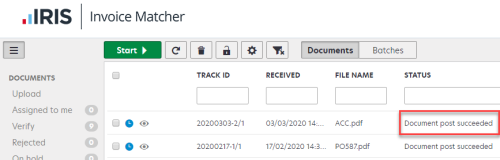
If the supplier emails the invoice to the dedicated non-order invoice address, IRIS Invoice Matcher automatically attempts to validate the invoice. If the invoice passes validation, it automatically posts the applicable Electronic Purchase Invoice (EPI) in PS Accounting and an email is automatically sent to the applicable finance user requesting they code the invoice.
Documents which have been successfully posted to PS Accounting/IRIS Financials display the status of Document post succeeded.
If the invoice fails validation, an email is sent to the applicable finance user to manually complete the validation.
The main reasons an invoice could fail validation are:
- Unrecognised supplier invoice format.
- Missing key information on the invoice.
Manually Uploading an Invoice to IRIS Invoice Matcher
If a supplier sends an invoice to another email address, or via post you need to manually upload the non-order invoice to IRIS Invoice Matcher. If you do not have access to IRIS Invoice Matcher, then you need to speak to the person in your establishment/organisation who has an admin login who can provide you with access.
- Log in to IRIS Invoice Matcher using your User name and Password.
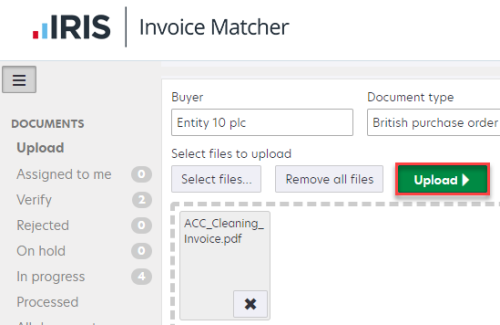
- The IRIS Invoice MatcherHome page is displayed. Select Upload from the DOCUMENTS section of the left-hand menu.
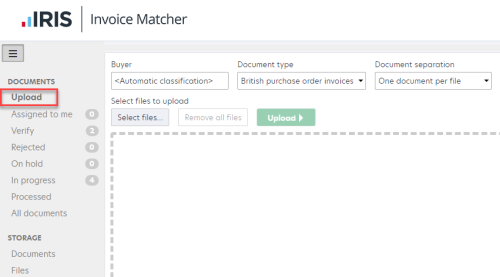
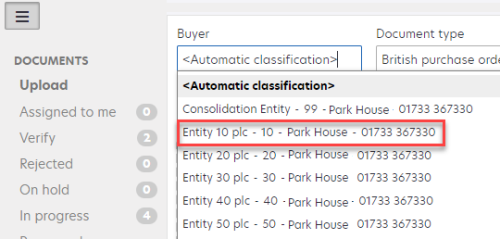
- Select the applicable location from the Buyer drop-down list. This should be the location or entity that is to be invoiced.
- Select British expense invoices from the Document type drop-down menu.
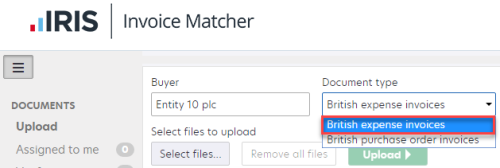
- The Document separation drop-down determines whether the attachment you are uploading contains one or multiple invoices. Select an option from the following:
One document per file - The file being uploaded contains a single invoice, even if it contains multiple pages.
Multiple documents per file - The file being uploaded contains multiple invoices.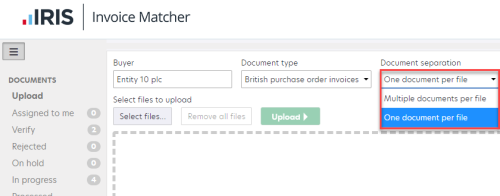
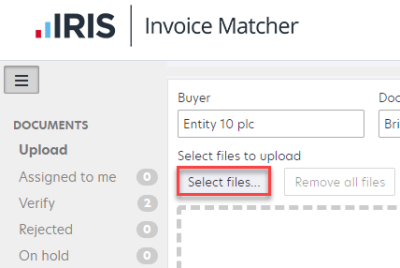
- Next, to select the files to be uploaded, click Select files....
- The Open dialog is displayed. Find and select the invoice that you want to upload, then click Open.
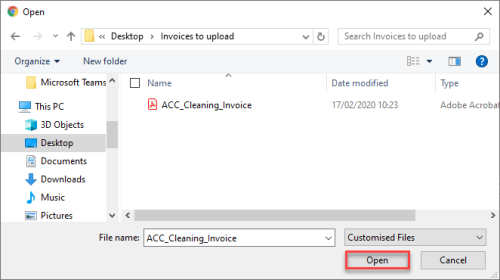
- The file displays on the page, which means it is ready to upload. You can select multiple files on this page.
The maximum number of invoices you can upload at once is 100. If you attempt to upload more than 100, the following error message is displayed.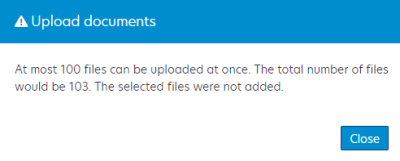
- Click Upload to upload the invoice(s).
A message is displayed to indicate the file(s) has successfully uploaded.
IRIS Invoice Matcher then attempts to validate the invoice. If the validation is successful, the applicable finance user for your establishment/organisation receives an email requesting the invoice to be coded in PS Accounting. You can ignore the Manually Verifying an Invoice section and read Coding the EPI (Electronic Purchase Invoice) Document.
Manually Verifying an Invoice
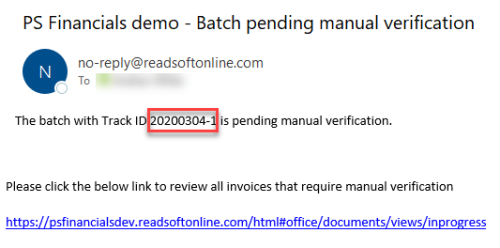
If IRIS Invoice Matcher is unable to validate the invoice, an email is sent to the applicable finance user requesting that they review the invoice.
The email contains the Track ID number, which can be referenced in IRIS Invoice Matcher. It also contains a link, which takes you straight to the Verification view within IRIS Invoice Matcher. This allows you to quickly access the document to complete the verification.
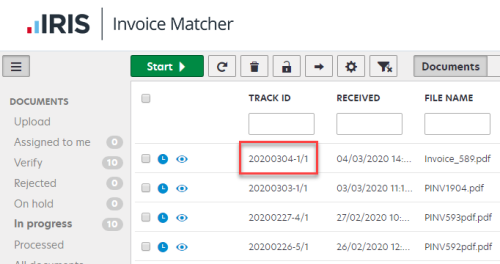
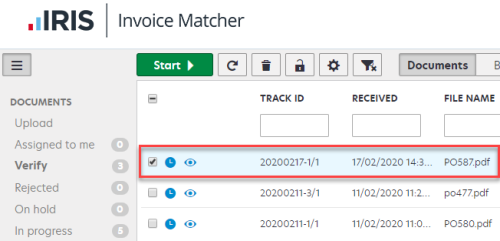
- Select Verify from DOCUMENTS in the left-hand menu, then select the invoice you want to verify. A tick is displayed in the selection check box on the invoice line.
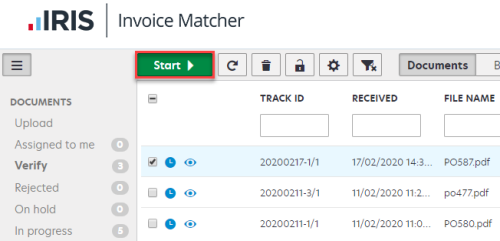
- Click Start to open the Document View page.
The Document View page displays the invoice and the data mapping fields. Any fields highlighted in amber need to be verified. A full list of the Document View controls can be found in Document View Controls.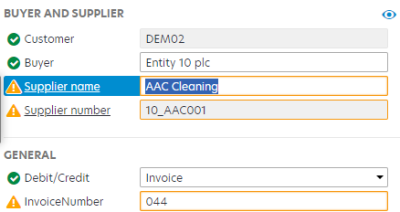
-
When all fields have been verified, click OK. IRIS Invoice Matcher then posts an Electronic Purchase Invoice (EPI) in PS Accounting to the Register period ready for coding.
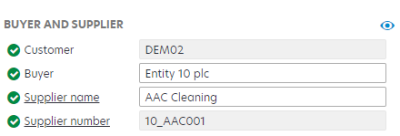
Verifying Buyer and Supplier Section
- Click on a field name to display the applicable search window.
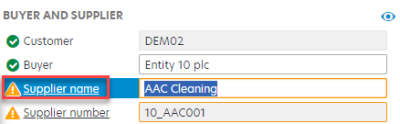
For example, clicking on Supplier name displays the Search suppliers window.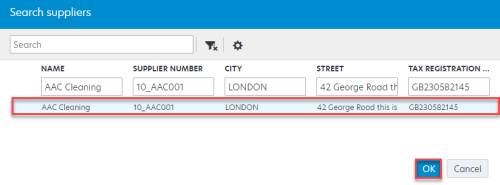
- Select the applicable supplier from the list, then click OK. Verifying the Supplier name also verifies the Supplier number.
Verifying the General Section
The General section contains information which links the invoice to your IRIS Financials system.
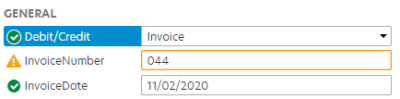
- Debit/Credit should default to Invoice. If for any reason, it is displaying Credit, click the drop-down list and select Invoice. Please do not select Credit as credit notes are not supported in IRIS Invoice Matcher.
- The InvoiceNumber automatically displays the invoice number if recognised on the invoice.
If it is not recognised, you can enter the invoice number in InvoiceNumber, then press the Tab key to validate.
Alternatively, you can show IRIS Invoice Matcher where the invoice number is. For more information, please see Re-assign Document and Line Item Fields.
The invoice number is displayed in Description in PS Accounting. - The InvoiceDate is the date of the invoice. This must match the date on the actual invoice.
Verifying the Amount Section
The amount section contains the financial values of the invoice.
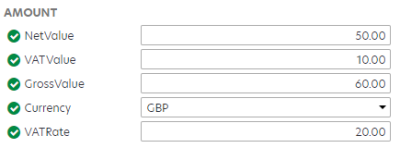
These values do not usually require validation, but we would recommend double-checking them to ensure they are correct. To verify the Amount section:
- The NetValue is the total of all items on the invoice excluding VAT. Overwrite this value if the information is incorrect or re-assign to the applicable part of the invoice. For more information, please see Re-assign Document and Line Item Fields.
- The VATValue is the total amount of VAT payable on the invoice. Overwrite this value if the information is incorrect or re-assign to the applicable part of the invoice.
- The GrossValue is total value of all items on the invoice including VAT. Overwrite this value if the information is incorrect or re-assign to the applicable part of the invoice.
- The Currency is the currency of the invoice. This drop-down list is populated via Masters > Currencies in PS Accounting.
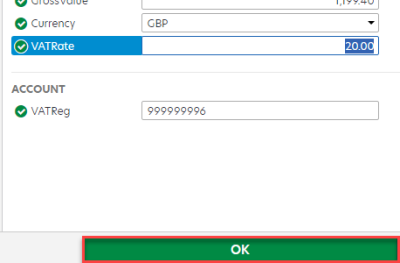
- The VATRate is the percentage rate of VAT on the invoice. Overwrite this value if the information is incorrect or re-assign to the applicable part of the invoice.
Verifying the Account Section
The Account section on IRIS Invoice Matcher contains the VAT registration number for the supplier.

To verify the VAT Registration number if required:
- Overwrite this value if the information is incorrect or re-assign to the applicable part of the invoice.
- When all fields have been verified click OK.
IRIS Invoice Matcher then posts an EPI document to PS Accounting. The EPI is posted to the Register period and to a nominated suspense nominal until it has been coded.
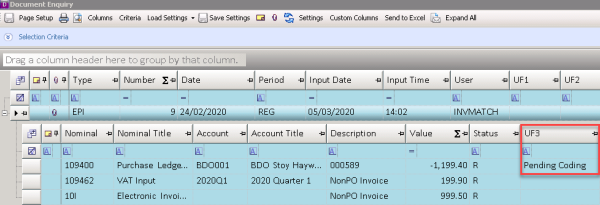
Coding the EPI (Electronic Purchase Invoice) Document
After the non-order invoice has been validated, IRIS Invoice Matcher posts an EPI document into PS Accounting. The EPI is posted to the Register period, where it needs to be coded by an applicable finance user.
The EPI document displays Pending Coding in Userfield 3 (UF3) when the document is expanded.
The applicable finance user receives an email stating an invoice is ready to be coded, which contains two links:
View the Document - Directs you to the invoice coding document input form to code the invoice.
View the Invoice - Displays the invoice in a new window.
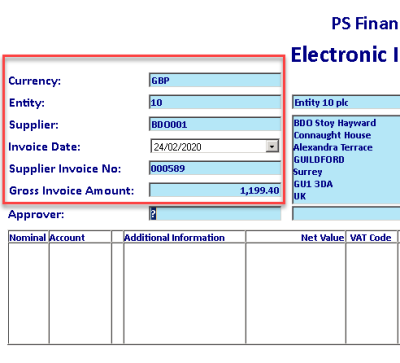
- Click on the View the Document link, which opens the EPI document on the coding page.

- The header fields are already populated with the details entered in IRIS Invoice Matcher, as shown in the following graphic. You can change these by double-clicking on the applicable field and selecting a new record, or overwriting the existing information.
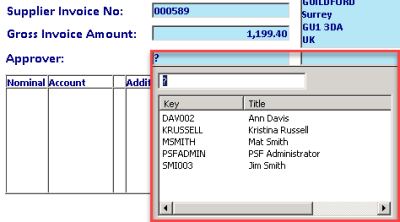
- Double-click in Approver, then select the applicable approver.
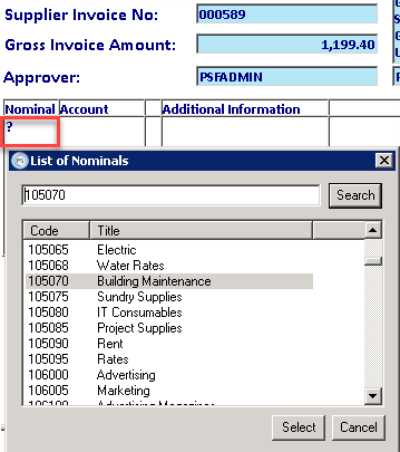
- Double-click in Nominal, then select the applicable nominal from the List of Nominals dialog.
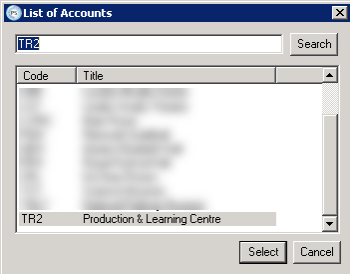
- If the nominal being used is linked to a ledger, you need to select an account. Double-click in Account, then select an account from the List of Accounts dialog.
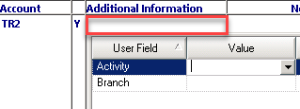
- Additional Information only needs to be completed if you use Detail Analysis Fields (DAF's). This is typically found in our Charity and Commercial database standard. Double-click in Additional Information, then select an applicable DAF from the Value drop-down list.
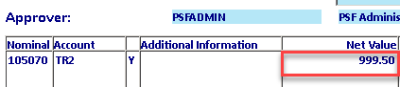
- Enter the total amount of the goods or services, excluding VAT, in Net Value. You can use multiple lines if you have received multiple goods or services on a single invoice.
- Double-click in VAT Code, then select the applicable tax type from the list.
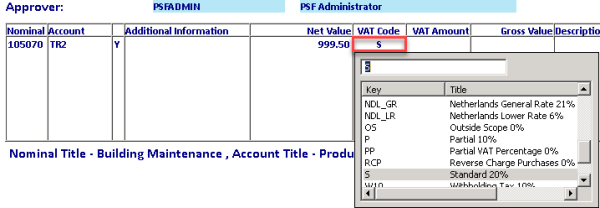
- The VAT Amount and Gross Value are automatically populated using the Net Value and VAT Code information entered.
- Enter the description shown on the actual invoice in Description.
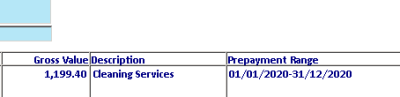
- If applicable, enter the prepayment start and end date in Prepayment Range. The following graphic shows the correct format that must be used.
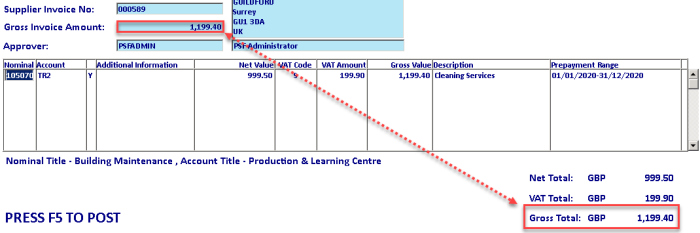
- Repeat for any additional lines on the invoice and press F5 to post. The Gross Total at the bottom of the invoice should match the Gross Invoice Amount on the header of the document.
- You can close the document input windows or choose another document to process.
An email is sent to the approver selected to authorise the EPI and the document status is updated to Coded.
Approving/Rejecting the EPI
Once the EPI has been coded, an email is sent to the applicable authoriser to authorise or reject the document.
To authorise or reject the invoice, you can click on the link in the email or search for the invoice in IRIS Purchasing. Both methods are explained further in this section.
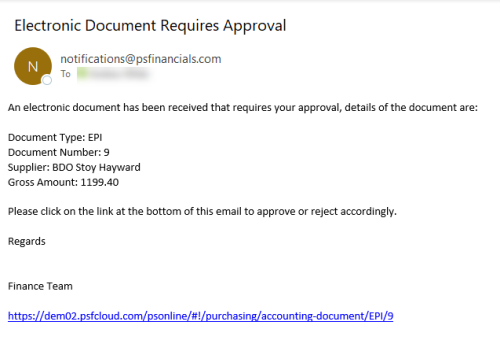
Approving using the email approval link
The EPI approver receives an email advising an EPI document requires approval. This email contains the document number, supplier, and gross amount.
- Click on the link in the email to open IRIS Purchasing.
- If you are already logged in to IRIS Purchasing, the EPI authorisation page is displayed. If you are not logged in, the IRIS Purchasing Login page is displayed, where you must enter your credentials.
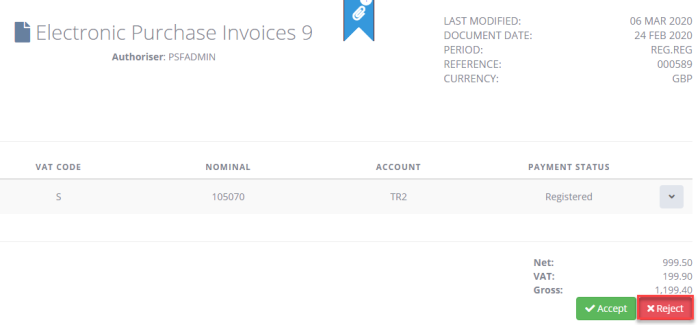
- The EPI details are displayed on the page. You can view a copy of the invoice by hovering over the attachment icon, then clicking on the attachment title, as shown in the following graphic.
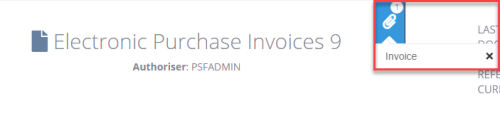
- The invoice is displayed in a new tab on your internet browser.
- To approve the invoice, click Accept on the EPI document approval page. This releases the document from the Register period and posts to the books to the specified nominal and account.
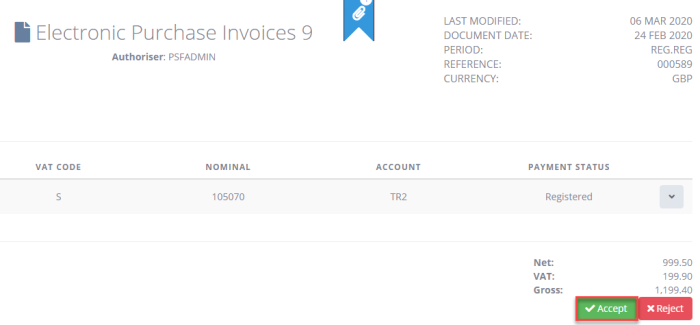
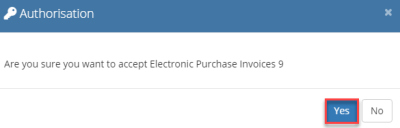
- The Authorisation window is displayed asking you to confirm you want to accept the EPI document. Click Yes to confirm or No to return to the EPI document approval page.
- A message is displayed confirming the invoice has been accepted.

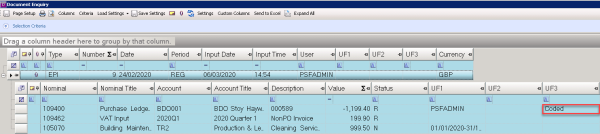
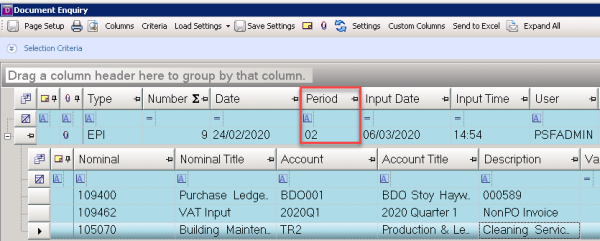
- In PS Accounting, the EPI has been moved from the Register period into an Accounting period, as shown in the following graphic.
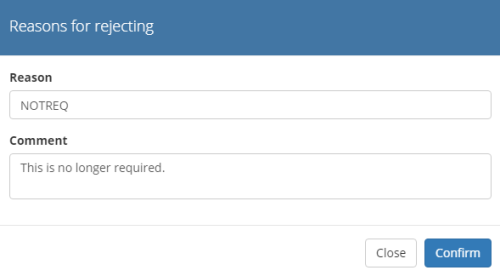
Rejecting the invoice
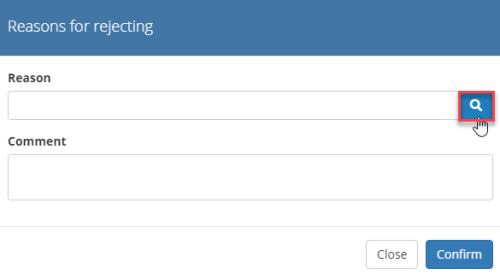
- To reject the invoice, click Reject.
- The Reasons for rejecting dialog is displayed. Click on the Search icon, as shown in the following graphic.
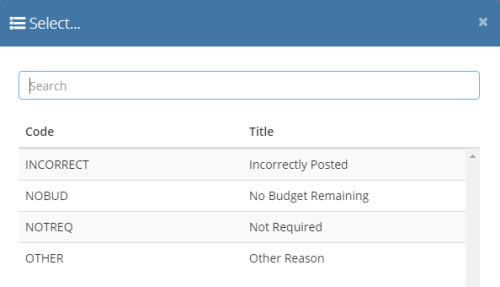
- Select a reason from the Select list. If an applicable rejection reason is not available, you need to add it. For more information, please see Add New Cancel or Reject Item/Document Reasons for IRIS Purchasing in our Knowledge Base.
- Enter an explanation in Comment, then click Confirm.
- A message displays confirming the EPI document has been rejected.

- The EPI remains in the Register period in PS Accounting. You have two options:
- Request a credit note from the supplier. When the credit note arrives, you can move the EPI out of the register period manually and allocate the two documents together. This ensures the document is not paid in error.
- Make any changes required to the EPI document using the Change Document function. You can then use the re-poll feature in IRIS Purchasing to repoll the EPI to re-send for approval.
For more information, please see Process an Invoice that has been Rejected in Error.