Creating a new bank account
This guidance is only for IRIS Financials Version 7.0.2103 or earlier. If using version 7.0.2223 or later, go to Add Bank Accounts to IRIS Financials.
If your establishment / organisation has additional bank accounts or open a new bank account, an account for the bank account can be set up in IRIS Financials to which payments can be recorded, imported, and reconciled.
When adding the details of a new bank account, you also need to set up a suitable bank nominal to which the new bank account is then assigned.
Adding a bank account consists of the following:
Creating a bank account nominal
Creating an account for the bank account
Setting the bank account as the default bank account
Creating a bank account nominal
Before creating a new bank account, you need to ensure you have an applicable nominal set up to assign to the new account.
Do not use a bank nominal that is already linked to or has been used for an existing bank account, or that has existing posted documents against the nominal.
Creating a bank account nominal consists of the following steps:
Checking for an available bank nominal
-
Go to Maintenance, then select Nominals from the menu.
-
The Nominal Maintenance window is displayed. Find the bank nominals group for your establishment / organisation
If a nominal already exists in the bank nominal group (9400 - 9409) that is not in use with a bank account, then you may want to rename the nominal and link it to the new bank account.
Creating the core nominal
If there are no available bank nominal codes, then you need to create a new one.
-
Go to Maintenance, then select Keylists from the menu.
-
The Keylist Maintenance window is displayed. Select
-
Next, enter the core (
-
An Update complete message is displayed. Select OK to close the message and return to the previous window.
Creating the nominal
When the core nominal has been created the nominal can be created.
-
Go to Maintenance, then select Nominals from the menu.
-
The Nominal Maintenance window is displayed. To create the new nominal, select ADD NEW, then select NOMINAL. A <New item> is displayed in the left-hand panel and automatically selected.
If the new nominal has the same settings as an existing nominal, you can copy the existing nominal to create the new nominal. On the Nominal Maintenance window, select the nominal you want to copy from the left-hand panel, select ADD NEW, then select NOMINAL (COPY).
-
Next, enter the code for the nominal(location and core nominal code) in Nominal
-
Next, select the nominal type as Balance Sheet from the Type drop-down list. Then, to determine the state of detail lines when documents are posted to the nominal, select Open External from the Initial State drop-down list.
-
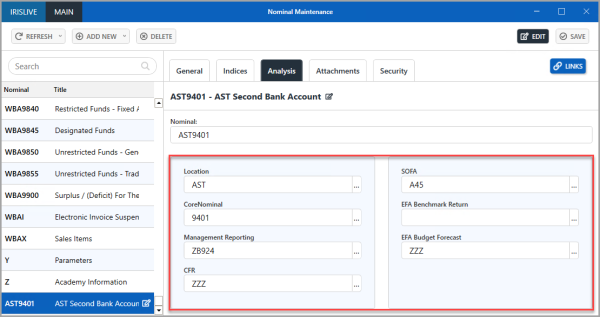
Select the Analysis tab, then complete all of the analysis fields. Select ... in the analysis field, then double-select to select the required option from the displayed field dialog. Typical analysis field codes are as shown in the following graphic.
If you are unsure which option to select for an analysis field, please contact the person within your establishment/organisation who administers your system, such as a CUSTADMIN user.
-
Next, select the Indices tab. If you have the latest EFA Budget Forecast index, select EFABFR201819 - EFA Budget Forecast 201819 from the Indices list, then select 700BS - Cash at bank and in hand from the Values panel.
-
Next, select NOMTYPE - Nominal Type from the Indices panel, then select B/S - Balance Sheet from the Values panel.
-
Finally, set the security roles for the nominal to determine which users can view, modify, and post to the nominal. Select the Security tab, select Drill (...) in View, Modify, Post, and Add ledger, then double-select to select the required security role from the Select a role for Nominal dialog.
For more information, refer to Overview of security roles.
If no security roles are selected, then all users with appropriate access levels can carry out all the functions (view, modify, post, add a ledger etc.) -
When you have completed all the required details for the nominal, select SAVE.
-
An Update complete message is displayed. Select OK to close the message and return to the previous window.
Creating an account for the bank account
An account for a bank account must be created on the following ledgers:
-
Bank Accounts - is used to import and reconcile the bank account.
-
Bank Ledger - is used to create a BACS file to make payments from the bank account.
-
Location Bank Ledger - is used to post accounting transactions (e.g. a Nominal Receipt) to the bank account.
Follow the instructions for each of the required ledgers:
Creating the account for the Bank Account ledger
-
Go to Banks, then select Bank Accounts from the menu.
-
The Bank Account Maintenance window is displayed. To create an account for the bank account, select ADD NEW, then select BANK ACCOUNT. A <New item> is displayed in the left-hand panel and is automatically selected.
If the new account has the same settings applied to an existing account, you can copy the existing account to create an account for the new bank account. On the Bank Account Maintenance window, select the bank account you want to copy from the left-hand panel, select ADD NEW, then select BANK ACCOUNT (COPY).
-
Enter the bank account number in Bank account, the sort code for the bank account in Sort code (do not enter any spaces or hyphens), and the name of the bank account in Title.
-
Next, select the nominal to which the bank account is to be linked. Select ... in Nominal, then double-select to select the required nominal from the Select a nominal dialog.
Do not use a bank nominal that is already linked to or has been used for an existing bank account, or that has existing posted documents against the nominal. A new nominal must be created for the bank account. For more information, refer to Creating a bank account nominal.
-
If there are funds in the bank account, enter the value of the funds in Balance, for example, 1000.00 (do not enter any currency symbols, £, $, and so on), then select SAVE.
-
An Update complete message is displayed. Select OK to close the message and return to the previous window.
Adding the bank account to the Banks ledger
-
Go to Maintenance, then select Accounts from the menu.
-
The Select a ledger dialog is displayed. Double-select to select the BANKS - Banks Ledger.
-
The Account Maintenance window is displayed. To add the bank account details, select ADD NEW, then select ACCOUNT. A <New item> is displayed in the left-hand panel and is automatically selected.
If the new account has the same settings applied to an existing account, you can copy the existing account to create an account for the new bank account. On the Account Maintenance window, select the bank account you want to copy from the left-hand panel, select ADD NEW, then select ACCOUNT (COPY). -
Firstly, enter the bank account number in Account, then enter the title of the bank account in Title.
-
Next, set the security roles for the bank account to determine which users can view, modify, and post to the account. Select the Security tab, select Drill (...) in View, Modify, and Post, then double-select to select the required security role from the Select a role for Account dialog. For more information, refer to Overview of security roles.
If no security roles are selected, then all users with appropriate access levels can carry out all the functions (view, modify and post).
-
When you have completed all the required details for the bank account, select SAVE.
-
An Update complete message is displayed. Select OK to close the message and return to the previous window.
Adding the bank account to the location Bank ledger
-
Select Maintenance, then select Accounts from the menu.
-
The Select a ledger dialog is displayed. Double-select to select the required bank account ledger for your >establishment/organisation location.
-
The Account Maintenance window is displayed. To add the bank account details, select ADD NEW, then select ACCOUNT. A <New item> is displayed in the left-hand panel and is automatically selected.
If the new account has the same settings applied to an existing account, you can copy the existing account to create an account for the new bank account. On the Account Maintenance window, select the bank account you want to copy from the left-hand panel, select ADD NEW, then select ACCOUNT (COPY).
-
Firstly, enter the bank account number in Account, then enter the title of the bank account in Title.
-
Next, select the Indices tab, select FUNDTYPE - Fund Type from the Indices list, then select the required fund type from the Values panel. If you are unsure which fund type option to choose, select XNODET - No Detail Selected or Required.
-
To link the bank account to the bank nominal, select the Analysis Fields tab, then enter the nominal code in Bank Nominal.
-
Next, set the security roles for the nominal to determine which users can view, modify, and post to the nominal. Select the Security tab, select Drill (...) in View, Modify, and Post, then double-select to select the required security role from the Select a role for Account dialog. For more information, refer to Overview of security roles.
If no security roles are selected, then all users with appropriate access levels can carry out all the functions (view, modify, post and so on).
-
When you have completed all the required details for the bank account, select SAVE.
-
An Update complete message is displayed. Select OK to close the message and return to the previous window.
Setting the bank account as the default bank account
When you have created the account for the bank account on the bank ledger, you can set the bank account as the default bank account for your establishment / organisation. For more information, refer to Set the default bank account for a location.