ID Print Configuration for Ringdale Server Printers
Before configuring ID Print with your Ringdale Server printer, you must have installed the correct licence, setup the server, and set up any required log files.
Server and Printer Setup
FollowMe Web Admin Setup
The Ringdale FollowMe server needs to be configured before IRIS BioStore will be able to connect to it. Follow these steps to progress with the setup:
-
The printer IP address will need to be entered in the Management > Printers section of the FollowMe Web Admin tool. Ensure the IP address is entered under both the FollowMe Print Spooler and the FollowMe Device sections.
-
To allow IRIS BioStore to connect to the print server, go to Tools > Options > FollowMe API Access. Add the IP address of the server running ID Print.
Sharing a printer
There are a variety of ways to connect to the Ringdale print server, however the simplest method is by using a Shared Printer Port. Use the following steps to set up a shared printer port:
-
Go to the Ringdale Program Files folder on the print server and open SharedPrinterAdmin.
-
Select the relevant printer from the dropdown menu, and then select Use Print Job Username. Click OK to close the window.
-
Go to the printers section of the Windows Control Panel, and right click the printer added to Ringdale. Select Printer Properties.
-
Select Ports > Add Port...
-
Select FollowMe Shared Printer Port and then click New Port...
-
Ensure the FollowMe Shared Printer Port is ticked, and then click OK.
Connecting to a printer from another machine
-
Add the printer (using the printer's IP address, not the server).
-
Right click the printer and select Printer Properties > Ports.
-
Ensure the FollowMe Shared Printer Port is selected. Also check that the Port for this option matches the print server IP address.
Configure ID Print with the printer
Select the Configuration tab to configure the Ringdale server credentials and the mapping between IDPoints and printers.
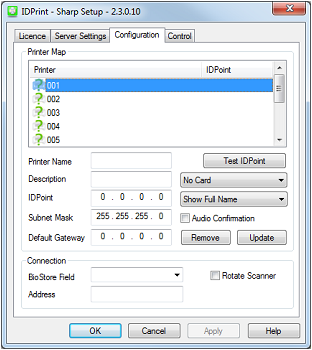
Ringdale Print Server Address - Enter the IP Address of the Ringdale print server.
Printer Configuration
Printer - Either enter the IP Address of the printer being set up, or alternatively click the Choose Printer button, which will generate a list of printers connected to the Ringdale print server.
Description - Enter a suitable description for the printer, such as the location. This will make it easier to find if further configuration is needed.
IDPoint IP Address, Subnet Mask and Default Gateway - Enter these settings in the relevant boxes.
Card Formatting - If cards are to be used with the ID Print system, select either decimal or hexadecimal formatting from the dropdown list.
Show or Hide Staff Names - Full staff names are shown by default on IDPoints, however this can be changed if required, using the dropdown list. The options are as follows:
-
Show Full Name: Show the full first and last name for staff members, for example, Joe Bloggs.
-
Hide Staff First Name: Hide the first name of staff members, for example, Bloggs.
-
Show Initial and Surname: Show only the first character of staff first names, and their surname, for example, J Bloggs.
Audio Confirmation - Tick this checkbox to enable an audible sound from the IDPoint upon positive identification of a user.
Rotate Scanner - This option should be used if better identification results are received when using the finger scanner upside down. This may be the case when finger scans have been enrolled on a scanner configured to use a different orientation.
Click Update to update the Printer Map list with any newly added settings.
To remove a mapped printer from the list, select the printer and click the Remove button.
No changes will be applied until the Apply button is clicked and the IDPrint service is restarted