Using Log Files
If you encounter any issues with your IRIS BioStore implementation, it can be very useful to send a log along with any support request.
Logs are not turned on by default; this needs to be done manually, although it's recommended to leave logging at a low level (1 or 2) after installation, to catch any future issues.
Once logging is turned on, the application keeps a log of important events, appropriate to the level of logging that has been selected. There are 5 levels, with level 1 being the lowest level available (only logging serious errors), and level 5 being the highest (includes information included in levels 1-4 and other trivial information). It's recommended to leave logging at a low level unless you're attempting to track down a problem.
IRIS BioStore logs will store up to 1MB of information at a time. Once this limit is reached, the log is archived, and a new log will be started.
Change the level of logging

You can set the level of logging from ID Print Setup’s Server Settings tab. The available log levels are detailed below:
-
No Error Logging - This is the default option. No logs will be kept if this option is selected.
-
Level 1 - Serious Errors - Only log errors that occur in the IRIS BioStore system, which should be addressed immediately.
-
Level 2 - Include Warnings - Add warnings to the log, in addition to the information from Level 1.
-
Level 3 - Include Some Trace Information - Include normal tracing information about the IRIS BioStore software in the log, in addition to the information from the previous levels.
-
Level 4 - Include Most Trace Information - Include verbose tracing information about the IRIS BioStore software in the log, in addition to the information from the previous levels.
-
Level 5 - Include All Trace Information - Include trivial tracing information about the IRIS BioStore software in the log, in addition to the information from the previous levels.
Select the level you want, and then click Apply. Any changes you make will be applied when the ID Print service is started or restarted, which can be done from the Control tab.
View the log file

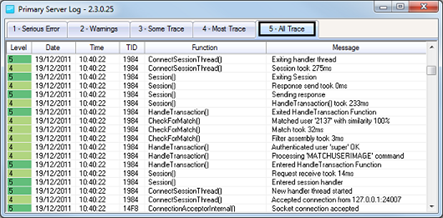
You can view the log file by selecting the View Log button under the Server Settings tab of ID Print Setup. Selecting this button will open the log viewer.

The log file will display up to 1MB of information at a time. Once this limit is reached, the current log file is archived and a new log file is started.
You can filter the log by selecting one of the levels displayed at the top of the log viewer window. Note that each level incorporates the previous levels, that is, Level 5 will display all logging information through levels 1-5. The information included in the log depends on the log level that has been selected.
Locate archived log files
Each IRIS BioStore application saves log files to one of the following directories (You may need to enable the show hidden files and folders option in Windows Explorer to view these):
-
Windows 7/8: C:\ProgramData\BioStore Solutions
-
Windows XP: C:\Documents and Settings\All Users\BioStore Solutions
These directories can also be accessed with the following variables:
-
Windows 7/8: %ProgramData%\BioStore Solutions
-
Windows XP/7/8: %AllUsersProfile%\BioStore Solutions
The default location for log files is %ProgramData%\BioStore Solutions\Biostore\.
Log files will be saved in the following format:
-
Current log file: [appName].bslog - for example, idprint.bslog
-
Archived log files: [appName][Date and time that the log was archived].bslog - for example, idprint(07-02-2013 05-42-20).bslog
Log files can be opened in a text editor, such as Notepad, or in IRIS BioStore's log viewer. To open an archived log in IRIS BioStore's log viewer, navigate to the Program Files directory where ID Print is installed, open IDLogView.exe, and select the archived log you want to open.
Reset the current log file

You can reset the log file by selecting the Reset Log button under the Server Settings tab of ID Print Setup. Selecting this button will archive the current log file and start a new one.
No data is deleted when you reset the log. The data that was stored in the current log file will be archived. You can view archived logs at any time.
Resetting the log can be useful for troubleshooting purposes, to clear earlier events.
Delete log files

You can delete all the log files for ID Print by selecting the Delete All Log Files button under the Server Settings tab. Selecting this button will delete all archived log files that were created by ID Print.
You cannot undo this action. The current log file will be unaffected.
We recommend the log level is set to a low level (1 or 2) for general usage. This is because higher log levels will capture a greater number of events, potentially taking up a significant amount of storage space. If you want to delete log files, or a subset of log files (for example, over a week old), this has to be done manually. Navigate to your log file archive, and delete the .bslog files you do not want to keep. These files are not required; you can delete them at any time.