ID Print Configuration for PCounter Printers
Before configuring ID Print with your PCounter printer, you must have installed the correct licence, setup the server, and set up any required log files.
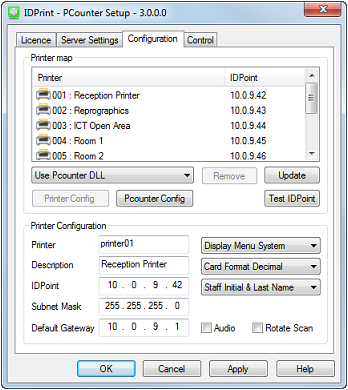
Select the Configuration tab to configure the mapping between the PCounter printers and the IRIS BioStore IDPoints.

To configure a Printer Map select one of the IDPoints in the list.
There are three options to select how ID Print connects to the Pcounter server:
- Use Pcounter DLL - Use the IDPoint as a job management terminal, allowing users to print and delete their jobs and check their balance from the IDPoint.
- Use Receiver Interface - Use the IDPoint to log in to the MFP only. This option uses the XPR receiver interface.
- Ensure the XPR Biometric Receiver is installed and configured to allow connections from the IP Addresses assigned to the IDPoints.
- Use Encrypted Receiver Interface - As above, but the receiver is AES encrypted.
Printer Type - (only displayed when a Receiver Interface option is selected) Select the type of connection needed for the printer:
- Printer 1 - Use the XPR Receiver Interface service.
- Printer 2 - Direct Connection - This option will send a data field directly to the MFD via port 2101. This option may be required for Ricoh MFDs. Enables the following two fields:
Direct Printing Data Field - Select the unique field to send from BioStore to the printer, such as the BioStoreID or PersonID.
Address - The IP Address of the MFD to send the BioStore field to.
If you enter details in these two fields, they will override the Receiver option.
-
Printer 3 - Requires Printer Address - Use this option if you need to send the MFD IP Address as part of the authentication process. Enables the following field:
Address - Enter the IP Address of the MFD.
Printer Name - Enter the name of the printer that is being mapped to the IDPoint.
Description - Enter a suitable description for the IDPoint, such as the location. This can make it simpler to identify multiple IDPoints if further configuration is needed at a later date.
IDPoint - Enter the IDPoint's IP address, Subnet Mask, and Default Gateway in the relevant boxes.
Card Formatting - If cards are to be used with the ID Print system, choose whether they are to be used in decimal or hexadecimal format from the dropdown list.
Show or Hide Staff Names - Full staff names are shown by default on IDPoints, however this can be changed if required, using the dropdown list. The options are as follows:
-
Show Full Name: Show the full first and last name for staff members, for example, Joe Bloggs.
-
Hide Staff First Name: Hide the first name of staff members, for example, Bloggs.
-
Show Initial and Surname: Show only the first character of staff first names, and their surname, for example, J Bloggs.
Audio Confirmation - Tick this checkbox to enable an audible sound from the IDPoint when a user is positively identified.
Rotate Scanner - This option should be used if better identification results are received when using the fingerprint scanner upside down. This may be the case when fingerprints have been enrolled on a scanner configured to use a different orientation.
If you have selected Use Pcounter DLL, the following options will also be available:
Printer Configuration - Open options for the printer, including print queue, prices, and access permissions.
Pcounter Configuration - Open the Pcounter server options.
There are two options for how the IDPoint should behave after a user authenticates:
Display Menu System - Display menu options for job release/deletion and viewing your remaining printer balance.
Print All - All jobs in the user's queue are printed when they authenticate.
If you have selected to use the Receiver Interface, the following options will also be available:
Address - The IP Address that the XPR Biometric Receiver software is installed on.
Port - The port number used to communicate with the receiver (default 60100).
Test - Test the connection to the receiver service by entering the AD username of someone who is in the print system.
Select the Update button when you have completed the configuration, and repeat the process for all of the IDPoints requiring configuration.
To remove a printer map, choose the IDPoint from the list and select the Remove button.