ID Print Configuration for OCM Printers
Before configuring ID Print with your OCM printer, you must have installed the correct licence, setup the server, and set up any required log files.
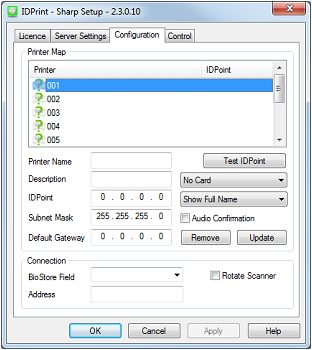
Select the Configuration tab to configure the mapping between OCM printers and IRIS BioStore IDPoints.

Printer Map Options
To configure a Printer Map select one of the IDPoints in the list.
Server Address - Enter the address to the OCM web service (Default: http://print-ocm:13233/Service1.asmx).
Description - Enter a suitable description for the IDPoint, such as the location. This can make it simpler to identify multiple IDPoints if further configuration is needed at a later date.
IDPoint - Enter the IDPoint's IP address, Subnet Mask, and Default Gateway in the relevant boxes.
Card Formatting - If cards are to be used with the ID Print system, choose whether they are to be used in decimal or hexadecimal format from the dropdown list.
Show or Hide Staff Names - Full staff names are shown by default on IDPoints, however this can be changed if required, using the dropdown list. The options are as follows:
-
Show Full Name: Show the full first and last name for staff members, for example, Joe Bloggs.
-
Hide Staff First Name: Hide the first name of staff members, for example, Bloggs.
-
Show Initial and Surname: Show only the first character of staff first names, and their surname, for example, J Bloggs.
Multi-App - This experimental option is used for configuring multiple applications to run on one IDPoint. This can be ignored if you're only using a single application on an IDPoint.
Audio Confirmation - Tick this checkbox to enable an audible sound from the IDPoint when a user is positively identified.
Rotate Scanner - This option should be used if better identification results are received when using the fingerprint scanner upside down. This may be the case when fingerprints have been enrolled on a scanner configured to use a different orientation.
OCM Print Server Configuration
Before ID Print will work with the OCM print server, the server needs to be properly configured.
Pre-Requisites: Version 4 or later of OCM, including the Web Services service. To check if this service is installed, open services.msc and look for OCMWebServer2.
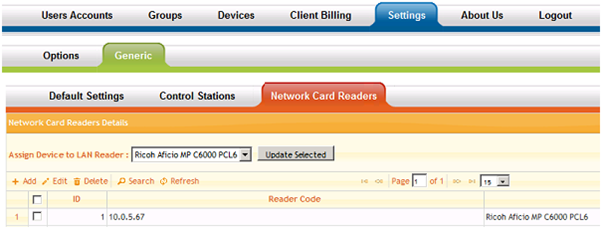
Assigning an IDPoint to a Printer
In the OCM Admin page, navigate to Settings - Generic - Network Card Readers. Add a reader, using the IDPoint's IP Address as the unique Reader Code. Then assign the device to one of the printers connected to the OCM print server.
