ID Print Configuration for Equitrac Printers
Before configuring ID Print with your Equitrac printer, you must have installed the correct licence, setup the server, and set up any required log files.
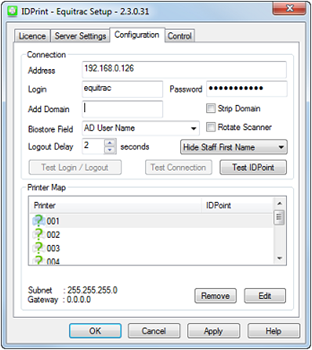
Select the Configuration tab to configure the Equitrac server credentials and the mapping between the printer IDPoints and the Equitrac printers.
Connection Options
Address - Enter the IP Address of the Equitrac print server.
Login and Password - Enter the login name and password required to connect to the Equitrac server.
Add Domain - Enter an Active Directory domain if required. This can be in one of two formats - @biostore.local or \\biostore, where biostore is your domain name.
Strip Domain - Tick this checkbox if the domain is to be removed from the configuration.
BioStore Field - Choose a BioStore field to be sent to the Equitrac server from the drop-down list. This field is combined with the Active Directory data stored in IRIS BioStore, and is used as a unique identifier to unlock print jobs.
Rotate Scanner - This option should be used if better identification results are received when using the fingerprint scanner upside down. This may be the case when fingerprints have been enrolled on a scanner configured to use a different orientation.
Logout Delay - This setting can be used to change the amount of time the system waits before someone can log in after another user has been logged out. The default setting is 2 seconds.
Show or Hide Staff Names - Full staff names are shown by default on IDPoints, however this can be changed if required, using the dropdown list. The options are as follows:
-
Show Full Name: Show the full first and last name for staff members, for example, Joe Bloggs.
-
Hide Staff First Name: Hide the first name of staff members, for example, Bloggs.
-
Show Initial and Surname: Show only the first character of staff first names, and their surname, for example, J Bloggs.
The following two buttons are only available once a printer has been mapped to an IDPoint (Go to Printer Map Options below).
Test Login/Logout - Click this button to open a test page for the Equitrac server. This test page can be used to view details of the printer being connected to. Additionally, the Login and Logout buttons of this test page can be used to send login and logout requests to the server, and the response XML can be seen. The Username and ID fields can be filled in with the details for logging in to the printer. The correct behaviour when selecting the Login button twice is for the response XML to show that someone is already logged in.
Test Connection - Select this to test that ID Print can connect to the Equitrac server using the entered details.
Printer Map Options
To configure a Printer Map select one of the IDPoints in the list and click the Edit button. The following dialog will appear.
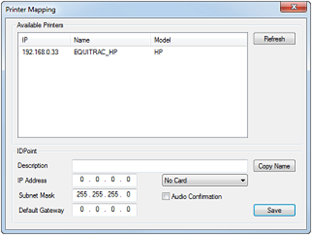
The list view displays the available printers that are connected to the Equitrac server.
Choose a printer from the list and enter the following details:
Description - Enter a suitable description, such as the location. This can make it simpler to identify multiple IDPoints if further configuration is needed at a later date.
Copy Name - Clicking this button will copy the printer name into the Description field.
IP Address, Subnet Mask and Default Gateway - Enter these settings in the relevant boxes.
Card Formatting - If cards are to be used with the ID Print system, select either decimal or hexadecimal formatting from the dropdown list.
Audio Confirmation - Tick this checkbox to enable an audible sound from the IDPoint upon positive identification of a user.
Select the Save button when you have completed configuration, and repeat the process for all of the IDPoints requiring configuration.
To remove a mapped printer from the list, select the printer and click the Remove button.