 |
 |
|
|
This screen shows the various events for the different share types created for this client. Using events gives the facility to identify which members received shares based on a specific share type.
To create an event the share types must first be set up correctly in the Share type tab in the Share Register. See How to create a new share type. Once the share capital has been set up, it can be issued to the relevant shareholders by entering a new share event.
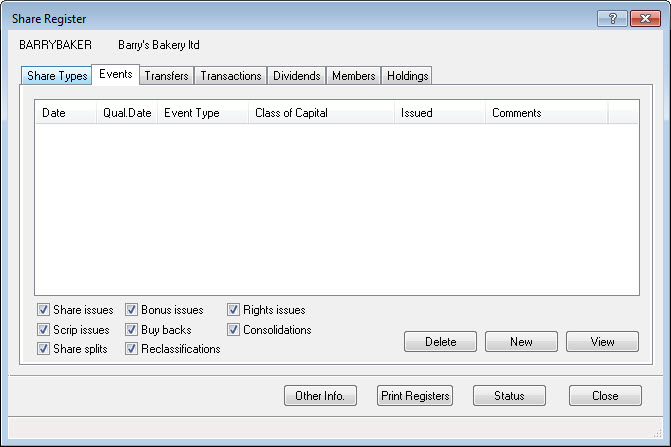
Several types of share events can be entered. Select New to create a new share event. When this is clicked there are options for which types of events can be created.
Share issue this is the issue of shares at nominal value or for a premium to new or existing shareholders.
Bonus issue are a form of dilution of share capital, they are free distributions of shares for example, are issued at no cost to the shareholder,. (Shareholder may receive 1 bonus share for each 4 shares they currently hold).
Rights issue are a form of dilution of share capital. When a company makes a rights issue it allots shares to a shareholder by virtue of and in proportion to their existing shareholding and the shareholder pays for these rights. Normally the issue is at a discount to market value. The difference between a rights issue and a bonus issue is that in a rights issue the new shares are paid for.
Scrip issue scrip or stock issues arise when a company paying a dividend gives its shareholders the option of taking the dividend in the form of new shares rather than cash.
Purchase own shares this is for when the company buys back its own shares from shareholders.
Share consolidation this means that the shares of the company will be consolidated into shares of a larger nominal value, for example, five shares of 10p each would be consolidated into one share of 50p each.
Share split this means that the shares of the company will be divided into shares of a lower nominal value, for example, one share of £100 each could be divided into 10 shares of £10 each.
Share reclassification this means that the shares of the company will be reclassified into share capital of the same nominal value. For example, one Ordinary A share of £1 is reclassified into one Ordinary B share of £1.
Options are available on the Events tab to alter the type of share events displayed on screen. For example, to only view all the bonus issues for this client, select the Bonus issues option only.
Generic options display in varying combinations at the bottom of some events when an entry is viewed are explained below:
Details – allows form 42 information to be altered for the selected event and for the transactions within the event. (For more details about form 42 options in the Share register go to Form 42 on page 21).
List displays the transactions specifically for the selected event.
Takeup – allows more shares to be allocated
Apply – allocates shares as per the details of the bonus issue (if this allocation has already been completed then no further shares will be allocated).
Go to Share Register | Events tab | New | Share issue.
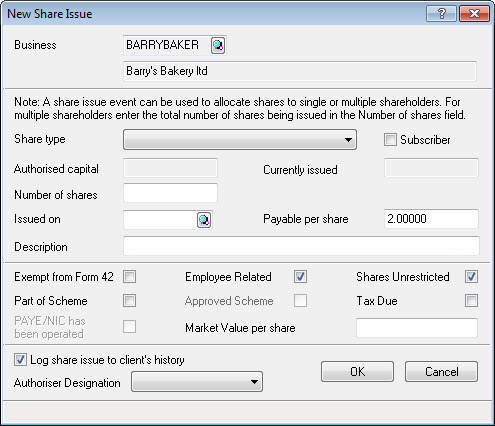
The New Share Issue screen displays with the identifier and business name confirmed at the top of the screen.
Details of New Share Issue fields
Complete the Share type field by clicking the drop-down arrow for a listing of all the types of share capital set for this client. Identify whether the share issue is subscriber shares by selecting the Subscriber option.
Authorised capital will show the amount of authorised share capital for this share type, this field will be greyed out as it is automatically filled in based on the details entered for the that share type.
Currently issued shows how many shares of the authorised capital are currently in issue. This field is also filled out by IRIS and is greyed out. IRIS adds up all transactions entered against that share type to establish this figure.
Number of shares, enter the total amount of shares that are to be issued, and the Issued Date. If the share issue is for more than one member, enter the total amount of shares that all members are to receive. Clicking the magnifying glass will display a calendar allowing a date to be selected. The detail of the recipients can be specified on a further screen.
Payable per share, enter the price that the shareholders are to pay per share. There is no need to stipulate currency in this field. Description should automatically be filled out using the number of shares in this issue and the payable per share details. This can be changed as required.
There are several fields specific to Form 42 which are Exempt from Form 42, Employee Related, Share Unrestricted, Part of Scheme, Approved Scheme, Tax due, PAYE/NIC has been operated, Market Value per share. Complete these details as relevant. (For more details about these options in the Share register go to Form 42).
There is an option to log this information in the client history and therefore activate a completed Form 88(2). Once this screen has been fully filled out, click OK to save the changes or Cancel to close without saving.
Specifying shareholders
After clicking OK, the Take up of share issue screen displays. This is where the issued shares are allocated to the particular shareholders. Select an IRIS client (one already setup on the IRIS basic database), an Other shareholder (see page 19, on how to create an other shareholder), or an Existing shareholder (a list of members already connected to this client).
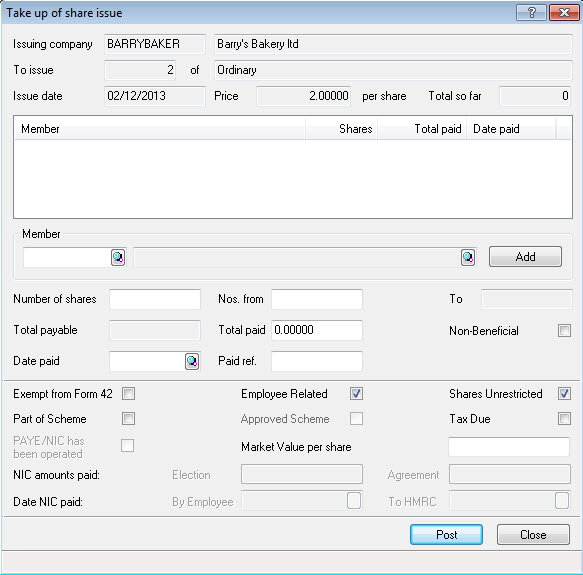
In the Number of shares field put the amount of shares that this shareholder received. F2 can be used to enter the remaining number of shares to be issued. Total payable will automatically be calculated. The next available share numbers are automatically inserted by IRIS, these can be changed if required. Enter the amount that has been paid in Total paid and then enter the Date paid. A calendar can be used by clicking the magnifying glass next to this field. Identify if this share holding is of Non-Beneficial interest to the holder by selecting the option.
There are also fields relating to whether this transaction should be included on Form 42. The options will default to the selections which were made on creation of the event but can be overwritten at this point.
Once completed click Post, the New Member screen displays (this will only display if this is the first time that this shareholder has held shares in this client). This screen can be used to set up joint shareholdings and to choose whether this shareholder has waived their dividends. Click OK to this screen and the Take up of Share Issue screen displays again with the shareholding listed. If there are other shareholders that need shares issued to them, repeat the above process.
The top of the screen identifies the number of shares that are to be issued for the selected share type and also the total so far. Click Close to exit out of the screen. Once all the shares are allocated, a screen displays confirming the Transactions Generated, click OK.
Go to Share Register | Events tab | New | Bonus issue.
The New Bonus Issue screen displays with the identifier and business name at the top of the screen.
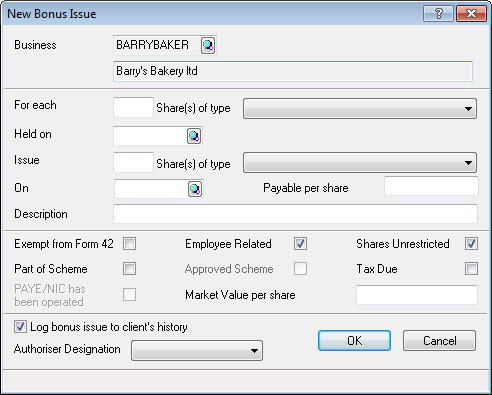
For each number of shares that are share(s) of type held on a particular date, a member has the right to buy a number of issued share(s) of type on a certain date.
Any other information should be put into the Description box. This field is automatically completed with information entered for the bonus issue.
There are several fields specific to Form 42 which are Exempt from Form 42, Employee Related, Share Unrestricted, Part of Scheme, Approved Scheme, Tax due, PAYE/NIC has been operated, Market Value per share. Complete these details as relevant. (For more details about these options in the Share register go to Form 42 on page 21.)
Finally there is an option to log this information in the client history and therefore activate a completed Form 88(2). When finished inputting information, click OK to save the changes or Cancel to close without saving.
Specifying shareholders
Once OK is clicked the following question displays; Do you wish to make all implied share transactions now?
Click Yes, a Transaction Generated screen confirms the transactions generated by IRIS. Click OK, the Bonus Issue screen displays. In order to view exactly what has been allocated click List.
Click No and the following question displays; Confirm that you wish to generate any transactions not yet made.
Click Yes, a Transaction generated screen confirms the transactions generated by IRIS. Click OK to return to the Bonus Issue screen.
Click No and the program returns to the Bonus issue screen without having allocated any shares.
To reallocate the bonus issue highlight the bonus issue in the Events tab, click View | Apply.
The following question displays; Confirm that you wish to generate any transactions not yet made.
Click Yes, a Transaction generated screen confirms the transactions generated by IRIS. Click OK to return to the Bonus Issue screen,
Click No and the program returns to the Bonus issue screen without having allocated any shares.
Go to Share Register | Events tab | New | Rights Issue.
The New Rights Issue screen displays, with the identifier and business name at the top of the screen.
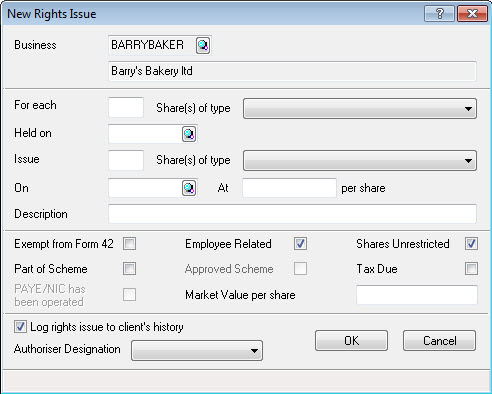
For each number of shares that are share(s) of type held on a particular date, a member has the right to buy a number of issued share(s) of type on a certain date at an amount per share.
Any other information should be put into the Description box. This field is automatically completed with information entered for the rights issue.
There are several fields specific to Form 42 which are Exempt from Form 42, Employee Related, Share Unrestricted, Part of Scheme, Approved Scheme, Tax due, PAYE/NIC has been operated, Market Value per share. Complete these details as relevant. (For more details about these options in the Share register go to Form 42).
Finally there is an option to log this information in the client history and therefore activate a completed Form 88(2). Once this screen has been fully filled out, click OK to save the changes or Cancel to close without saving.
Specifying shareholders
Once OK is clicked the following question displays; Do you want to simply allocate shares to all eligible members to 100% of their entitlement?
Click Yes, a Transaction Generated screen confirms the transactions generated by IRIS. Click OK, the Rights Issue screen displays. In order to view exactly what has been allocated click List.
Click No, the Rights Issue take up screen displays. The screen lists all the current shareholders in this client, it shows how many shares they are entitled to and how many shares of this entitlement have been issued so far and whether this holding is of non-beneficial interest (N/B). The Add column is used to allocate shares to a shareholder. Enter the amount of shares each shareholder is to receive in this column. In the column called On enter the date that the shares were allocated. Per Share should already have the amount to be paid per share in it, and finally the Total column will automatically be updated with the total amount that this shareholder should pay. Once this screen has been filled out click OK. A screen displays confirming the generated share transactions, click OK.
Go to Share Register | Events tab | New | Scrip Issue.
The New scrip Issue screen displays, with the identifier and business name at the top of the screen.
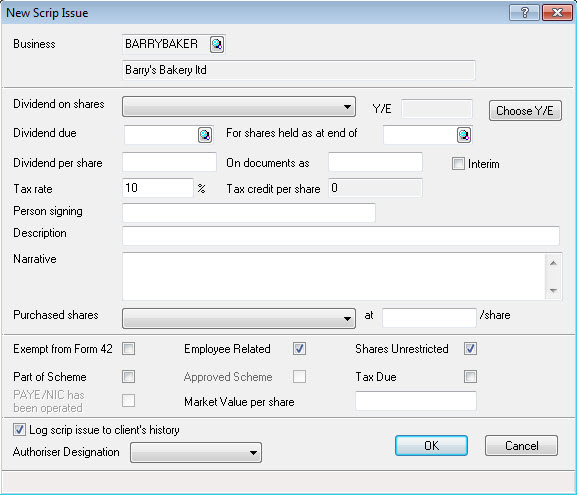
A Scrip Issue is when a company offers their shareholders shares instead of cash for a dividend; this screen is similar to the New Dividend screen (See How to create a new dividend on page 4 for details of the fields on this screen).
Extra fields on this screen are:
Purchased shares enter the share type that is being offered instead of cash.
At … /share is read as At a Price of £ Per Share, enter the price to be paid per share.
Description is completed with the detail entered in the above two fields. This can be altered.
There are several fields specific to Form 42 which are Exempt from Form 42, Employee Related, Share Unrestricted, Part of Scheme, Approved Scheme, Tax due, PAYE/NIC has been operated, Market Value per share. Complete these details as relevant. (For more details about these options in the Share register see Form 42).
There is an option to log this information in the client history and therefore activate a completed Form 88(2). When finished inputting information, click OK to save the changes or Cancel to close without saving.
Specifying shareholders
Once OK is clicked the following question displays; Do you simply want to allocate all shares to all eligible members to 100% of their entitlement?
Click Yes, a Transaction generated screen confirms the transactions generated by IRIS. Click OK to return to the Scrip Issue screen.
Click No, the Scrip Issue take up screen displays. The screen lists all the current eligible shareholders in this client, it shows whether their share holding is of non-beneficial interest (N/B), the dividend they are due (based on what has been created in the dividend tab), each members’ entitlement of shares and how many of these shares have been issued So far. The Alloc. column is used to allocate shares to a shareholder. Enter the amount of shares each shareholder is to receive here. In the column called On, enter the date that the shares were allocated. Per Share should already have the amount to be paid per share in it, and finally the Total column will automatically be updated with the total amount that this shareholder should pay. Once this screen has been filled out click OK. A screen displays confirming the generated share transactions, click OK.
To allocate the shareholders at a later point or reallocate due to having made some changes to other shareholdings, then ensure any current transactions linked to the scrip issue are deleted.
To reallocate the scrip issue highlight the scrip issue in the Events tab, click View | Take up. The following question displays; Do you simply want to allocate all shares to all eligible members to 100% of their entitlement?
Click Yes, a Transaction generated screen confirms the transactions generated by IRIS. Click OK and it returns to the Scrip issue screen.
Click No and the program enters the Scrip Issue take up screen without having allocated any shares.
Go to Share Register | Events tab | New | Purchase own shares.
The New share buy back screen opens, with the identifier and business name at the top of the screen.
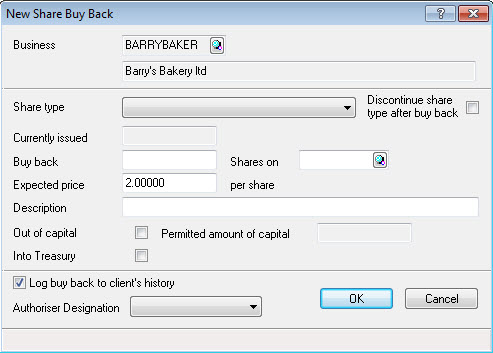
Details of New share buy back fields
Complete the Share type field by selecting from the drop-down list. The Currently issued field shows how many shares of the authorised capital are currently in issue. This field is also automatically filled by IRIS and is greyed out. IRIS will add up all transactions entered against that share type to establish this figure.
Buy back, enter the total amount of shares that are to be bought back by the company. In the Shares on field enter the date the shares were purchased back. Clicking the magnifying glass displays a calendar allowing a date to be selected.
Expected price and per share, enter the amount to be paid for each share purchased by the company.
Description is completed with the number that was entered into the Buy back field and followed by ‘..own shares purchased’, this can be overwritten.
Out of capital used to identify whether a 173 form is needed for this event. It also allows an entry to be made in the Permitted amount of capital field.
There is an option to log this information in the client history and therefore activate a completed Form 169 and, if the Out of capital field is completed, Form 173. Once this screen is completed click OK to save the changes or Cancel to close without saving.
Specifying shareholders
After clicking OK, a question displays, Do you want to automatically buy back the shares?
Click Yes and a Transaction generated screen confirms the transactions generated by IRIS. Click OK to return to the Share Buy Back screen. In order to view exactly what has been allocated click List.
Click No, the Shares Sold Back to Company screen displays, this is where the individuals who are selling their shares back to the company can be identified.
A list of the shareholders and the amount of shares they currently hold is displayed on the bottom left hand side of the screen, double click a shareholder so their name appears on the right hand side of the screen. Further details can then be entered for this shareholder.
Sells back, enter the number of shares being sold back.
Shares on, enter the date of the purchase.
At … per share, enter the amount that the shareholder should receive per share.
Payable is calculated by multiplying Sells back with At … Per share.
Date Paid, enter the date the amounts have been paid for the shares and also a Reference for this payment if applicable.
Other options available on this screen:
Shareholder gives further details of the selected shareholder.
Post, this has the effect of saving the entered details. Once Post has been selected the Confirm share numbers to be disposed of screen displays. This shows the numbers of shares held by the shareholder and the numbered shares the system is allocating for the buy back. If the share numbers are correct, click System choice, if the share numbers should be different make the relevant changes and click Accept.
Revert puts the on screen numbers back to the original assumptions. Once the numbers have been accepted via this screen it then returns to the Shares sold back to company in order for another shareholder to be entered.
Close, exits the screen. A Transaction generated screen confirms the number of transactions entered. Click OK and it returns to the Share buy back screen. In order to view exactly what has been allocated click List.
To delete the event and associated transactions highlight the share buy back in the Events tab, click Delete.
To reallocate who has purchased the shares highlight the share buy back in the Events tab, click View | Take up. Then the Shares sold back to company screen will appear allowing the stipulation of which shareholders have sold their shares back to the company.
Go to Share Register | Events tab | New | Share Consolidation.
The New Consolidation screen opens, with the identifier and business name confirmed at the top of the screen.
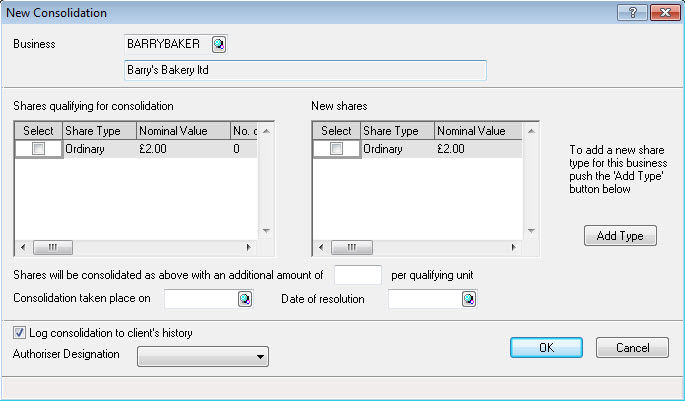
All the share types created against the company are listed on the left and right hand side of the screen. If a new share type is needed, click Add type and enter the relevant details.
Share qualifying for consolidation, enter the number of shares that are being consolidated against each share type that this event is related to. The Disc. column is to identify if the share type is discontinued once consolidated. Enter the number of New shares that are being generated by the consolidation against the relevant share type. There is also the option to enter an amount of cash that may be paid for each consolidating unit. Enter the date that the consolidation took place and the date that the resolution was passed.
There is an option to log this information in the client history and therefore activate a completed Form 122. When finished inputting information, click OK to save the changes or Cancel to close without saving.
Specifying shareholders
After clicking OK a question displays, Do you wish to make all implied share transactions now?
Click Yes, a Transaction Generated screen confirms the transactions generated by IRIS. Click OK and it returns to the Consolidation screen. In order to view exactly what has been allocated click List.
Click No, the following question displays, Confirm that you wish to generate any transactions not yet made.
Click Yes, the Transaction generated screen confirms the transactions generated by IRIS. Click OK and it returns to the Consolidation screen.
Click No and the program returns to the Consolidation screen without having allocated any shares.
To delete the event and associated transactions highlight the share consolidation in the Events tab, click Delete.
To automate the transactions for the consolidation highlight the consolidation in the Events tab, click View |Apply. The following question displays, Confirm that you wish to generate any transactions not yet made.
Click Yes, the Transaction generated screen confirms the transactions generated by IRIS. Click OK to return to the Consolidation screen.
Click No and the program returns to the Consolidation screen without having allocated any shares.
Go to Share Register | Events tab | New | Share split.
The New Share split screen opens, with the identifier and business name confirmed at the top of the screen.
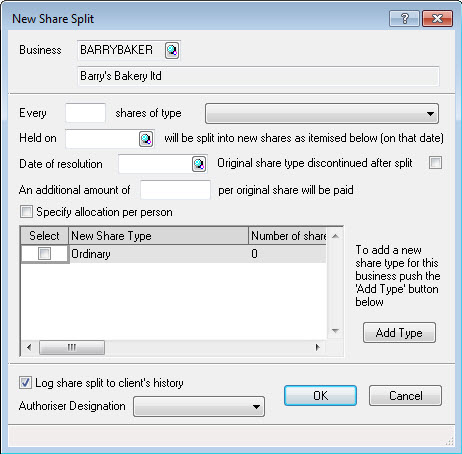
Details of New Share Split fields
Every, number of shares that are shares of type, held on a particular date will be split into new shares as itemised below (on that date). At the bottom of the screen insert
the number of shares created by the share split. If Specify allocation per person is selected then at the bottom of the screen tick each share type which members will receive shares in.
Date of resolution used to split the shares and the amount of any cash consideration per original share if applicable. If applicable, select Original share type discontinued after split.
There is an option to log this information in the client history and therefore activate a completed Form 122. When finished inputting information, click OK to save the changes or Cancel to close without saving.
Specifying shareholders
Where Specify allocation per person is not selected:
Once OK is clicked the following question displays, Do you wish to make all implied share transactions now?
Click Yes, a Transaction generated screen confirms the transactions generated by IRIS. Click OK and it returns to the Share split screen. In order to view exactly what has been allocated click List.
Click No, the following question displays, Confirm that you wish to generate any transactions not yet made.
Click Yes, a Transaction generated screen confirms the transactions generated by IRIS. Click OK and it returns to the Share split screen.
Click No and the program returns to the Share split screen without having allocated any shares.
Where Specify allocation per person is selected:
Once OK is clicked the Share split screen displays. This screen lists all members with qualifying shares, it shows how many shares they hold that qualify for being split and the value of those shares (that is, the number of shares multiplied by the nominal value of the selected share type). For each share type the shares are being split into there will be two columns:
If left blank shares of this type will not be allocated to the member.
Once this screen has been completed, click OK, a screen displays confirming the generated share transactions, click OK.
To automate the transactions for the share split highlight the share split in the Events tab, click View | Apply. The following question displays, Confirm that you wish to generate any transactions not yet made.
Click Yes then a Transaction generated screen confirms the transactions generated by IRIS. Click OK and it returns to the Share split screen.
Click No and the program returns to the Share split screen without having allocated any shares.
Go to Share Register | Events tab| New | Share reclassification.
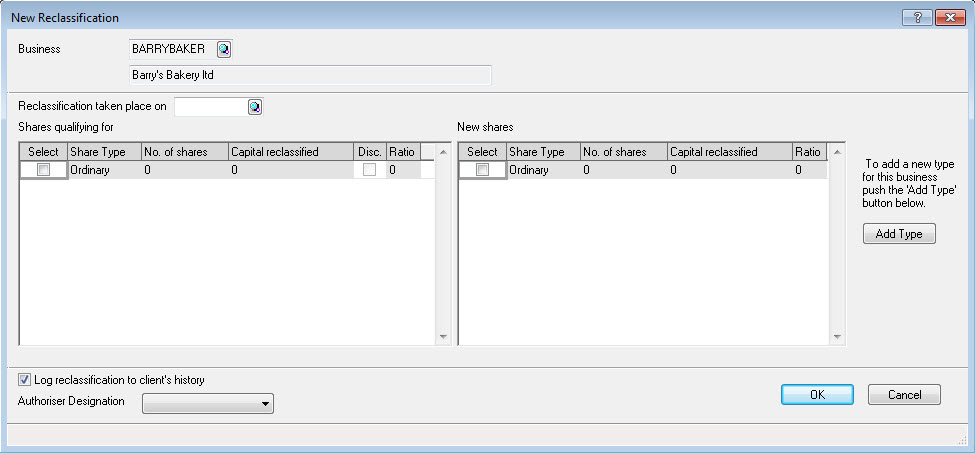
The New reclassification screen opens, with the identifier and business name at the top of the screen.
A share reclassification is where the number and nominal value of the shares held remain the same but the name and/or the rights associated with the share type have been altered.
Details of New reclassification fields
Enter the date the reclassification has taken place at the top of the screen. All the share types created against the company are listed on the left and right hand side of the screen.
Shares qualifying for reclassification, select the Share Type/s which need to be reclassified. By default the rest of the columns of information are completed on the assumption that the whole share type is being reclassified, if this is not the case then amendments may be required to the details entered in each column. No. of Shares is the number of authorised shares for each share type. In Capital reclassified enter the number of authorised shares of that share type to be reclassified as part of this event, tick Disc. If the share type is discontinued as a result of this event and for Ratio enter the lowest denominator of share exchange.
New shares, select the share type/s which the shares will be reclassified to. The list will only comprise of share types of the same nominal value as the share types selected to be reclassified. By default the rest of the columns of information are completed on the assumption that the total authorised number of shares for each selected share type will be created as a result of the reclassification, if this is not the case then amendments may be required to the details entered in each column. Capital reclassified is the number of authorised shares as a result of the reclassification and Ratio should be the lowest denominator of the share exchange.
There is an option to log this information in the client history and therefore activate a completed Form 128(4). When finished inputting information, click OK to save the changes or Cancel to close without saving.
Ratio Example:
100 Ordinary A shares are being reclassified into 100 Ordinary B shares. Therefore the ratio of
shares would be 1 for Ordinary A and 1 for Ordinary B. Every 1 Ordinary A share is reclassified to 1 Ordinary B share.
Specifying shareholders
After clicking OK, a question displays, Do you want to automatically allocate the shares?
Click Yes, a Transaction generated screen confirms the transactions generated by IRIS. Click OK to return to the Share Reclassification screen. In order to view exactly what has been allocated click List.
Click No, the Reclassification Transactions Take up screen displays. A list of the shareholders and the amount of shares they currently hold is displayed on the bottom left-hand side of the screen. Double-click a shareholder so their name displays on the right-hand side of the screen. Further details can then be entered for this shareholder.
In the shares being reclassified table:
Total Held is the total of shares held by the selected member for share types selected to be reclassified.
No. to Reclassify enter the number of shares being reclassified for each share type displayed which cannot exceed the number of shares held by the member.
In the new shares received table:
No. shares enter the number of shares of each share type which will be posted to the selected member.
Total Payable is calculated by multiplying No. shares with Nominal Value.
Total Paid and Date Paid, enter the amount paid and the date the amounts have been paid for the shares and also a Reference for this payment if applicable.
Other options available on this screen:
Shareholder gives further details of the selected shareholder.
Post has the effect of saving the entered details. Once Post has been selected the Confirm share numbers to be disposed of screen displays. This shows the numbers of shares held by the shareholder and the numbered shares the system is allocating for the buy back. If the share numbers are correct then click System choice. If the share numbers should be different make the relevant changes and click Accept. Revert puts the on screen numbers back to the original assumptions. Once the numbers have been accepted via this screen it then returns to the Shares sold back to company in order for another shareholder to be entered.
Close, exits the screen. A Transaction generated screen confirms the number of transactions entered. Clicking OK returns to the Share reclassification screen. In order to view exactly what has been allocated click List.
To enter additional transactions for the share reclassification highlight the share reclassification in the Events tab, click View | Take up. The Reclassifications Transactions Take up screen displays allowing the stipulation of which other shareholders have reclassified their shares.