 |
 |
|
|
This screen shows all the different types of share capital created for a client.
In the Share Types tab, click New. The Share Type for Client screen displays requiring details to be entered.
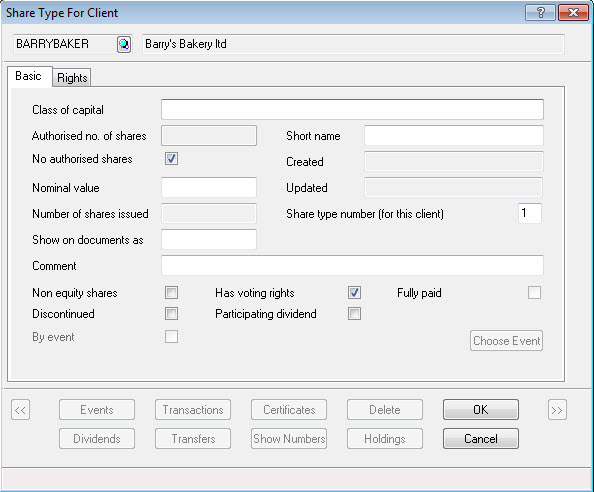
A description of each field is given below:
Class of capital enter the name of the share type for example, Ordinary, Preference.
Tab to the next field and the Short name is completed automatically but can be changed if needed. The Short name is generally used on the Companies House Forms and the Class of capital description is generally used in IRIS Accounts Production.
Nominal value do not include the currency sign, that is, enter 1 not £1.
Show on documents as is filled automatically with the nominal value and the currency sign for example, £1 but can be changed if needed to 100p. This is the format the nominal value will appear in on the share certificates.
Number of shares issued will be greyed out as the shares cannot be issued until the share capital has been fully set up. The figure in this field should never exceed the Authorised no. of shares. As transactions are created for that specific share type the number in this field will automatically be updated.
Share type number (for this client) should be filled out with a unique number for the share type. The share type number entered here indicates which account codes to use for the various types of share capital when posting in Accounts Production.
Accounts Production can identify more than three different types of shares when using the ELTD chart of accounts only.
Non equity shares if selected the Participating dividend option is selectable. If the share capital has participating dividends then select option. The Fully paid field is greyed out, as IRIS will fill this field in based on transactions linked to this share type as long as the Total paid and Date paid fields are completed.
These 3 fields are generally used within IRIS Accounts Production.
Discontinued select if the share type has become discontinued. A share type may be discontinued by an event when entered within the Events tab which will automatically select the By Event option and associate it with the share type. If there is not an associated event, click Choose Event to choose which event discontinued this class of capital.
Created and Updated fields identify the user that created or made changes to this share type. Once the Share Type for Client screen is completed click OK to save the share type in the Share Register.
The Change of Authorised Share Capital screen displays. Complete this screen to activate a completed Form 123. The necessary details for this form are the date that the change occurred and the date that the resolution was passed. Click the magnifying glass on either field to display a calendar. There is also a freeform section for the conditions of issue of the new share capital. Once complete, click Log to activate a completed Form 123 or select Don’t Log to stop the program from generating a Form 123. Either choice saves the new share type onto the Share type tab.
In the Share Types tab, highlight a share type and click View. The same screen will be displayed as for a New share type. The information on this screen can be altered. Rights can be completed with the specifics of any rights associated with the share type which is used on Form 128(1).
In the Share types tab highlight the share type and click View | Certificates. A Share Certificates screen displays showing the relevant shareholdings and the shareholders for the chosen share type. All of the shareholdings on the list can be chosen by clicking Select All or deselect them all by clicking Select None. An individual shareholding can be selected by ticking the box next to it.
Click Print once all the relevant shareholdings have been selected, this will display the Share certificate options screen. On this screen the default date to appear on the certificates is the transaction date, if this option is deselected then any date can be entered. Click the magnifying glass to display a calendar. Also, select who is to sign the certificates; there are three options: two directors, a director and a secretary and also under the seal of the company, select the relevant option and click OK. The share certificates should then open within a word document, and can be printed. Click Close on all the screens to get back to the Share Register.
If using Practice Management and a share certificate is printed then the option to log the share certificates against the company and the relevant individuals displays.