Add and amend posts
Once the Multiple Posts module has been switched on, you can start adding posts to your employees. This can be done manually or, if you have post data on a spreadsheet, you can import them.
Add a post to an employee
-
Go to Employee Files.
-
On the toolbar, click Base Data then choose the employee.
-
Select the Multiple Posts tab.
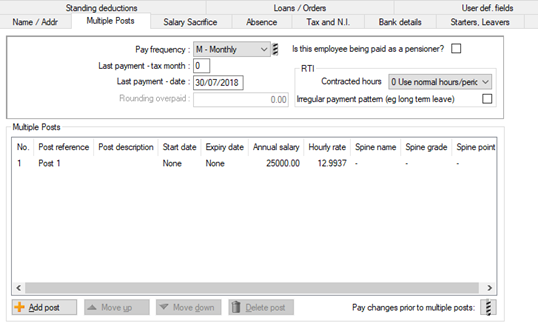
By default, every employee is assigned a ‘default’ post, listed as Post 1. If the employee had salary details before you switched the multiple post system on, these are saved against this default post.
-
On the Pay Frequency list, set a value. The Last Payment - date field is populated for you.
-
If you're entering contracted hours for the posts, you can leave the RTI Hours Band at the default setting and IRIS Payrite will sum up the contract hours for each role and allocate the band accordingly. If not, select a band from the list.
-
Select the Irregular Payment Pattern box if all posts allocated to an employee are casual or irregularly paid.
-
Click Add post. The Post details screen is displayed.
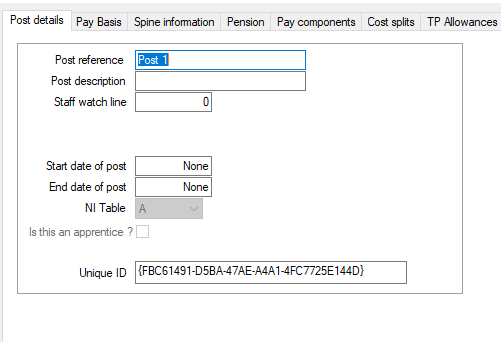
- In the Post reference box, enter a reference code for the post. This can be displayed on the payslip on the basic pay line (see Switch multiple posts on and off).
- In the Description box, enter further information about the post (you can add the job title here).
-
Enter the Start date of post.
Leaving this date blank will not stop the payment of any salary for that post, however if the employee starts the post mid-period and you enter the correct date, IRIS Payrite will pro-rata the salary for you according to the rules specified in System Setup. If you enter a future date, payment for the post will not be processed until the pay period relating to that date is reached.
-
If the employee is leaving the post, enter the End date of post. (If you enter a date in the middle of a period, the salary for the post will be pro-rata’d to the leave date.)
The Unique ID can be used for importing into the multi-post file, which is useful where an employee can have two posts with identical references.
-
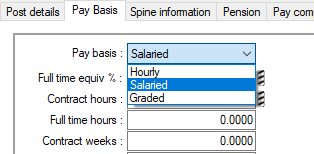
Select the Pay Basis tab.
-
On the Pay Basis list, select an option:
-
Hourly
IRIS Payrite requires the individual’s normal hours and the rate per hour. Basic pay is calculated as hours multiplied by the rate. When starting a pay run IRIS Payrite assumes the normal hours; this can be amended using the pay run data entry options. -
Salary
IRIS Payrite requires the individual’s normal hours and the salary per annum / period. The hours are used for reporting purposes and to calculate the individual’s hourly rate. When starting a pay run, IRIS Payrite assumes the normal salary; this can be overridden using the pay run data entry options. -
Graded
This option only appears if the Pay Spines module is present and the individual is paid on a pay spine with a grade and a pay spine point. The graded pay can be salary-based or hourly-based.
-