How to create a new Spreadsheet Import template
-
On the ‘Payroll’ menu, select ‘Spreadsheet Import’ then 'Configure Templates'.
Select ‘Add’ to open a blank template screen.
-
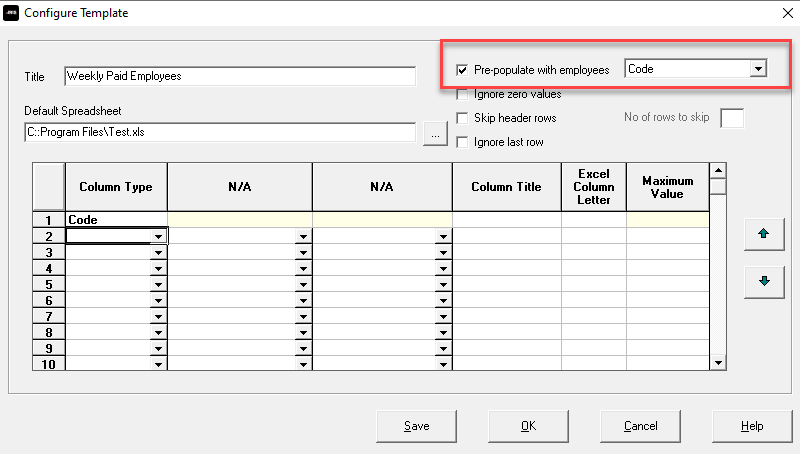
Enter a name for the template in the Title field.

-
If you already have, or intend to create, a Microsoft Excel spreadsheet containing all your pay information, enter its name and location in the Default Spreadsheet field. Alternatively, select Browse to search for the file on your system.
-
If you would like the template to open complete with a list of all your current employees, select the ‘Pre-populate with employees’ box. Select the order in which you would like the employees to appear from the drop-down list to the right of the tick box.
-
If you are linking to a default spreadsheet, select the other boxes as needed.
-
Pre-populate with employees - select to automatically list your employees on the template in the Spreadsheet Import entry screen. Once selected, there are four options to order the employees, Code, Surname, Dept/Code, Dept/Surname.
-
Ignore zero values - allows any zero values in the linked Microsoft Excel spreadsheet to be ignored. This stops any data already entered for a pay element being accidentally overwritten when the pay information is imported.
-
Skip header rows - allows data to be imported into the Spreadsheet Import entry screen without reading the header rows in the linked Microsoft Excel spreadsheet. Enter the amount of header rows to be ignored in the text box to the right.
-
Ignore last row - stops the last row of the spreadsheet from being imported into the Spreadsheet Import entry screen.
-
The first column must always be Code, as in Employee Code, and is therefore already in place for you. If you would like the Code column to have a different name on the template, enter that name under Column Name. If you are linking to a default spreadsheet, you must enter the column letter that Code appears under in your Microsoft Excel spreadsheet.
-
After setting up row 1 for Code, select the down arrow within the first blank cell in row 2 to select the next pay element. Do this for each pay element you wish to import, as follows:
-
From the drop-down list, select the element you wish to import. Depending on which you select, different columns will be available and will have different name.

-
If the next item you want on your spreadsheet is Name, select it from the list and the second, third and last columns become unavailable. You can enter in a Column Title and an Excel Column Letter, if one exists. The same applies if you select Department.
-
Salary is slightly different, in that the sixth column, Maximum Value, becomes available. Use this to set a maximum possible salary value to be imported.
-
If Hours is selected, all of the columns become available. The second column name becomes Rate, and the third Factor. Rate lists all rates configured in the current company. Factor lists all overtime factors configured in the current company.
Select the required Rate and Factor from the drop-down lists. Again, you can enter in a Column Title and a Excel Column Letter, if one exists. Use Maximum Value to set a customer maximum possible amount of hours to be imported
-
If Payment is selected, all of the columns are available. The second column name becomes Payment, and the third Mode. Payment lists all payments configured in the current company.
The options for Mode are Overwrite and Add To. Select Overwrite to overwrite any standard amount brought through from the employee’s details. Select Add to, to add to a standard amount which exists in the employee’s details. Select the required Payment and Mode from the drop-down lists. Again, you can enter in a Column Title and a Excel Column Letter, if one exists. Use Maximum Value to set a maximum possible payment amount to be imported
-
If Deduction is selected, all of the columns are available. The second column name becomes Deduction, and the third Mode. Deduction lists all deductions configured in the current company. Select the required Deduction and Mode from the drop-down lists. The choices for Mode are Overwrite and Add To.
Select Overwrite to overwrite any standard amount which exists in the employee’s details. Select Add to, to add to a standard amount brought through from the employee’s details. Again, you can enter a Column Title and a ,Excel Column Letter if one exists. Use Maximum Value to set a maximum possible deduction amount to be imported.
-
Holiday is slightly different in that it only locks up the third column. The second column becomes Type. The options in the Type column are Units and Advance Weeks.
This means, depending on how you have Holidays set up, you can either import an amount of Holiday, as in Hours, Days or Weeks, or advance an employee for a number of pay periods. Again, you can enter a Column Title and a Excel Column Letter. Use Maximum Value to set a maximum possible amount to be imported.
-
Statutory allows you to import statutory payment information. Only the third column is unavailable, with the second column becoming Type. The choices in the Type column are SSP, SMP, SAP and SPP. Again, you can enter in a Column Title and a Excel Column Letter. Use Maximum Value to set a maximum possible value amount to be imported.
Columns available in table when selecting different Column Types