Create a vacancy
Creating a vacancy is one of the primary functions of the system and it's really easy to do!
- On the banner, select Create Vacancy (or select Vacancies > Create Vacancy).
- In the Vacancy Templates panel, select the template you want to use.
- In the Structure Level panel, select the appropriate structure level for the vacancy.
The structure level determines who can see the vacancy, who can be added to it, and how you report.
- Select Create Vacancy. You can now complete the details of the vacancy.
Complete the following tabs:
Once a section is complete, select Next to continue. You can select Save and Continue Later at any time to go back to the dashboard and leave the vacancy as Pending. If you've made a mistake, or don't want to continue, you can select Delete Vacancy. Any fields with a red asterisk * are mandatory.
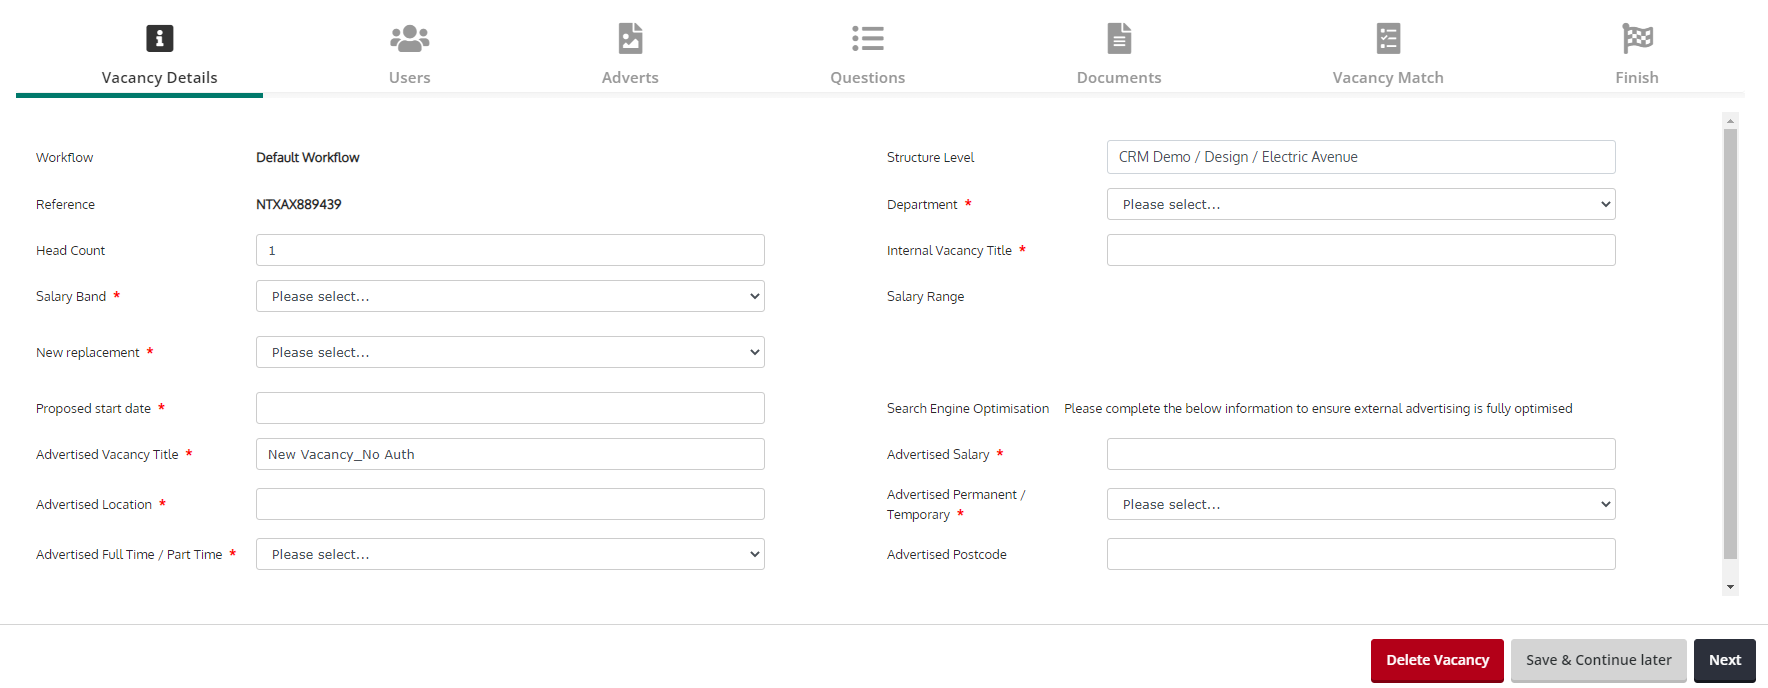
Vacancy Details
-
Enter the Head Count and select the Salary band. (Once selected, the Salary Range field is automatically populated.)
-
On the New replacement list, choose whether this is a new position or a replacement (backfill).
-
In the Proposed Start Date box, enter the date the position needs to be filled by.
-
In the Advertised Vacancy Title box, enter the role title. (This is what candidates will be looking for and will appear on your advert.)
-
In the Advertised Location box, enter the location where the role will be based. (This is the town or city that candidates will be looking for and will appear on your advert.)
-
On the Advertised Full Time/Part Time list, choose whether the position is full time or part time. Select in the box to change it here, if required.
-
The Structure Level box shows the structure level you selected in the previous step. Select the box to change it here, if required.
-
On the Department list, choose the department this position will sit in.
-
In the Internal Vacancy Title box, enter the internally recognised title for the vacancy. (This could be different from the Advertised Vacancy Title, which is shown on job ads.)
-
In the Advertised Salary box, enter the salary that you want to appear on the job ad.
-
On the Advertised Permanent/Temporary list, choose whether this is a permanent or temp vacancy.
-
In the Advertised Postcode box, enter the postcode of the location the vacancy will be based.
-
Select Next. The Users tab is displayed.
Users
Here, you can assign users to this vacancy. Assigning a user means the vacancy is displayed in their list of vacancies on the Dashboard and allows them to be assigned responsibilities throughout the recruitment process.
By default, the person creating the vacancy will be assigned as the Vacancy Administrator. The Vacancy Administrator is the vacancy owner and can be kept updated on key activities in the recruitment process.
At least one user should be assigned to a vacancy.
The Selected Users panel shows the current Vacancy Administrator. You can set this user as the Hiring Manager or Vacancy Observer using the switches.
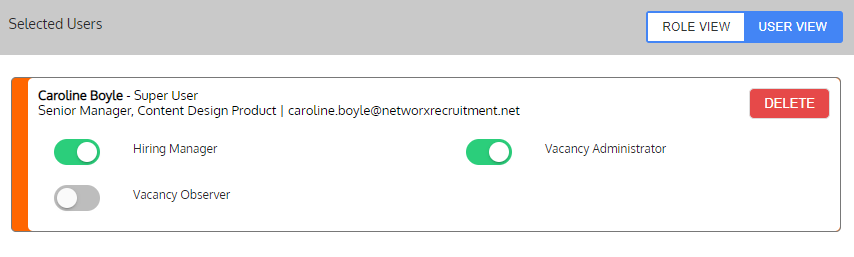
You may have additional user roles depending on your specific requirements and configuration.
Add a user to the vacancy
-
Enter the user name in Search Available Users and select ADD.
-
Add the required roles to the user.
If you are using Applicant Scoring, select if you want them to be a Panel Member or Lead Panel. All Panel Members have to score the applicants. Only the Panel Lead shortlists those to be progressed to interview.
-
If you want to the vacancy to only be viewed by the selected users, select Privacy On.

-
Select Next.
Adverts
The advert is what candidates will see after selecting a vacancy on your website. The advert is automatically populated with the title, location and salary information you defined when creating the Vacancy Details.
- To update your advert, select Edit.
- You can change the salary and location - select the boxes and update as required. Select OK when complete.
- Select the main body of the advert then copy and paste the text (or type) and use the text editing tools if required.
To avoid formatting issues, use the Paste from Word option and copy text from an existing Word document.
- Review the entire ad and make sure you're happy with it. To view the mobile version of the ad, at the top of the page, select Switch to Mobile View.
- At the top of the page, select Save & Close. You can now specify the vacancy questions.
Questions
Application questions are defined in your default application form and automatically populated here. If you're happy with the questions, simply select Next and move to the next step.
- If you have several application forms, you can select Clear and choose different questions. This does not delete the original application form.
- Select Edit to add questions or sections to the application form.
- If you have a long application form, when building questions, clear the Quick Apply box.
- If have a short application form, select the Quick Apply box.
- If using a two-stage process, select or clear the Quick Apply check box, depending on when you want the question to appear to the candidate.
-
When you're done, select Next. You can now add supporting documents.
Shortlisting Criteria
You will only have this section if you are using Applicant Scoring.
Check the preselected criteria.
You can make the following changes:
-
Delete any existing criteria .
-
Clear & Reselect, then select a different criteria list or add new criteria.
-
Add Criteria.
-
Select and drag the row to reorder the criteria.
When you have selected all the required criteria, select Next.
Documents
You can add supporting documentation to the vacancy, such as a job description or additional candidate information.
- On the Documents tab, select Add Document.
- Next to Type, select Private if you want this document to be visible internally or select Public if you want to make it visible to candidates.
- Select the Display on Advert check box if you want the document to be visible to candidates on the job ad.
-
Select Choose Document to navigate to and select the document you want to upload. (You can choose a document from the Document Library or from your device or network.)
- In the Document Name box, enter a name for the document. (This will be visible to candidates if applicable.)
PDFs are the preferred format. Make sure the document is no bigger than 5Mb.
- Select Upload and then select Next. You can now complete the vacancy match settings.
Vacancy Match
The final stage of the vacancy creation process is to specify the criteria to match vacancies to candidate job alerts. If applicable, you can also match vacancies to your advanced job search.
To trigger as many relevant job alerts as possible, consider the following:
- Make sure your lists of locations and disciplines are accurate to your business and that all of your locations and job disciplines are selected. Without this, your registered candidates may not be able to be specific in their choices.
- People will generally travel a distance proportional to the salary they will get paid but you could also consider where people could easily commute from. Think about whether the role is near a bigger town or city - would people mainly be searching there for a job?
- People will consider salaries above and below their ideal, so think about selecting more than one or a range (especially if it's near to the limits of a band).
- If you have territory roles, select the relevant regions and counties. If you have store- or office-based roles, select the towns they are in.
- Consider transferable skills. For example, someone looking for an administrator role could also perform data entry or receptionist roles.
If you're selecting multiple locations and you have the correct network, you must also do the following after the vacancy has been published:
- Select Vacancy Actions then select Edit Details.
- Enter the actual town or city the role will be based in, in the Feed location box.
- Select Save. This will ensure the network feed puts that location first.
-
On the Salary Band list, select the salary that relates to the vacancy. Or, select Enter Salary Range to manually enter it.
-
Do one of the following:
This information is only used to match the vacancy to candidate job alerts.
- In the Postcode box, enter the postcode and select Lookup. (This is used to calculate the distance between the candidate’s postcode and the location of the vacancy).
- Select No Postcode then in the Search box start to type the location name and select the correct location. (This option does not give a candidate’s distance from their home.)
- Select Home-based.
-
Under Disciplines select the check box for the disciplines you want to match on. (Enter a term in the search box to filter the list.)
-
Select Next. Your vacancy has been created and is ready to publish.
-
Once you reach this stage you can either:
-
Select Finish to go to the publishing wizard.
-
If applicable, select Publish Now to go to the publishing wizard.
-
If applicable, select Publish Later. The vacancy will be set to Pending. Pending vacancies can be published at any time and can be found by using the vacancy search or the dashboard.
Once you exit the vacancy creation process you can edit the vacancy on the Vacancy Setup tab.