Give a standard employee access to the Group Absence Calendar
Standard employees do not need Team Rights permissions to view non-sensitive absence When an employee or worker is absent from work. This can be for a variety of reasons. information in the Group Absence Calendar for their team.
When given access, employees can view the Group Absence Calendar from:
-
Their homepage > Group Absence Calendar.
Assign Group Absence Calendar access to an employee
-
Sign in to IRIS HR Professional.
-
In the navigation menu, select Directories.
-
Search for the required employee and select their record.
-
Select the Edit option or choose the Edit icon:

-
Choose Personal.
-
Select Actions > Set Rights Set Rights are the system permissions you allocate to employees to control the information available to a user about other employees..
The employee's Set Rights screen opens.
-
The level of calendar access you want to grant the employee determines the next step.
If you want to:
-
Give the employee access to non-sensitive absence information for all current employees in the company, go to Step 8.
-
Give the employee access to non-sensitive absence information for a specific group of employees in a team or department, go to Step 10.
Give an employee calendar access to view absence information for all current employees
-
-
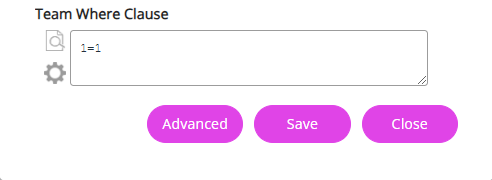
In the Team Where Clause Allows you filter records using a specific criteria. field, enter 1=1.
This grants the employee access to non-sensitive absence information in the Group Absence Calendar for everyone in the company, including information about themselves.

-
Select Save.
To check that the Team Where Clause has worked as expected and the employee has group absence calendar access for the correct employees, refer to Check a Team Where Clause in an employee's record .
Give the employee access to non-sensitive absence information for specific employees
-
In the Team Where Clause section, select the Builder icon.

-
Decide whether you want to create the clause using the Follow option.
The Follow checkbox is dynamic and means that the system 'follows' the information you choose from the Field dropdown in the clause instead of using a Value. Refer to Option 2 for more information.
Option 1 - Create a Where Clause without the Follow option
To learn how the Follow checkbox works, refer to option 2.
-
From Field, choose any of the following options from the dropdown:
-
Contract - Department - provides the employee access to non-sensitive absence information in the Group Absence Calendar for their department.
-
Contract - Location/Division - provides the employee access to non-sensitive absence information in the Group Absence Calendar for their location/division.
-
Contract - Country - provides the employee access to non-sensitive absence information in the Group Absence Calendar for employees in their country.
-
-
Set Operator to Equal to.
-
From the Value dropdown, choose the employee's department, country or location/division.
-
Select Set.

-
The Where Clause builder screen opens.
The Team Where Clause field populates with the Where Clause criteria. For instance, if you create a clause granting an employee access to the absence calendar for the marketing department, the Where Clause would be TheDepartment = 'Marketing'.
You must remember to update the Where Clause if the chosen Value changes.
For example, if you set the Value as Marketing, but later the employee moves to the Sales department, you would need to update the Value in the clause to Sales to ensure the employee can only access non-sensitive absence information for people in the sales department.
-
Select Save to give the employee access to the Group Absence Calendar.
Check the Where Clause
To check the Team Where Clause has worked as expected and the employee has group absence calendar access for the correct employees, refer to Check a Team Where Clause in an employee's record .
Option 2: - Create a Where Clause with the Follow option
By selecting the Follow checkbox, the system 'follows' the option you choose from the Field dropdown, such as Contract - Department, and updates the employee's permissions accordingly.
To illustrate further, suppose the employee works in Marketing. If you update their Department in My Details > Contract to Product, the system automatically updates their calendar permissions. This allows the employee to view non-sensitive absences When an employee or worker is absent from work. This can be for a variety of reasons. for their new team.
To utilise the Follow option, complete these steps:
-
From Field, choose Contract - Department.
-
Set Operator to Equal to.
-
Select the Follow checkbox.
-
Select Set.

The Team Where Clause field should populate with the Where Clause, TheDepartment = {Department}.
-
Select Save to give the employee access to the Group Absence Calendar.
To check the Team Where Clause has worked as expected and the employee has group absence calendar access for the correct employees, refer to Check a Team Where Clause in an employee's record .