Set up the IRIS Recruitment integration
Use this topic to integrate IRIS Recruitment with IRIS HR Professional.
After you complete the setup, IRIS Recruitment automatically sends hired candidate details to IRIS HR Professional and creates an employee record. You can find employee records in Directories.
Before you start
Before you set up the integration, in IRIS HR Professional, make sure to:
-
Create an API user in IRIS HR Professional. Make sure to give it a specific name that relates to this integration, for example, name it IRIS Recruitment. The API user must have either full admin access via Set Rights Set Rights are the system permissions you allocate to employees to control the information available to a user about other employees. permissions or at least access to the Starters & Leavers permission. Without this, the API will not return the expected responses
-
Make a note of the API username and password
-
Create the Company and Country lookup lists
-
Have administrator access in IRIS Recruitment
You will use this information during the setup process.
How the integration works
When you hire a candidate with the SHR candidate type, IRIS Recruitment:
-
Collects the employee information from the configured forms
-
Runs the HR integration extract service
-
Sends the data to IRIS HR Professional
-
Creates an employee record in IRIS HR Professional
Set up the integration
-
Sign in to IRIS Recruitment directly or sign in to IRIS HR Professional, and on your homepage, from the left navigation menu, select IRIS Recruitment, and complete the following steps.
In IRIS HR Professional, you must activate IRIS Recruitment in System Configuration for it to display in your system.
Create required Lookup Types
-
Go to Vacancy Settings.
-
Select Lookup Type Maintenance.
-
Create the following lookup types:
Lookup type Values Staffology – Gender Male, Female Staffology – Title Dame, Dr, Lord, Madam, Miss, Mr, Mrs, Ms, Prof, Sir Staffology – NI Code A, B, C, H, J, M, V, Z Staffology – Marital Status Civil Partnership, Co-Habiting, Divorced, Engaged, Married, Partner, Separated, Single, Widowed Staffology – Employee Type Casual, Flexible Hours, Full Time, Part Time, Reduced Hours, Subcontractor Staffology – Currency GBP -
You must create these lookup lists manually. You cannot import them using Lookup Import.
Import Company and Country lookup lists
-
Go to Vacancy Settings.
-
Select Lookup Type Maintenance.
-
Select Sync SHR lookups.
Import the following lookup lists:
-
Staffology – Company
-
Staffology – Country
-
Create a form to collect employee information
-
Create a form or use existing forms to capture the information IRIS HR Professional requires when a candidate is hired.
Mandatory fields
Include all the following mandatory fields to make sure the integration works:
| System Area | Field Name | Form Type | Rules or Max characters |
|---|---|---|---|
| Personal | Title | Lookup Type | max 10 characters |
| Personal | Surname | Single Line Text | max 50 characters |
| Personal | Forenames | Single Line Text | max 50 characters |
| Personal | Known As | Single Line Text | max 50 characters |
| Personal | Gender | Lookup Type | — |
| Personal | Date of Birth | Date | — |
| Contract | Start Date | Date | — |
| Contract | Continuous Service Date | Date | — |
| Contract | Company | Lookup Type | — |
| Contract | FTE | Numeric | — |
| Personal | Employee Number | Single Line Text | max 20 characters |
| Payroll | Pay Type | Lookup Type | max 20 characters |
| Contract | Country | Lookup Type | — |
The integration will fail if you do not include these mandatory fields.
Optional fields
You can include additional fields if needed, but they are not required for the integration:
| System Area | Field Name | Form Type | Rules or Max characters |
|---|---|---|---|
| Personal | Initials | Single Line Text | max 50 |
| Personal | Middle Names | Single Line Text | max 50 |
| Personal | Personal Email | Single Line Text | max 128 |
| Personal | Personal Mobile | Single Line Text | max 50 |
| Personal | Home Phone | Single Line Text | max 50 |
| Personal | Car Registration | Single Line Text | max 10 |
| Personal | Driving Licence Number | Single Line Text | max 20 |
| Personal | Additional Medical Details | Multi-Line Text | max 1000 |
| Personal | Gender Identity | Lookup Type | — |
| Personal | Nationality | Lookup Type | — |
| Personal | Disability | Lookup Type | — |
| Personal | Ethnic Origin | Lookup Type | — |
| Personal | Pronouns | Lookup Type | — |
| Personal | Marital Status | Lookup Type | — |
| EmergencyAddress | Emergency Contact | Single Line Text | max 50 |
| EmergencyAddress | Emergency Contact Phone | Single Line Text | max 50 |
| EmergencyAddress | Emergency Contact Relationship | Single Line Text | max 50 |
| EmergencyAddress | EC Address Lines 1–5 | Single Line Text | max 50 each |
| EmergencyAddress | EC Address Postcode | Single Line Text | max 50 |
| Contract | Volunteer | Radio Buttons Yes/No | — |
| Contract | Is Line Manager | Radio Buttons Yes/No | — |
| Contract | Hours Per Week | Numeric | — |
| Contract | Contract End Date | Date | — |
| Contract | Job | Lookup Type | — |
| Contract | Location Division | Lookup Type | — |
| Contract | Department | Lookup Type | — |
| Contract | Team | Lookup Type | — |
| Contract | Cost Centre | Lookup Type | — |
| Contract | Contract Type | Lookup Type | — |
| Contract | Employee Type | Lookup Type | — |
| Contract | Role | Lookup Type | — |
| Contract | Personal Grade | Lookup Type | — |
| Contract | FTE Scheme | Lookup Type | — |
| Contract | Work Pattern | Lookup Type | — |
| Address (Personal) | Main Address Lines 1–5 | Single Line Text | max 50 each |
| Address (Personal) | Main Address Postcode | Single Line Text | max 50 |
| Payroll | NI Code | Lookup Type | — |
| Payroll | NI Number | Single Line Text | max 9 |
| Payroll | Salary | Numeric | — |
| BankDetails (Payroll) | Bank Name | Single Line Text | max 50 |
| BankDetails (Payroll) | Account Name | Single Line Text | max 50 |
| BankDetails (Payroll) | Account Number | Single Line Text | max 50 |
| BankDetails (Payroll) | Sort Code | Single Line Text | max 50 |
Create the SHR hired candidate type
-
Go to Vacancy Settings > Hired Candidate Types
-
Create a new type called SHR.
This type is what you use to identify the candidates who you want to send to IRIS HR Professional.
Update your offer workflow
Create or update an Offer workflow that includes the required tasks:
-
Completing forms
-
Hiring the candidate
Optional: Set the Hired Candidate Type to SHR in the workflow so only relevant candidates are included in the integration.
Activate the HR integration module
-
Go to Account Details > Edit Modules.
-
Activate the HR Integration module.
-
Enter the username and password of the API user created for this integration in IRIS HR Professional.
-
Select Save.
-
Leave Run in Test Mode deselected.
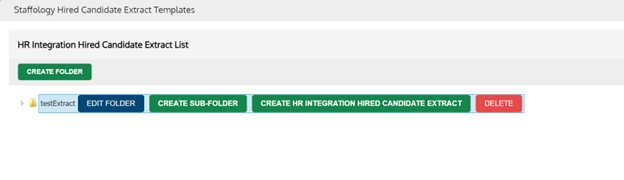
Create the extract template
-
Select Manage Extract Templates > Create Folder.
-
Enter a folder name and select Save.
-
Open the new folder.
-
Select Create HR Integration Hired Candidate Extract
-
Enter a description and select Create.
Select forms and map fields
-
Open the Settings tab.
-
Select the forms that contain the required IRIS HR Professional fields.
-
In Extract Type, select HR Integration Hired Candidate Extract.
-
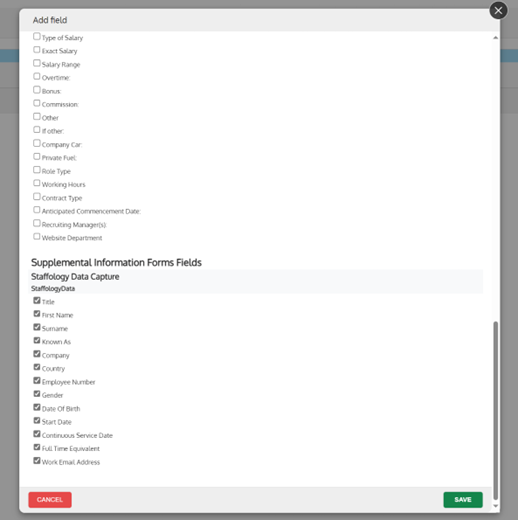
Go to the Fields tab.
-
Select Add Field.
-
Choose all required fields from your forms.
-
Select Save.
-
For each field, select the correct IRIS HR Professional field mapping from the drop-down.
Schedule the integration
-
Open the Extract Service Settings tab.
-
Enter the time to run the extract.
-
Set status to Active.
-
Set Candidate Type to SHR.
-
Select Save.
IRIS Recruitment will now regularly send hired candidates with the SHR Candidate Type to IRIS HR Professional.
Configure the integration report
You can set up a Primary Report that allows you to check the status of any hired candidate transferred to IRIS HR Professional.
-
Go to Account Details > Primary Reports > Configure Primary Reports > Assign Other Reports.
-
Choose SHR Hired Candidate Report.
Use this report to:
-
Check whether the integration successfully sent candidates
-
View error messages if a transfer fails
Test the integration
-
Create a test vacancy.
-
Add a test candidate.
-
Hire the candidate.
-
Wait for the extract service to run.
Check the employee record in IRIS HR Professional
-
Go to Directories > Employees or Starters.
-
IRIS HR Professional places the employee record based on the start date:
Start date Location Past date Employees tab in Directories Future date Starters tab in Directories 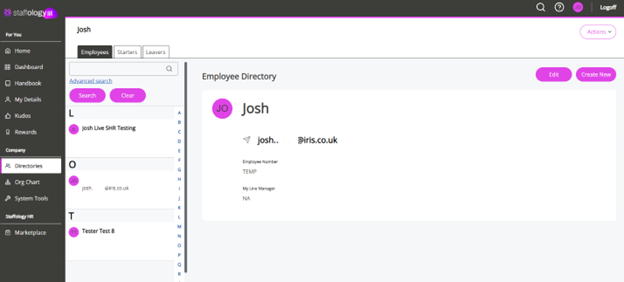
Monitor the integration
After you hire a candidate, the extract runs at the scheduled time and creates a new employee record in IRIS HR Professional.
Check the status of transfers
-
Go to the Extract Log tab
-
Find the candidate’s transfer status
If a transfer fails:
-
An additional tab called Extract Service Errors appears
-
This tab shows why the record creation failed so you can resolve the issue

-
Retry failed transfers
-
Failed transfers are automatically retried every 24 hours until successful
-
If you have resolved the errors, in the Extract Service Settings tab, you can trigger a Forced Run
-
The forced run usually completes within 2 to 3 minutes