Create a salary review spreadsheet
Before you begin, make sure you have created a group of the employees you want to review. You can create a new group using Query Builder, Organisation Explorer, or by selecting the individual employees in HR > All Employees, selecting [Filter Selected], then Save Group.
-
Select the group of employees.
You can select a group in the Show menu, Manage Static Groups, or Query and Groups Catalogue. When you select Save Group in All Employees, this group will be selected automatically.
-
Go to Admin.
-
In the Pay section select Global Salary Update.
-
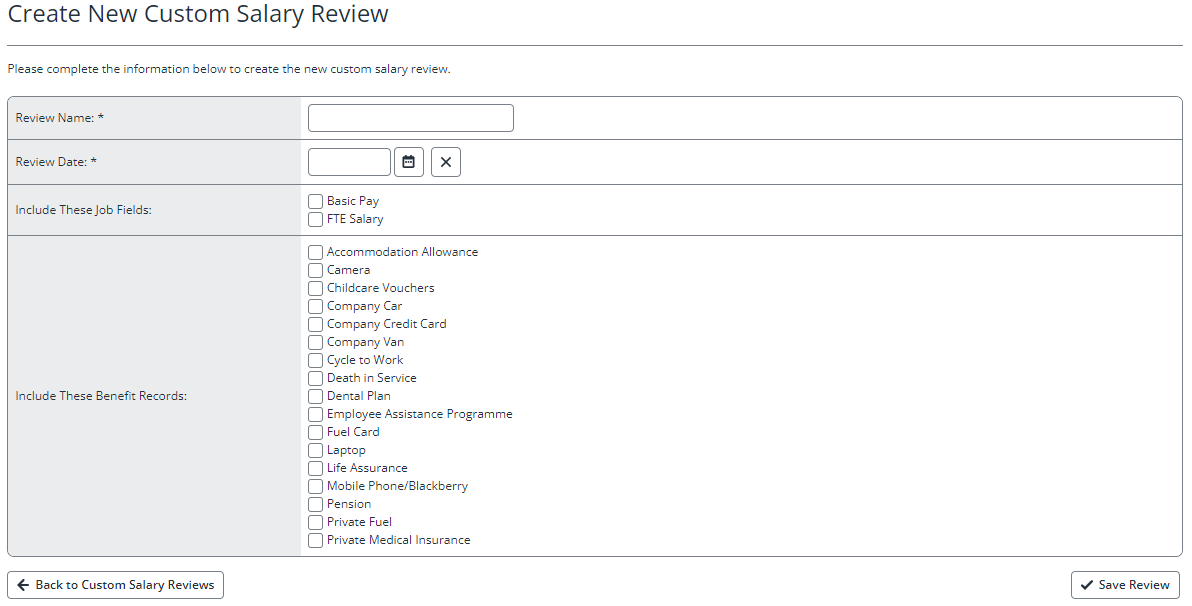
Select Custom Salary Review, then select Create New Review at the end of the screen.
-
Enter a Review Name.
-
Enter a Review Date.
The review date is the date the new job and salary record is created when the review is completed.
-
From Include these job fields, select any field(s) from the Job & Salary page that you want to include in the review. For salary reviews, you only need to select Basic Pay.
-
From Include these benefit records, select any field(s) from the Type field list on the Benefits page that you want to include in the review.
These options are not usually used during a yearly salary review.
-
Select Save Review to create a salary review record including a list of employee names and their basic salary. You can use this saved data at any point.
-
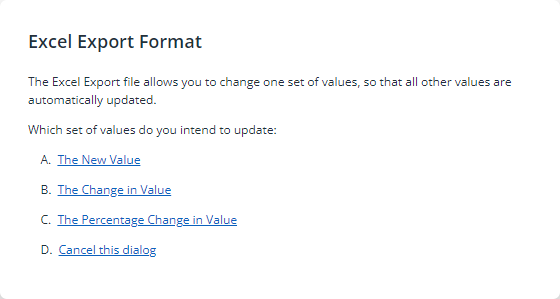
Select Export to Excel.
-
Select the set of values you want to update. Based on your selection, the system automatically updates the other values.
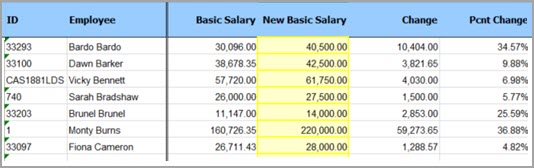
- The New Value - In the New Basic Salary column, enter the total new basic pay value, including any increase (for example, £26,500.00). IRIS Cascade updates the change value and the percentage change. If the new value is lower than the original, you’ll see a minus figure in the Change column.
-
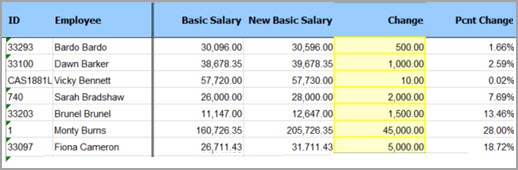
The Change in Value - In the Change column, enter the amount by which the salary will increase (for example, £500). IRIS Cascade updates the basic pay value and the percentage change.
- The Percentage Change in Value - In the Pcnt Change column, enter the percentage by which the salary will increase (for example, 2%). IRIS Cascade updates the change value and the new basic salary value.
-
Amend the data in the spreadsheet as required, and note the following:
-
You can use the blank columns to the right of the data for calculations while you’re working on the spreadsheet, but you must delete any extra data before you upload the data back into IRIS Cascade.
-
The yellow cells must contain absolute values, not cell references or formulae.
-
To exclude any employee(s) from the review, either leave their details blank or return to the group and amend their details. Don’t remove any rows from the spreadsheet, or the upload to IRIS Cascade will fail.
-
-
When you're happy with the changes, save the spreadsheet.
Examples
The following examples show the data exported from IRIS Cascade and the data after the value has been changed, for each set of values:
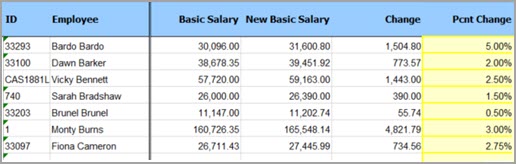
New Value data exported from IRIS Cascade
New Value data after value change
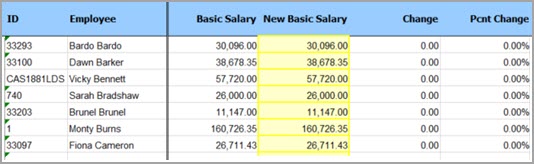
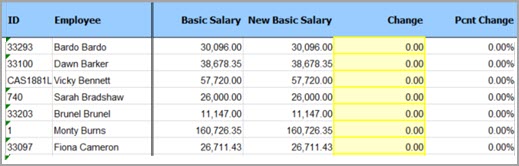
Change in Value data exported from IRIS Cascade
Change in Value data after value change
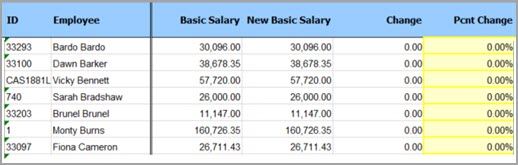
Percentage Change in Value data exported from IRIS Cascade
Percentage Change in Value data after value change