Importing Bank Statements
This topic is only for manually importing bank statements. If using Open Banking, go to Import Open Banking Statements and Transactions
In order to carry out a bank reconciliation, all required bank statements need to be added to the system. This is usually achieved by importing the statements from a CSV file, which can be downloaded from your establishment / organisation's bank. There may however, be occasions when you are unable to access online statements and it is therefore possible to manually add statements, as described in Manually adding a bank statement.
If you are importing a bank statement to an account for the first time, you must have entered an opening balance for the bank account before importing the bank statement. For more information, please see Recording bank account opening balances.
In order to import bank statements, a statement definition XML file is required. These files are different for each bank. The required file should have been installed as part of your system implementation, but banks do change these files, sometimes without warning.
If you experience any issues when trying to import your bank statements, please contact the support desk with a copy of your statement definition file so that they can check that you have the latest version, and if necessary, send you a new version.
Each import is counted by the system as a separate sheet and given a sheet number. When downloading statements from your bank, great care should be taken to ensure that the date range does not overlap with the last downloaded statement, otherwise duplicate entries may be imported.
Do not including the day of the download in the file as there may be unprocessed transactions for that day that are missed by the download.
We have also produced a video to guide you through this process — go to Video — Importing Bank Statements.
-
Go to Banks, then select Bank Statement Import from the menu.
-
The first page of the Bank Statement Import wizard is displayed (Step 1 of 4). To select the required bank statement CSV file, select Browse....
-
The Open dialog is displayed. Locate and select the required bank statement CSV file, then select Open.
-
You are returned to the wizard with the chosen file displayed, as shown in the following graphic. Select Next.
Make sure that the selected bank statement CSV file is not open anywhere. The import fails if the CSV file is not closed.
-
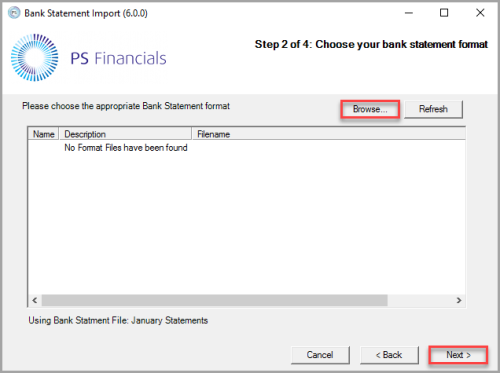
The Step 2 of 4 page of the wizard is displayed. If this is the first time you have used the wizard, you need to select Browse..., select the folder in which the required bank statement definition file is located from the Browser For Folder dialog, then select OK.
-
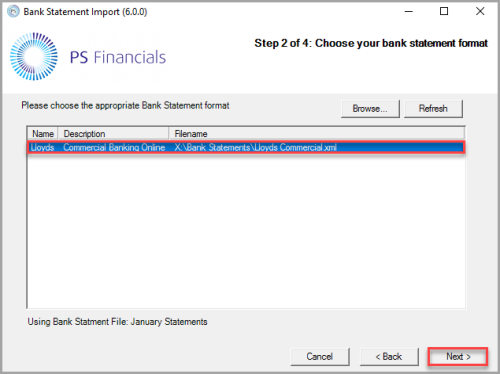
Any previously selected statement definition files are displayed in the Bank Statement format panel, select the required file, then select Next.
If you do not have a statement definition file or are unable to find one, please email the support desk with a copy of the CSV file you are trying to import and support can send a statement definition file which matches the unique format of your bank account.

-
The destination file path of the selected statement definition file is displayed in the Bank Statement format panel. Select Next.

-
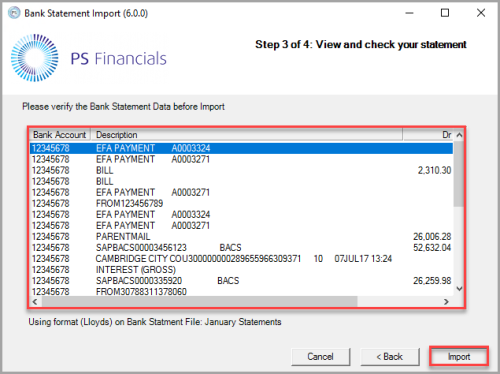
The Step 3 of 4 page of the wizard is displayed. The transactions from the selected bank statement file are in the Bank Statement Data panel. Check the bank statement data is correct, then select Import.
If any of the displayed transactions appear incorrect, check that the transactions in the original uploaded CSV file are correct. On the Bank Statement Import wizard, select Back until you reach Step 1 of 4, then select Browse... to re-select the CSV file (ensuring that the file is closed) and upload the file again. Alternatively, the bank statement can be manually added to the software as described in Manually adding a bank statement.

-
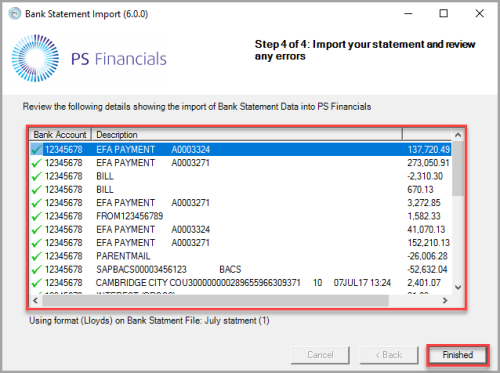
The Step 4 of 4 page of the wizard is displayed. Transactions included in the bank statement file are displayed in the Review panel. Successfully imported transactions are displayed with a green Tick adjacent to the transaction line. Unsuccessfully imported transactions are displayed with a red Cross. Check the status of the transactions, then select Finished. The imported bank statement is then available to view in the Bank Statement Maintenance window.
If any lines are missing, these can be manually added as described in Adding additional lines to an imported bank statement.
