The Data Migration Agent (DMA)
|
On this page: |
Next page: Migrate your PTP data |
The Data Migration Agent (DMA) is a small application that allows you to move your client data from your original IRIS product to your new IRIS Elements account.
The DMA must be downloaded, installed, and configured before you can migrate data.
Watch a video tutorial on downloading and installing the DMA to migrate accounts data only:
Watch a video tutorial on downloading and installing the DMA to migrate tax and accounts data:
Before installing:
You must have Windows Admin credentials to manage this on your own PC or laptop. If you don't have the right permissions, consult with your IT supplier.
Important: Before attempting to install and configure the DMA, please note the following:
-
You must have an active IRIS Elements account to connect to. Check your emails for an activation link if you haven't set up your IRIS Elements account yet.
-
The DMA must be installed on a PC or laptop that has your Keytime product installed.
-
The latest version of .NETDesktop Runtime is required. Go to https://dotnet.microsoft.com/en-us/download to download the latest version.
-
The latest version of PTP Suite is required. Go to https://www.iris.co.uk/support/ptp-software-support/downloads/ to download the latest version.
1. Find your data
To successfully connect your data to the DMA, you must know where your data is stored.
-
If your data is stored on your computer or laptop, the DMA will connect to the database and move the data.
-
If your data is stored on a server, you will need to give the DMA permission to access the server before it can connect to your data to move it.
Follow the steps below to find where your data is in PTP Tax and PTP Accounts Production, and then how to give the DMA permission to access the data if needed.
How do I check where my data is?
To find your data in PTP Tax:
-
In PTP Tax, go to the Settings menu (spanner icon)
-
Select the Configuration tab.
The path to your data is displayed at the bottom under Path to Tax Platform Database Platform.mdb.
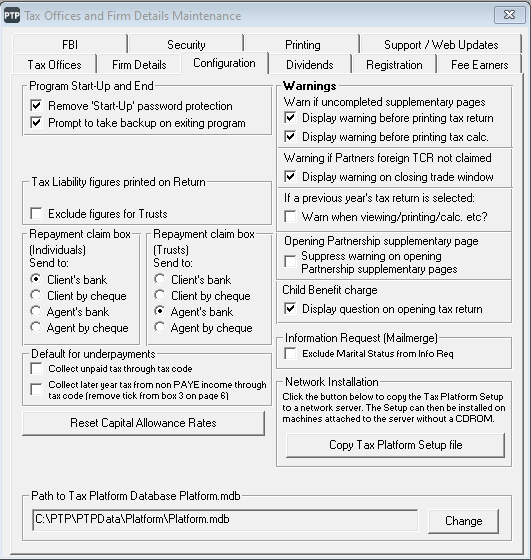
If the data location starts with something like
C:\, this means it is stored on your computer or laptop. You don't need to do anything else, go to Step 2. Downloading and installing the DMAIf the location looks something like
\\company\keytime\platform\example.db, this may mean it is stored on a server and you need to give the DMA permission to connect to the server. Go to How to give the DMA permission to connect to the server below.To find your data in PTP Accounts Production:
-
In PTP Accounts Production, go to Help.
-
Select About and go to the Details tab.
The path to your data is shown. In this example, the path is
C:\IRIS\DATA.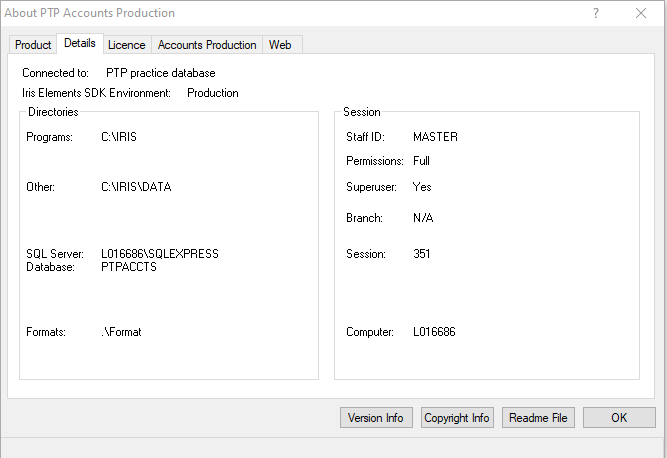
-
If the data location starts with something like C:\, this means it is stored locally. You don't need to do anything else, go to Step 2. Downloading and installing the DMA
If the location looks something like \\company\keytime\platform\example.db, this may mean it is stored on a server and you need to give the server permission to share this data with the DMA.
How to give the DMA permission to connect to the server
-
Go to the server where your Keytime data is stored, right click on the Keytime folder and select Properties.
-
Go to the Sharing tab and select Advanced Sharing.
-
Make sure Share this folder is selected, then select Permissions.
-
Select Add.
-
Enter a group name, such as Everyone and select Check Names. Select OK.
-
Select the checkbox to allow Full Control. Select OK.
-
Make sure to select Apply to save your changes. Select OK to close the window.
2. Downloading and installing the DMA
-
Download the latest version of the DMA from the download page (https://www.iris.co.uk/support/ptp-software-support/dma-downloads/) and make a note of where it downloaded to.
-
On your computer or laptop, find the download file and double-click to run.
-
Follow the instructions on screen to install the DMA. A shortcut to the DMA Configuration Tool is placed onto your desktop.
-
Right-click the DMA Configuration Tool shortcut and select Run as Administrator to launch.
3. Data Migration Agent (DMA) Configuration Tool
Launching the DMA Config Tool takes you to a Product Selection Setup page where you have the option to configure the DMA to allow your chosen IRIS product’s data to be migrated IRIS Elements.
The DMA supports multiple IRIS products, so you must make sure you select the correct product before proceeding.
Select PTP Accounts Production (AP) including Tax or PTP Tax only and then Next to proceed.
4. Using the DMA
The next step has two options, depending on whether you selected PTP Accounts production including tax or PTP tax only in the previous step.
Migrate PTP Accounts Production including tax
Once you have selected to migrate PTP Accounts Production including tax, please check you have completed the required prerequisites before you start migrating your data.
These Prerequisites cover all the IRIS Product offerings available for migration; not just for the product currently selected.
-
Select the checkbox to confirm you have completed the prerequisites, and select Next to continue.
-
Enter the login credentials of your IRIS Elements admin user.
-
Go to PTP Accounts Production, and navigate to the Setup menu .
-
Select Connect to IRIS Elements.
-
Go back to the DMA.
-
There are two ways to establish a connection to PTP Accounts Production database where data will be migrated from. What step works for you will depend on what you confirmed in Step 1. Find your data above.
-
If your data is stored on your computer or laptop, select Browse and follow the path you confirmed earlier to find the database, which is called IrisDBconfig.xml.
-
If your data is stored on a server, enter the details of the server.
-
-
Select Test Network Access. This checks if the details you entered in the previous step are correct.
-
Choose to Grant or Revoke the DMA permissions.
-
Select Validate Access to check the connection.
-
If this fails, check you have entered the correct details for where your data is stored and that the DMA has access to any server used (How to give the DMA permission to connect to the server)
-
-
Select Save Configuration to continue.
-
The DMA is now ready to run. Select Start DMA Service to start. Follow the link to go to IRIS Elements.
There are also some optional Advanced Diagnostic Connection Tests available to run.
Additional diagnostics can be performed to test:
Request Service - to check the configuration is correct.
Recipient Service - where the data from the products are sent when it has aggregated all the information.
Migrate PTP Tax only
Once you have selected to migrate PTP Tax, please check you have completed the required prerequisites before you start migrating your data.
These Prerequisites cover all the IRIS Product offerings available for migration; not just for the product currently selected.
-
Select the checkbox to confirm you have completed the prerequisites, and select Next to continue.
-
Enter the login credentials of your IRIS Elements admin user.
-
The next screen pertains to PTP Accounts Production. As you are only migrating tax data, select Connect Tax Data in the left hand panel.
-
Your PTP installation may be be auto-detected. If it is not, there are two options depending on what you confirmed in Step 1. Find your data above.
-
If your data is stored on your computer or laptop, select Browse and follow the path you confirmed earlier to find the database.
-
If your data is stored on a server, enter the details of the server.
-
-
Select Test Connections to validate the path is correct. If successful, the data path will turn green.
-
Select Save and then Next to continue.
-
The DMA is now ready to run. Select Start DMA Service to start. Follow the link to go to IRIS Elements.
There are also some optional Advanced Diagnostic Connection Tests available to run.
Additional diagnostics can be performed to test:
Request Service - to check the configuration is correct.
Recipient Service - where the data from the products are sent when it has aggregated all the information.
The DMA is now forming a connection between your PTP data and IRIS Elements. The next step is to start moving your data along that connection.
If you're experiencing problems,
Next page: Migrate your PTP data