Create Sales Items
If you want to sell anything where payment is made using IRIS PlusPay, you must create a payment item in IRIS ParentMail. Payments items can be for anything for which a person needs to make a payment, for example, clothing, stationery, trips, etc.
Create New Item
- Select Payments > Create New Item.
- The Create New Item window is displayed. Select Create New.
- The Create New Item window is displayed.
Create New Item from a Template
- Select Payments > Create New Item.
- The Create New Item window is displayed. Select Use Previous Item.
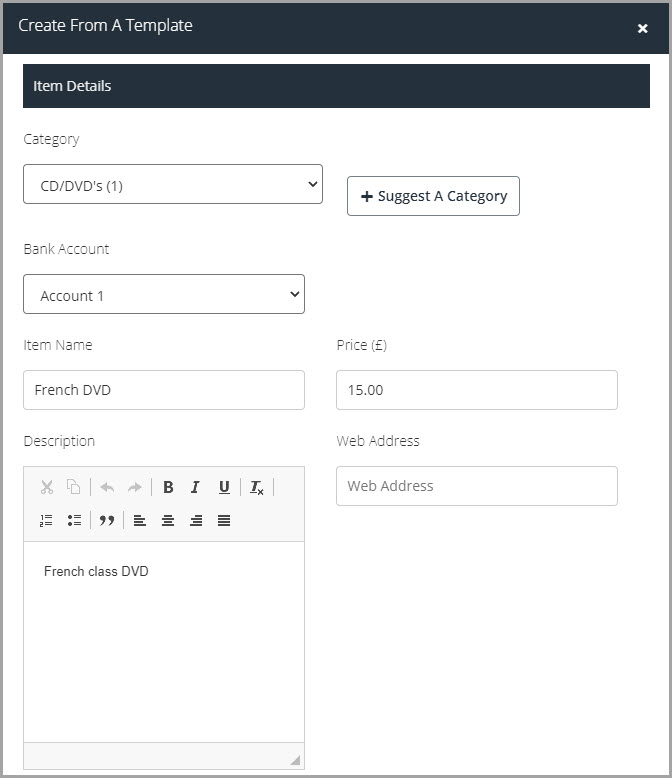
- The Create From A Template window is displayed. Select a category and Select a product from the drop-down lists, then select Select Template.
Enter Payment Item Details
-
Select an option from the Category drop-down list. A number is displayed adjacent to the category that identifies the number of payment items currently available for that category.
The default categories are provided by IRIS ParentMail. If there is a category that you want to use but it is not listed, select + Suggest A Category. Enter the details of your suggestion, which is sent to IRIS ParentMail.
- Select the Bank Account from the drop-down list that payments for the item need to be made to.
-
Enter an Item Name (255 character limit), Price (£), and Description.
If the item needs to be purchased from another site, enter the Web Address.

-
Select the required Settings (On/Off), then enter the required Settings for the item. The following options are available:
- Alert Users of Creation — send a message to notify users that the payment item is available as soon as it has been saved. We recommend that this option is selected so that your users know when items are available for purchase.
- Requires Fulfilment — for items that needs to be posted or handed to the person. An email is automatically sent to the staff member specified in the payment settings.
- Allow Donation — users can make an optional donation of their choice in addition to the item price. If the item can be paid in instalments or part paid, users are unable to make a donation until the item has been paid in full.
- Gift Aid — allows gift aid to be added to charity donations if Allow Donation has been selected.
- Create Ticket Numbers — to add ticket numbers to your payment item. For example, if the item is an event ticket or raffle tickets. You can run the Download a List of Ticket Numbers for a Product report (accessed via Reports > Payment Reports) to download the ticket numbers.
- Fast Moving — for items that sell out quickly. The user needs to pay for the item within 20 minutes.
- Compulsory Item — for items that need to be purchased. Automatically adds the item to the To Pay section.
- Parental Consent Required — consent needs to be provided for the item, for example, a trip.
- Allow Waiting List — if an item is not available, the person can join a waiting list to be notified when the item is available to purchase again. If an order is cancelled, you can view the waiting list on a first-come first-served basis. View the waiting list for the selected product report (accessed via Reports > Payment Reports).
- Allow Part Pay — the user can make a part payment and pay the remaining balance at a later date.
- Allow Pre Order — allow users to pre-order. Useful for identifying how much stock of an item you need to order.
-
Select the required Settings (Detailed for the item, then enter the required Settings. The following options are available:
- Select Specific Users — if the item should only be made available to certain users. If you do not specify any users here, the payment item is available to all users. If this option is selected, the Limit Quantity Per Child option is selected automatically and defaults to 1.
- Stock Quantity — to specify the amount of stock that will be available. This can apply if there are a restricted number of physical items or a limited number of places on a trip.
- Event Date — if the payment item (such as a school trip, performance, etc.) occurs on a specific date.
- Due Date — to specify a date when payments should be made by (often required for school trips). When the order date has passed, new orders can not be placed.
- Accounting Codes — to make accounting code information available for this payment item. Enter the Cost Centre, Department, Nominal Code, or SKU field as required. The accounting code information is available in the following reports, all of which can be accessed by selecting Reports > Payment Reports from the left-hand menu.
- VAT Rate — to display a VAT rate for the payment item.
- Instalments — the item can be paid for in instalments. This can be particularly useful for school trips and/or more expensive items.
- Purchase Window — to add a start and end date during which the payment item can be purchased. If the item with a Purchase Window was set as a Compulsory Item or for Instalments, then the item is still available to be selected and paid for after the date entered in Viewable To.
- Options — to provide options for the payment item, such as size, colour, etc. If you want to enable quantity as an option, Stock Quantity must be selected.
- Limit Quantity Per Child — to limit the number of times a parent can purchase an item. For example, enter 1 if you only require a parent to pay once for a trip. (Automatically selected if Select Specific Users is selected.)
-
When you have entered all the item details, select Save.