Important Installation Information for C2K Schools
The install process for organisations that are part of the C2K network is slightly different to other schools as the software must be installed on the Principals PC. This is because they have more administrative rights than other users.
You must install a local SQL instance if one does not already exist before you can use the software tool.
When the install is complete, the configuration page is opened. Enter a SIMS account and under Option 1, Browse to the Vol 1 drive and select the Sims folder. When you have completed this, select Settings at the bottom of the page. This opens the Proxy Settings page.
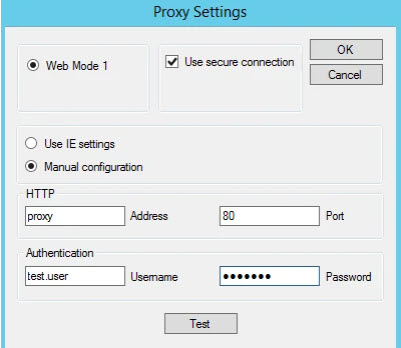
Change the option to Manual configuration and for the Address enter proxy and for the Port enter 80. Under Authentication you must enter a Username and Password. We recommend using one of the accounts in the Excel document, which can be found in MySchool, then select C2kExchange, then MySchool, then School Documents, then Guest Wireless.
If this is not possible or you do not have access to this area you can use the username and password you use to log on to your PC. However, this expires every 3 months when your password changes so this needs updating manually each time.
To make sure the details you have entered work, select Test. This must come back Connection Ok. Once you have filled in all of the details, select OK. This displays two messages which should confirm the setup has been completed successfully.
If you receive any errors whilst configuring the software please check our Common Errors guide