Display the Purchase Order Icon in IRIS Purchasing
CUSTADMIN access only
This article explains how to ensure the Purchase Order icon is displayed for a user in IRIS Financials Purchasing.
The following scenario is based on a user in the FINAST user group, who does not have the Purchase Order icon on the IRIS Financials Purchasing Home page.
The icons for IRIS Financials Purchasing users are set up in the Distribution module.
To access Distribution:
- Select Start > PS Financials > Distribution. The graphics in this article are from a PS Cloud server. If you are not a PS Cloud customer, your system appear differently. Please speak to your IT department/provider if you cannot find the Distribution module.
- The PSF Distribution Logon window is displayed. Enter the applicable server in the Server field.
- Enter the PSFADMIN or CUSTADMIN username and password in the applicable fields.
- Select the applicable Database and Company from the drop-down lists and click the OK button to login.
- Select Masters > Workflow > Document Types from the Distribution main menu.
- The Document Types Maintenance dialog is displayed. Select the required document type, e.g. PORD - Purchase Order then click the Workflow button.
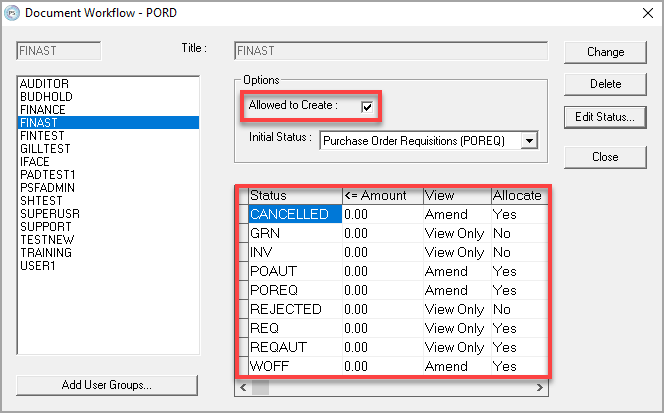
- The Document Workflow dialog is displayed. A list of user groups already able to access this document type is displayed in the left-hand panel. If the required user group is not listed, click the Add User Groups button.
- The Select User Groups window is displayed. Select the user group to add, then click the Add button. The selected user group will be moved to the bottom panel. Click the OK button.
- From the Document Workflow dialog select the required user group - FINAST in our example.
Any access already applied will be displayed on the right-hand side. The Allowed to Create check box must be selected.
The previous graphic displays a typical set up for the purchase order document type. If the user does not have these Statuses, you will need to add them. These allow the user to view and post purchase orders. If they are set as an approver in IRIS Financials, it will also allow the user approve or reject an order. - To add these Statuses, click the Edit Status... button.
- Click the Add Status... button.
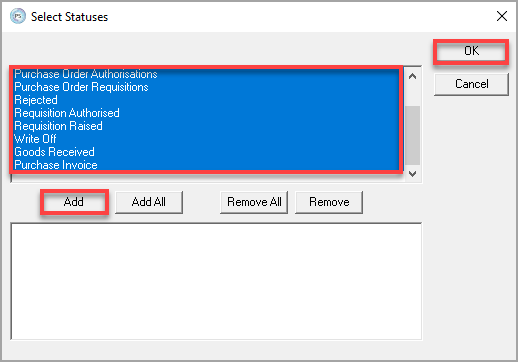
- Select the following Statuses from the list and click the Add button. When you have completed your selections, click the OK button to return to the previous window.
- POREQ
- POAUT
- GRN
- INV
- CANCELLED
- REJECTED
- MIXED
- WOFF

-
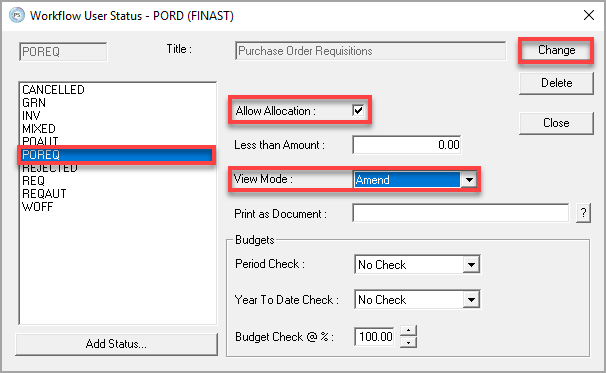
Select a Status, e.g. POREQ, and select the Allow Allocation check box if applicable. Then select the applicable option from the View Mode drop-down list and click the Change button. A full list of recommended settings can be found in the following table.

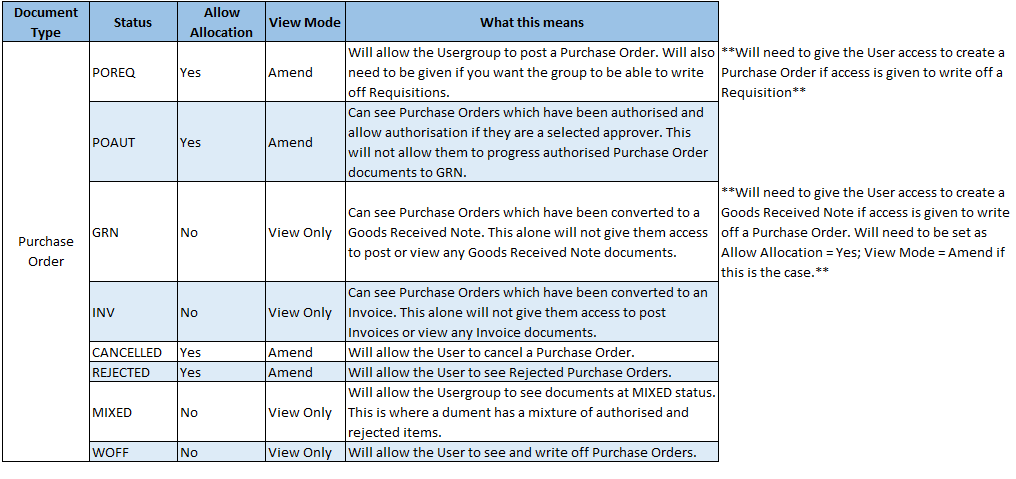
The following table is a 'one size fits all' recommendation in order for a user to access the PORD icon in IRIS Financials Purchasing. You may wish to make some adjustments to your own configuration, please see the spreadsheet at the bottom of the Providing Access to IRIS Purchasing Documents & Statuses article for more information. Please note, even with the following configuration, a user will not be able to authorise or reject a document unless they are a designated approver. Please see the Setting up IRIS Purchasing Document Approvers / Authorisers article for more information.

Once you have configured the list of Statuses, the user will be able to see the Purchase Order icon on the IRIS Financials Purchasing Home page.