Providing Access to Document Statuses
CUSTADMIN access only
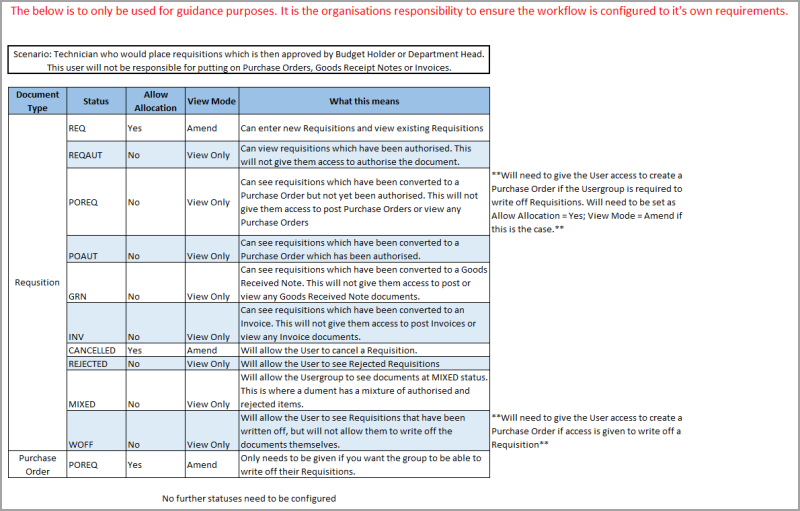
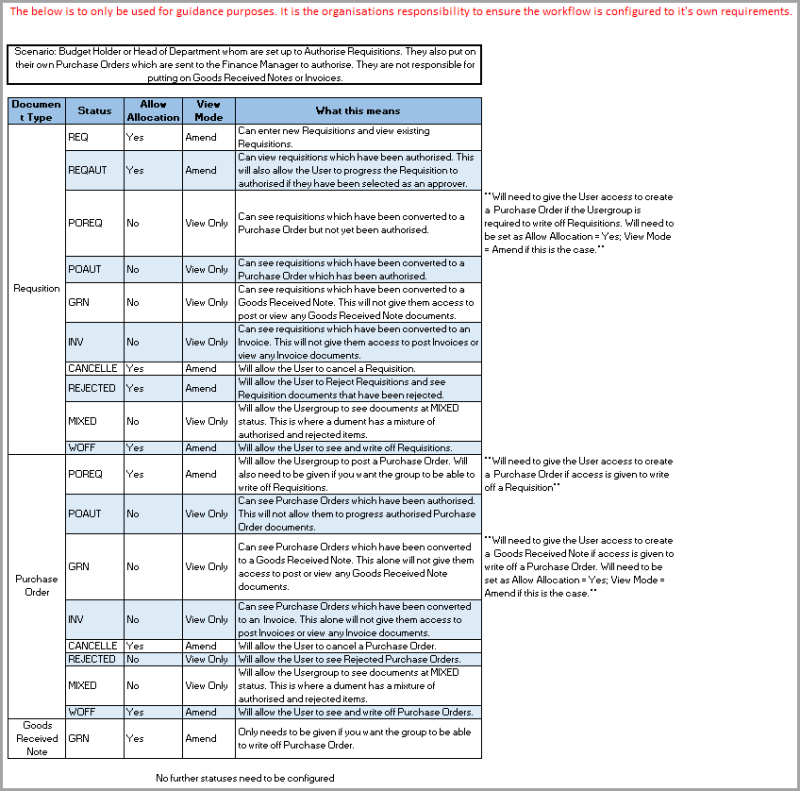
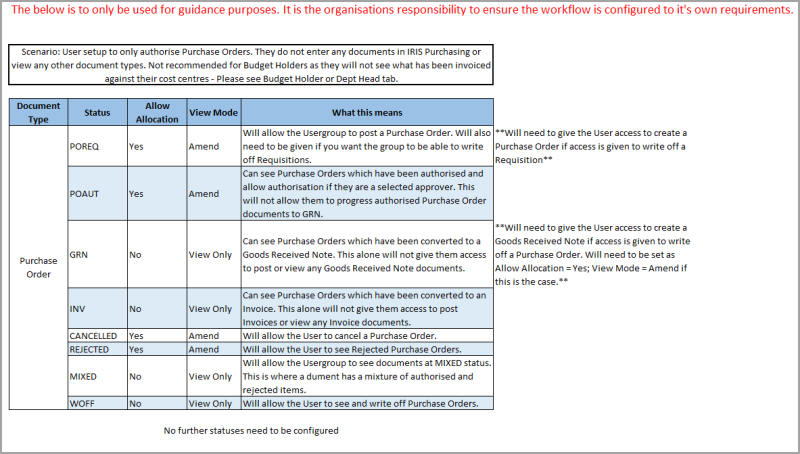
There are various types of documents used within the purchasing cycle, i.e. requisitions (optional), purchase orders, goods received notes, and invoices.
Each type of document is allocated a status to identify to which stage of the purchasing process the document relates. For example, a status of POREQ is allocated to a purchase order and a status of POAUTH is given to a purchase order that has been authorised.
Three new document statuses have been provided in IRIS Financials Purchasing
-
Mixed - Identifies a document that has multiple item lines - some of which have been authorised and some rejected.
-
Rejected - Identifies a document that has been rejected by the authoriser.
-
WOFF - Identifies that the document (or a part of it) has been written off.
Access to these new document types is provided at the time IRIS Purchasing is installed. However, if you have created any new user groups for IRIS Purchasing, you need to give access to these new document types via the Distribution module.
If you do not have access to the Distribution module, please contact the person within your establishment/organisation who administers your system, i.e. has a CUSTADMIN login.
-
Select Windows Start > PS Financials > Distribution.
-
The PSF Distribution Logon is displayed. Enter you login details, then click OK.
-
The PS Distribution window is displayed. Select Masters > Workflow > Document Types from the top menu.
-
The Document Type Maintenance dialog is displayed. Select the required document type from the left-hand panel, then click Workflow....
-
The Document Workflow dialog is displayed. User groups who already have access to the document type are displayed in the left-hand panel. If the required user group is not displayed, click Add User Groups....
-
The Select User Groups dialog is displayed. Select the user group(s) to which you want to give access from the top panel, then click Add.
-
The selected user group(s) is displayed in the bottom panel, click OK to confirm your selections.
-
The Document Workflow dialog is displayed. Select the User Group you just added from the left-hand panel e.g. PURADM, (any existing statuses assigned to the user group are displayed in the bottom panel). In the Options panel, if required, select the required settings for Allowed to Create and Initial Status.
-
Allowed to Create - is selected if you want to give the user group access to create the selected document type e.g. a purchase order. If not selected, the document type is not displayed in IRIS Purchasing.
-
Initial Status - is selected from the drop-down list to determine the initial state of the document type when first selected by a user in the user group. For example, for purchase orders you would typically select POREQ as the document needs to be sent for authorisation.
-
-
To select the document statuses for the user group, click Edit Status....
-
The Workflow User Status dialog is displayed. Click Add Status....
-
The Select Statuses dialog is displayed. Select the required statuses from the top panel, then click Add. The selected statuses are displayed in the bottom panel, then click OK to confirm your selections.
In most circumstances, users would be given a minimum of view only access so that they can track the progress of any document they have created i.e. whether it has been approved and progressed.
-
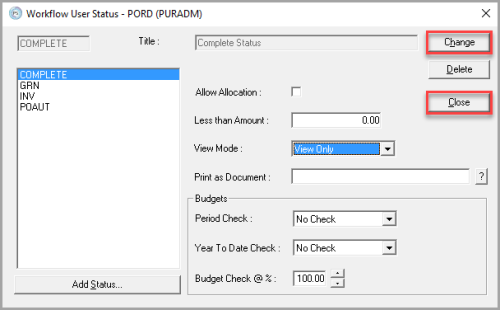
The Workflow User Status dialog is displayed. The selected document types are displayed in the left-hand panel. You must select the options for each of the document types individually or the default settings are applied. Select a document type from the left-hand panel, then select, as applicable, the options for the user group from the following:
When giving users access to create INV documents in IRIS Purchasing, you must also give the user access to the POIN document type in IRIS Financials. For more information, please see Setting Up Access to Document Input Types
OPTION DESCRIPTION Allow Allocation Select to enable the user to create the specific document status, e.g. create a requisition, purchase order, etc. Less Than Amount Select if you want to limit access based on an order value. For example, you could enter 1000.00 to limit access to orders up to 999.99. If you do not want to limit access leave the value at 0. View Mode Select an option from the drop-down list to determine user group access. The options available are: No Access - the user group are unable to view the document. View Only - the user group can view but are unable to amend the document. Amend - the user group is able to amend the document. Print as Document You do not need to select this as it is not available in IRIS Purchasing Period Check Select an option from the drop-down list to determine if the budget period is checked against the current period spend. The options available are:
No Check - select if you do not want a check performed.
Check - select if you want to display a warning to the budget holder if the order takes them over budget.
Enforce - select to prevent an order from being placed if the order exceeds the budget period.Year Check Select an option from the drop-down list to determine if the cumulative budget from period 1 to the current period is to be checked against the all spend to date for the year. The options available are:
No Check -select if you do not want a check performed.
Check - select if you want to display a warning to the budget holder if the order takes them over budget.
Enforce -select to prevent an order from being placed if the order exceeds the budget period.Budget Check @% Select the amount of percentage of the budget you want the checks calculated at, which displays a message to the user if the order takes the budget over the percentage, but does not stop the order being progressed. -
When you have selected the required options for the document type, click Change to confirm and save your selections. When you have selected the options for all required document types, click Close to return to the Document Workflow dialog.
The following examples contain different scenarios to assist with which statuses to apply to the user groups for required documents. Click the user group to display the additional information.
Finance Department
In addition to the following, the User Group also need access to create POIN or (PI) documents in IRIS Financials. For more information, please see Checking Security for Viewing and Authorising Non-Order Documents .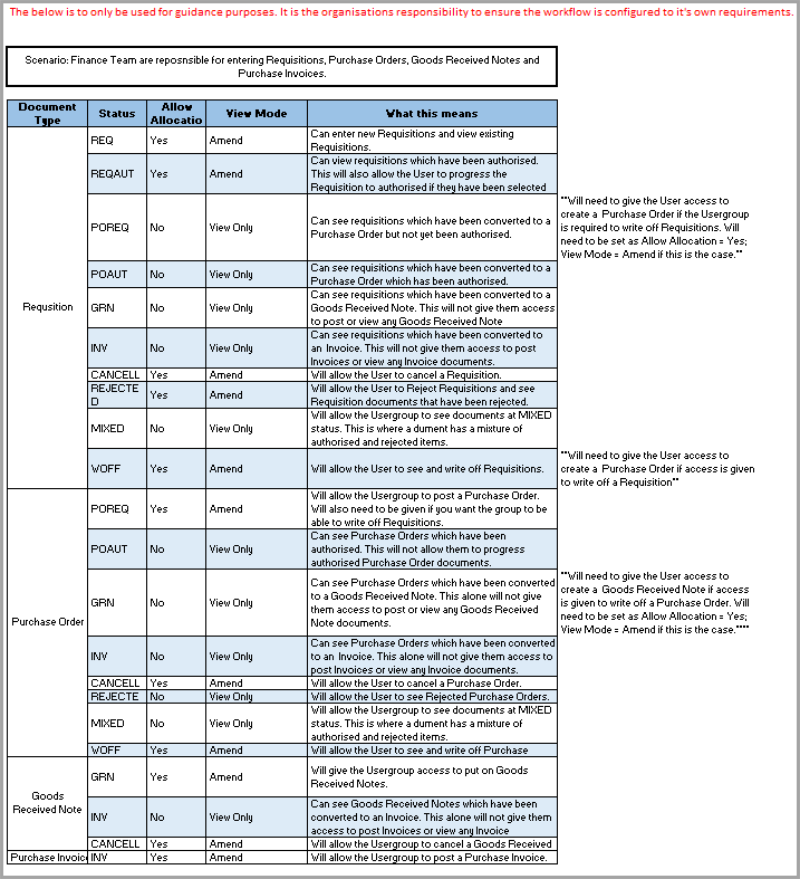
Auditor
In addition to the following, the User Group also need access to create POIN or (PI) documents in IRIS Financials. For more information, please see Checking Security for Viewing and Authorising Non-Order Documents .
