Emailing Supplier Statements Using Remittance Emailer
In IRIS Financials the Remittance Emailer module is used to email and print remittance advices for distribution to suppliers that are based on a previously defined paylist. Payments that have been posted manually (i.e. using a document input form) are not identified by Remittance Emailer. If the payment for a supplier has not been allocated for any reason (for example, if you want to change the accounting period for a specific invoice), the paylist stamp is removed from the supplier, which means that they do not appear in the search for that paylist and therefore a remittance document would not be produced or emailed for that supplier.
Before using Remittance Emailer, there are some settings that need to be configured for each user. For more information, please see Configuring the Emailer Suite Product.
- Log into Remittance Emailer as described in Logging into Remittance Emailer. The Remittance Emailer window is displayed.
- Enter the required search criteria as described in Selecting Documents and Accounts in Remittance Emailer.
- The paylist is displayed, click Expand (+) adjacent to the paylist name to view the list of suppliers/people included in the paylist.

- Select the check boxes adjacent to the accounts you want to send remittances to
- If you want to preview the remittance before sending it, right-click on any line and select Preview Report. To print a copy of the remittance advice, click the Print Remittance icon on the toolbar (select the required printer by clicking the drop-down arrow adjacent to the icon).

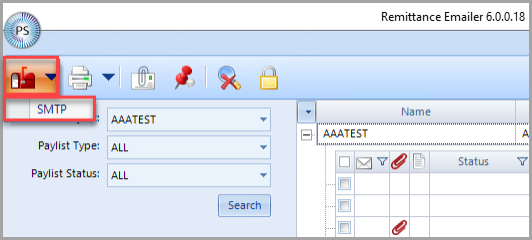
- To send remittance emails to the selected accounts, click the Email Remittance icon, then select the correct SMTP option from the drop-down list.
- The Emailing Complete dialog is displayed
- If you receive the Unable to send email. Report generation failed. error, please see Dealing With The Report Generation Failed Message.