Managing Approvers who have Left (v2, v4, v6)
There may be instances where a purchase order/requisition has been posted and the approver/authoriser for that document subsequently leaves or goes on long-term sick.
If this is the case, you can change the authoriser on the cost centre, or other applicable ledger, and repoll the document to send the order to a new approver for authorisation.
If an approver has left your organisation, their IRIS Financials account must also be deactivated.
The term repoll refers to resending a document through the IRIS Financials approval workflow, i.e. resending for authorisation.
There are several steps required for this process:
- Is the new approver already a user in the IRIS Financials system?
If the user already exists in the system, skip to step 2. If not, ensure that a replacement approver has been added as a new user (if required) using the Financials Administrator application. For more information, refer to Add Users. - Set/check the authorisation details for the new approver (if required)
If the replacement approver is not an existing approver, you will need to set their authorisation details, such as approval limits. - Change the approver on the applicable cost centre/ledger(s)
This process determines whether the user can approve requisitions, purchase orders (or both), and to what level (based on the approval limits previously set). It is important to ensure that the approver is assigned to all required cost centre/ledgers. For example, a user could be an approver for the History cost centre as well as a Trips ledger. - Mark the absent approver as on holiday (optional)
This is a recommended step. Marking the absent approver as on holiday will capture any purchasing documents relating to a cost centre or ledger that you may not have changed the approver for (as described in the previous step). - Identify Purchasing documents awaiting authorisation
This is achieved by producing the Unauthorised Requisitions report and the Unauthorised Purchase Order report. This identifies that purchasing documents that are waiting to be authorised and require action. - Update the requisition or purchase order with the new approver
This is achieved by resending the applicable documents for approval using a process called repolling.
You may find it useful to produce a list of cost centres/ledgers and their authorisers to help identify any other approvers that need adding or changing. For more information, see
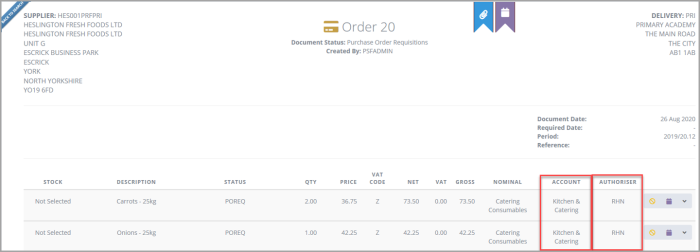
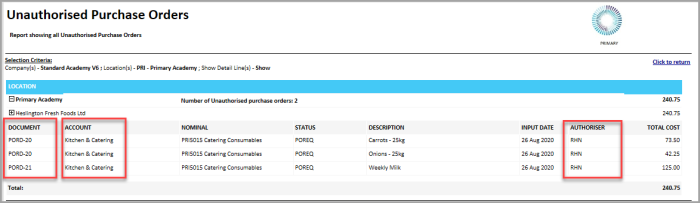
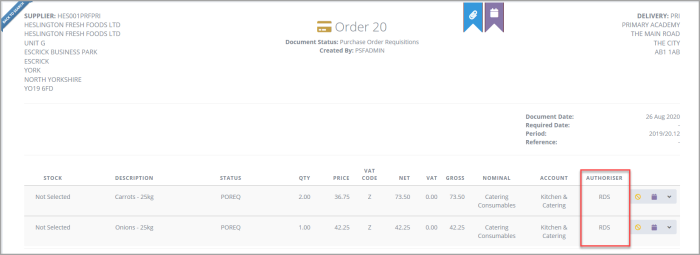
Example used in this topic: Purchase order 20 is awaiting authorisation by RHN - Rita Nash as shown in the following graphic, but user RHN has already left the organisation and the purchase order needs to be authorised by RHN - Rita Nash.
Step 1 - Is the new approver already a user in the system?
Step 2 - Set/check the authorisation details for the new approver (if required)
If the replacement approver is not an existing approver, you will need to set their authorisation details, such as approval limits.
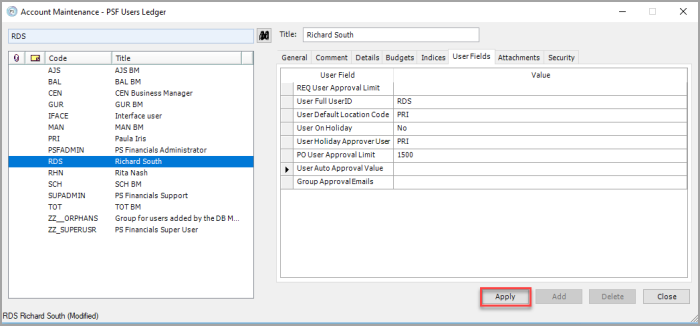
Each approver must have their authorisation details set via the USERS ledger.
-
Select Masters > Accounts from the top menu. The List of Ledgers dialog is displayed.
- Double-click the USERS ledger. The Account Maintenance dialog is displayed.
-
Select the new approver from the left-hand panel, then select the User Fields tab.
-
Complete the information as follows:
- REQ User Approval Limit - Enter the maximum amount this user can authorise for requisitions. If your establishment/organisation does not use requisitions, leave this blank.
- User Full UserID - Displays the username used to login.
- User Default Location Code - The default location code for the selected user.
- User on Holiday - Select No from the drop-down list. This should be changed to Yes if the user is on holiday or on long term leave. Any orders requiring authorisation will be rerouted to the user who is assigned as the User Holiday Approver User.
- User Auto Approval Value - Documents up to, and including this value will be automatically approve for this authoriser. Leave blank if you do not want to use this function.
- Group ApprovalEmails - Only applicable to user group authorisations (accounts on the USERS ledger beginning with ZZ). Enter the applicable email addresses for the users in the group, separated by a comma if applicable. Leave blank if the account does not begin with ZZ.
- Click the Apply button to confirm your settings.
Step 3 - Change the approver on the applicable cost centre/ledger
Once you have set up a new approver's settings, you need to assign them as an approver on the applicable cost centre account.If you are changing approvers due to absence or departure, simply overwrite the existing approver.
-
Select Masters > Accounts from the top menu. The List of Ledgers dialog is displayed.
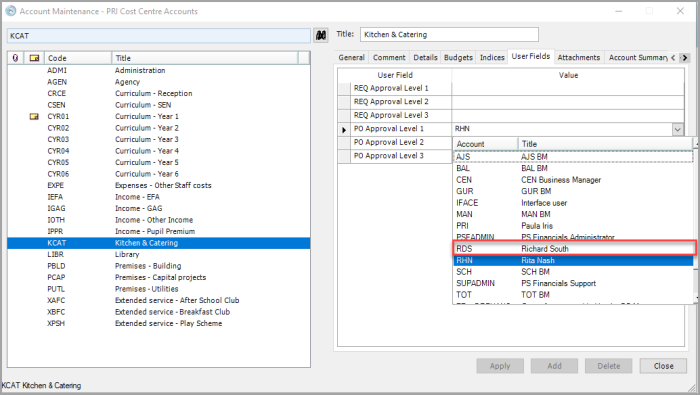
- Double-click the applicable cost centre ledger, which will be prefixed by a location. In the previous graphic, PRI_COSTCTR (PRI Cost Centre Accounts) is selected.
-
The Account Maintenance dialog is displayed. Select the applicable account , e.g. KCAT - Kitchen & Catering, then select the User Fields tab.
-
Select the applicable PO Approval Level field based on your purchasing workflow (which determines who approves a requisition or requisition based on their approval limits). contains the previous authoriser, i.e. PO Approval Level 1. Select the correct approver from the drop-down list. e.g. RDS (Richard Smith).
-
Click the Apply button to save your changes. Repeat for any other cost centre accounts as applicable.
You should also consider accounts on ledgers such as TRIPS, CAPITAL, etc. that may also contain approvers.
Step 4 - Mark the approver as on holiday (optional)
This is a recommended step. Marking the absent approver as on holiday will capture any purchasing documents relating to a cost centre or ledger that you may not have changed the approver for.
When an approver is on holiday, it is often necessary to set another user as the holiday approver to ensure that orders are not held up in the system.
If an approver is marked as on holiday, all orders are re-routed to the holiday approver within 72 hours.
If the approver is not on holiday and the authorisation is still outstanding after 72 hours, a chase email will be sent to the original approver.
Holiday approvers can authorise requisitions or orders up to the authorisation limit of the approver who is absent, irrespective of the holiday approver’s limits.
Users of IRIS Financials Purchasing can force orders to be rerouted by repolling the documents if the 72 hour period is too long. For more information, see Resending Documents for Authorisation (Repolling) in .
This section assumes that the new approver has already been created in Financials Administrator.
- Select Masters > Accounts from the top menu.
- The List of Ledgers dialog is displayed. Double-click the USERS ledger to select it.
-
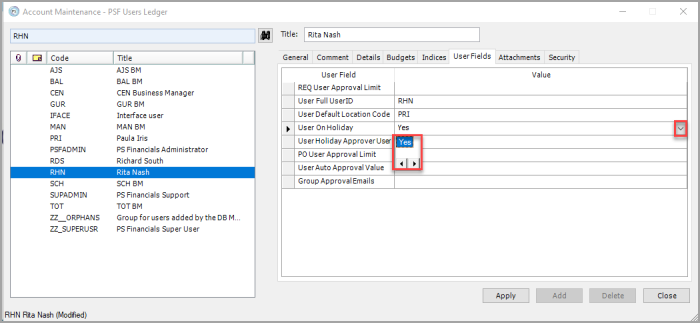
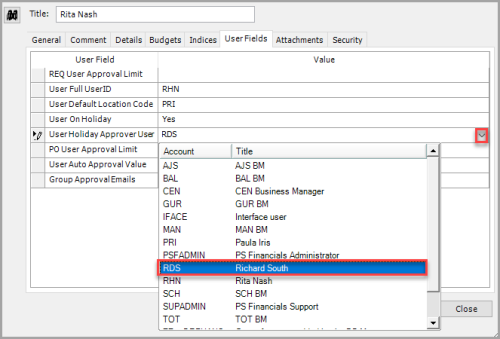
Select the current authoriser of the document(s) e.g. RHN (Rita Nash), then select the User Fields tab.
-
If this approver has left your establishment/organisation or is on long-term sick, select Yes from the User on Holiday field drop-down list.
-
Select the new approver from the User Holiday Approver User drop-down list, e.g. RDS - Richard South, then click the Apply button. This will ensure that any documents already awaiting approval from the old approver, will transfer to the new approver within 72 hours. You can manually force these through to the new approver immediately if you do not want to wait. For more information, see Update the requisition or purchase order with the new approver section.
Step 5 - Check for additional unauthorised documents
The Unauthorised Purchase Order or Unauthorised Requisition report displays all orders that are waiting to be authorised by a specified approver. You can use these reports to view any requisitions or purchase orders awaiting authorisation by the user who has left , or is on long term leave. These documents can then be resent for authorisation (repolled) as described Update the requisition or purchase order with the new approver.
The following instructions show how to run the Unauthorised Purchase Order report.
- FromIRIS Financials , select Modules > Reporting Suite from the top menu.
-
The Reporting Suite Home page is displayed. Select Unauthorised Purchase Orders from the Purchase Ordering section.
-
The Unauthorised Purchase Orders report criteria section is displayed. Use the criteria to search for unauthorised purchase orders as follows:
- Select the Company(s) - Company within your establishment/organisationthat raised the order.
- Select the Location(s) - Select the check box adjacent to the applicable location(s).
- Hide or Show Detail line(s) - Displays or hides line item details for the purchase order(s).
-
Search for Authoriser - Enter the user name of the applicable approver. In our example,
RHN. Leave this field blank to search for all orders waiting to be approved by all authorisers for the applicable location(s) you have selected.
-
Click the View Report button to run the report.
-
The report displays any purchase orders matching the criteria you have specified. The report displays unauthorised documents, document numbers, the accounts and the authoriser can be established (if unknown).
Step 6 - Update the requisition or purchase order with the new approver
You can update the applicable purchase documents with the new approver using the Repoll Purchasing Document function. Repolling a document clears the current approver in IRIS Financials Purchasing and resends the document for authorisation by the new approver.
Note: This function can only be carried out by a user with System Administrator access and only one document can be repolled at a time.
-
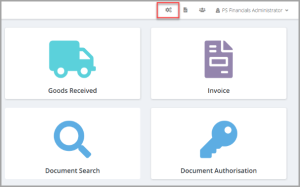
Log into IRIS Financials Purchasing as CUSTADMIN/PSFADMIN then click the Settings icon on the Home page.
-
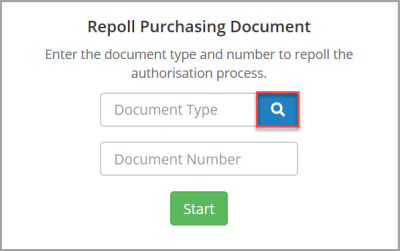
The Maintenance window is displayed. From the Repoll PS Purchasing Document panel, choose the type of document to search for by clicking the Search icon adjacent to the Document Type field.
-
Click PORD - Purchase Order from the Select window.
-
The Document Type field displays the selected type. Enter the applicable document number in the Document Number field (ascertained from the Unauthorised Purchase Order or Unauthorised Requisition report) then click the Start button.
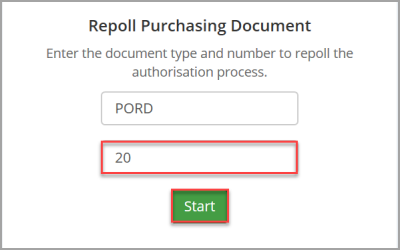
It is only possible to repoll one document at a time.
- ADocument repolled successfully message is displayed if the document repoll has been successful.
It can take several minutes for the document to go through the workflow process before the new authoriser is displayed on the purchase order.
In our example, purchase order 20 was displaying RHN as the authoriser. After the document has been successfully repolled, the new approver now correctly displays (RDS in our example).
If the document number is incorrect or there is nothing to repoll, one of the following messages is displayed. This usually indicates the document has already been authorised or the document does not exist.
