Process goods received
Generate a goods received note (GRN) when you receive ordered goods. You can generate an invoice only after you produce the applicable GRN.
It is essential that GRNs correctly reflect what goods have been received. We recommend that you put vigilant internal procedures in place so that goods received are accurately checked before the physical goods received note is passed to the Finance Team. If any items are missing or damaged, refer to Handle missing or damaged items.
Create a new goods received note (GRN)
Once the goods have been checked against the supplier delivery/goods received note, you can then generate a goods received note (GRN) in IRIS Financials Purchasing.
- From the Home page, select the Goods Received icon.
- By default, a list of suppliers with authorised purchase orders appears in the Select your Supplier window.
- Either scroll through the list, or search for the required supplier via the Search Criteria field. You can enter any element of the supplier’s account code or name/title. The list is reduced based on the criteria entered.
The system selects Load Indices by default to improve search performance. It should be left selected. For maximum efficiency, suppliers are loaded 20 at a time. As you scroll through the list more suppliers are loaded. A slight delay might be noticeable on slower internet connections. - Select the required supplier to select them. The select your detail lines window opens.
- Select the required items, then select Progress. You can create a GRN for items from multiple purchase orders for the same supplier, if required. The details from the authorised purchase orders are then progressed to the GRN as this graphic shows.
- Complete the required GRN information as follows:
Delivery Address
Check that the delivery address is correct. Select the Edit icon to select a different address if the goods were delivered to a different location.
Supplier Details
The GRN shows the supplier details, which are read-only. You can add other items from other authorised purchase orders for this supplier by selecting the Edit icon.
Document and delivery dates
Defaults to the current date and can be amendedby selecting the applicable Edit icon. For example, you may want to enter a copy of a physical GRN and use the dates on that document.
Period
Automatically populated based on the initial document date. This is the accounting period that the commitment posts into, and you can change it by selecting the Edit icon.
Reference
This field contains any previous reference entered at the requisition or purchase order stage. Select the Edit icon to amend or enter a required reference, such as the delivery note number (your administrator may have set up your system so that you must provide this reference).
Comments
Enter any comments relating to the GRN, such as any items that are missing or damaged.
- With the exclusion of QTY, the item information is unavailable, displaying the information as posted in the purchase order. You can show extra information for each item by selecting the down arrow at the end of the line.
- Select the Edit icon to amend the quantity of any item received. Reduce the quantity if items are missing or damaged because you have not received the full amount. For more information, refer to Handle missing or damaged items.
- Once the items have been checked against the physical items received, select Post Received Note at the bottom of the document. Correct any errors that appear before you continue. A message appears to indicate the GRN has been successfully posted and a GRN document number automatically created.
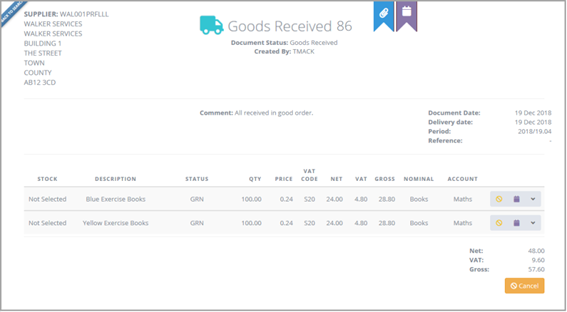
- This graphic shows that all goods have been received.
- You may want to attach a scanned copy of the physical goods received note as an attachment. For more information, refer to Add attachments to documents.