Customising Enquiry Displays
Some Of the nominals and ledgers used in this topic may be different to those in your chart of accounts.
An enquiry is used to view documents that have been added to IRIS Financials to record your establishment/organisation's transactions. From any of the enquiry windows you can customise the enquiry display, for example, adjust the column widths or add and remove columns to only view the information you need. You can also use enquiries to export data in a report form. For more information, please see Exporting Data to Excel.
Enquiries have a range of functions that can be used with various documents. For more information, please see Detail Enquiry Functions and Document Enquiry Functions.
The following examples use the Document Enquiry window but the functionality is the same for all enquiry windows.
Adding or Removing Columns
- On the enquiry window, right-select anywhere on the document column header bar (or where available, the detail line column header bar).
- Select or deselect the required column heading(s) from the pop-up menu, then select anywhere on the enquiry window to close the pop-up menu.
The column types available for selection depend on whether the headings are at document or detail line level. Selected fields have a Tick icon adjacent to the Title if they are currently displayed. If you are unable to see the column heading in the enquiry window, use the scroll bar at the bottom of the window.
Adjusting Column Widths
If you are unable to see the full details within a column or you want to reduce the width of a column to display more columns in the window, you can adjust the individual column widths.
- On the enquiry window, hover over the column title in the header bar, then when the adjustment pointer is displayed, double-select to increase or decrease the width. Alternatively, select and drag the column to the right or left to resize it to the required width.
Moving Columns
If you want to move the order of the columns, you can drag the required column to a different position.
- On the enquiry window, select and hold the column title in the header bar of the column you want to move, then drag it to the required position on the header bar.
Sorting Columns
To sort the data, for the required column, select the heading until the results are displayed in the required ascending or descending order.
Only one column can be sorted at a time.
Grouping Results
To group the data by a specific column type, select the required heading and drag it onto Drag a column here to group by that column.
Grouped column data can be expanded to display individual transactions — for the required row, select +.
Filtering Results
Results can either be filtered by specific values or on more than one type of criteria.
Sort on Specific Values
- For the required column heading, select the drop-down arrow.
- Select all the required values.
- To close the filter, select the column heading.
Sort on More than one Criteria Value
- For the required column heading, select the drop-down arrow.
-
Select the advanced filter icon.
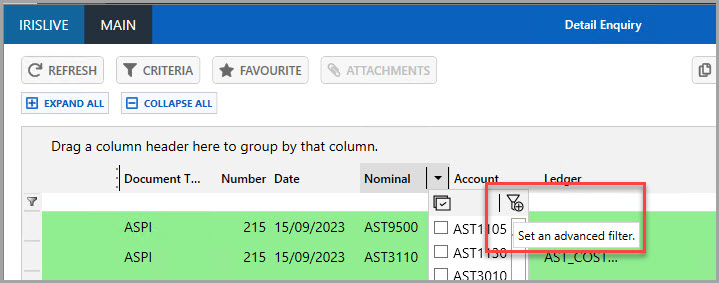
- Enter the required criteria.
- To display the results, select OK.
Saving Customised Displays
If you have customised the display of the enquiry window and you want to save the settings so that they are displayed by default when you run the particular enquiry, you can save the selected columns as default. When you run the enquiry type again, your default columns are then displayed with the results.
- On the enquiry window, when you have selected the columns you want to be your default, select SETTINGS, then select SAVE AS DEFAULT COLUMNS.
- The Save As Default Columns message is displayed, select OK to return to the enquiry window.