Setting up Pupil Manager security options
Use the Security Options tab in Management Options to control user access within the Pupil Manager module. Access to the Pupil Manager module is already restricted to users selected in Control Panel > Permissions & Security Profiles.
By default, module users have the level of access defined in the permissions for their security profile. Security options allow higher access rights for specific areas for the specified user/s. For example, teachers may have read only access and you want a selected teacher to have edit permissions.
You can also set up restrictions to the pink drop-down list. For example, you may want to restrict permissions so that teachers cannot send SMS messages directly to students.
Process Security overrides Area Security for sections which are listed in both tabs.
To work with security options:
- In the Pupil Manager module, select Management Options.
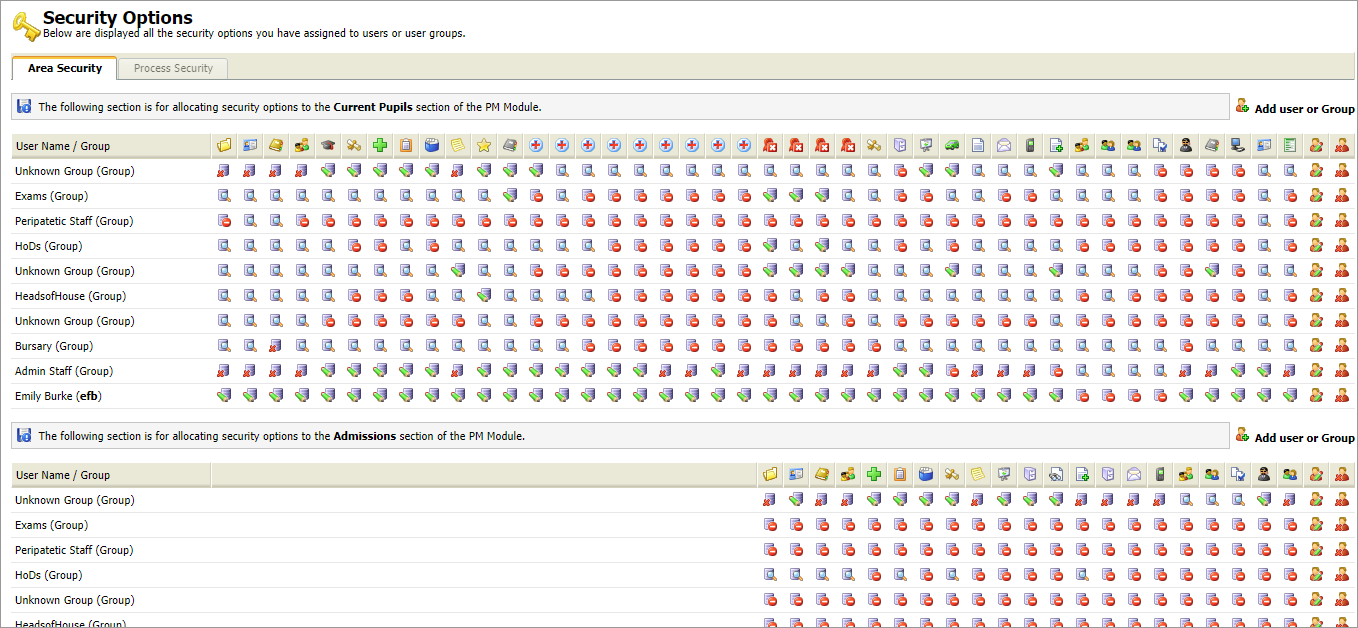
- Click Security Options:
-
Choose to work with:
- Area Security. Control access to the module by selected users and groups.
- Process Security. Control access to the pink drop-down list.

Two tabs are available to work with.
Area Security
Control access to the module by selected users and groups:

The Area Security tab is split into three sections to represent the three types of student record available:
- Current pupils.
- Admissions or applicants.
- Former pupils.
Each area available in student records can have a different level of access for each user or group of users. These areas are identified by a header bar icon in the three sections displayed:

Hover over an icon to view an explanation of its meaning.
The icons under the header bar indicate the access levels that you set up for users in each student record area (a key is provided for you at the bottom of the Area Security tab:
| Icon | Users... |
|---|---|
|
|
Have no access to this area of student records. |
|
|
Can only view information and not make any changes to student records. |
|
|
Can edit the information in the student records. |
|
|
Can delete the information in student records. |
Choose to:
Set up bespoke access levels for a user or groups of users in the Pupil Manager module.
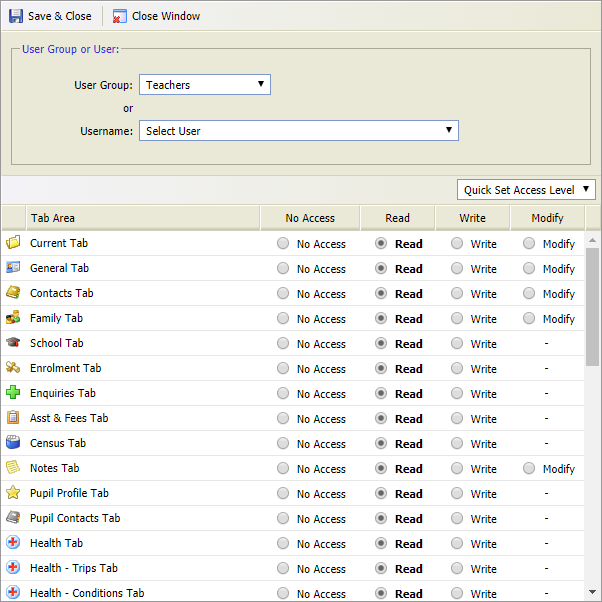
- Click Add user or Group in the section you want to work with. The Security Options window is displayed:
- Select a User Group or Username from the drop-down lists displayed.
- Use the Quick Set Access Level drop-down to set all areas with a selected level of access.
- Click on the radio buttons available to set up access levels for each area in student records.
- Click Save & Close. Your selections are displayed in the Security Options screen. Icons represent the access levels you have selected for each of the areas in student records. Use the on-screen key to help you.

The users you set up access levels for are also listed in the other student record types available. By default, these users now have no access to these other record types. Choose to edit user security options, if required, to change the access levels for all record types.
Edit access levels for a user or group of users in the Pupil Manager module. You can also edit the users with access to the module, this saves time when setting up user access if staff have changed responsibilities.
To edit security options, follow the steps below:
- Click the edit icon in your selected user group or user in the section you want to work with. The Security Options window is displayed:
- Change the User Group or Username from the drop-down lists displayed, if required.
- Use the Quick Set Access Level drop-down to set all areas with a selected level of access.
- Click on the radio buttons available to set up access levels for each area in student records.
- Click Save & Close. Your selections are displayed in the Security Options screen. Icons represent the access levels you have selected for each of the areas in student records. Use the on-screen key to help you.

Delete a security option from the Pupil Manager module to remove bespoke access levels to the module.
Removing user security options removes all the security options set up for that user across all types of student record. By default, users with no security options have full access to all areas of the module.
To delete a security option, follow the steps below:
- Click the delete icon in your selected user group or user in any of the sections listed. You are prompted Are you sure you want to delete this security option?
- Click OK. All the security options set up for that user group or user are deleted from the module. The user group or selected user now have full access to all areas of the module.
Process Security
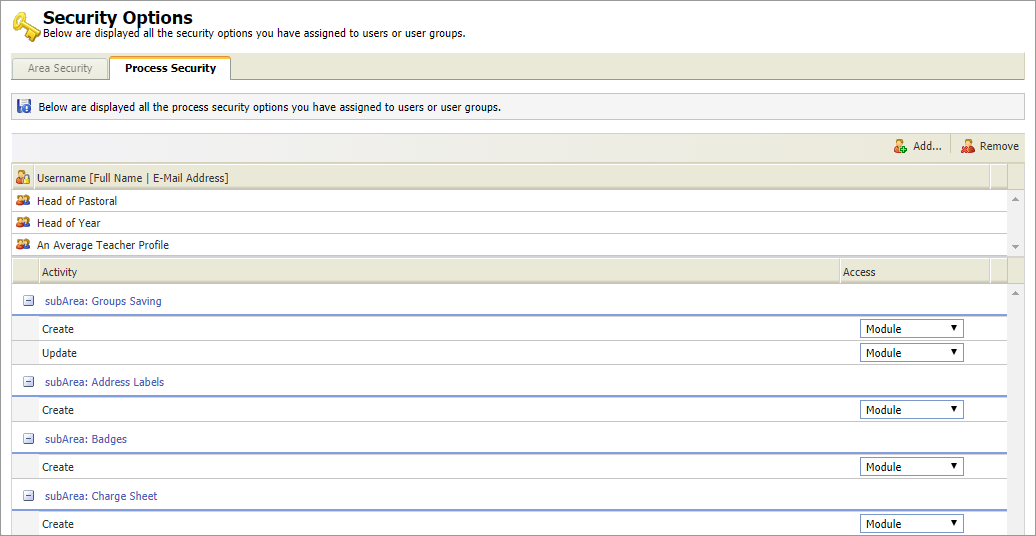
Control access to the pink drop-down list to selected users or permission groups. Any process security options assigned to selected users or permission groups are listed at the top of the tab:

Choose to:
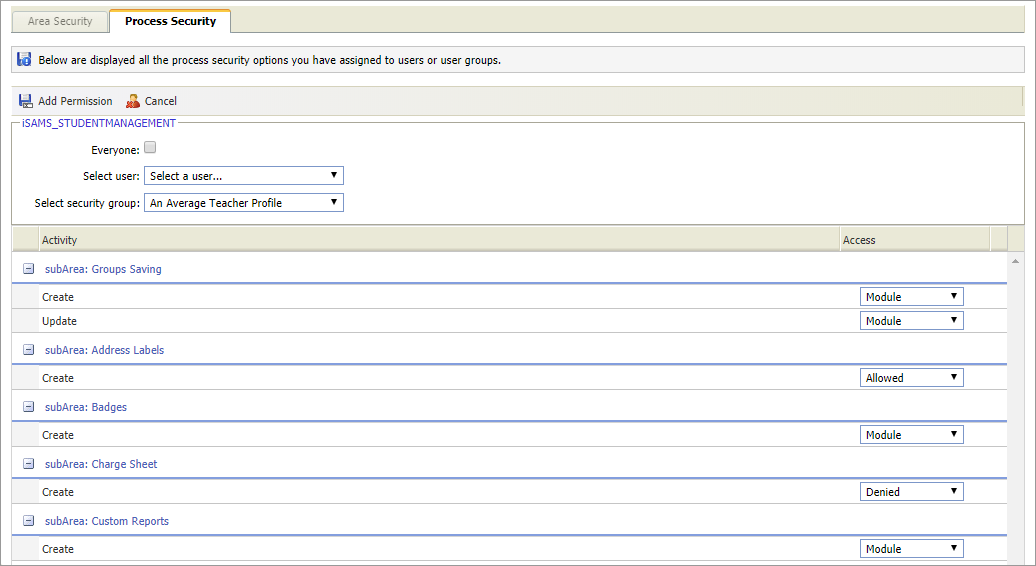
- Click Add on the right in the header to display these fields:
-
Select either:
- Everyone. This selects all current Ed:gen users.
-
A selected user.
or - A selected security group. Security groups are configured in the Permissions & Security Profiles applet and allocated in the User Accounts applet. These are both found in the Control Panel module.
-
Scroll through the areas listed under the Activity header
and set the access using the Access drop-down
list:
- 'Allowed'.
- 'Denied'.
- 'Module'. This is the default level of access, currently set as allowing all access to all users.
Process security options are automatically saved.

- Click user or group that you want to edit.
-
Scroll through the areas listed under the Activity header
and set the access using the Access drop-down
list:
- 'Allowed'.
- 'Denied'.
- 'Module'. This is the default level of access, currently set as allowing all access to all users.
Process security options are automatically saved.
- Click user or group that you want to remove.
- Click Remove on the right in the header. The assigned security option is removed.