IRIS BioStore Initial Setup for ID Print PaperCut Direct
This topic details the first-time setup steps required for an IRIS BioStore installation.
Installing a Primary Server
The Primary Server is the main part of an IRIS BioStore installation. There is only one Primary Server per site, and this is where the database is configured and stored. The Primary Server is a software server, generally hosted on one of the customer’s own machines, and on their network.
The ID Gateway installation option is used for populating the IRIS BioStore database with an Management Information System (MIS), and is not generally required for demo systems.
Licensing the Primary Server
Once the Primary Server has been installed, it must be licensed before a database can be created. This is done by applying the main BioStore Licence File (BSLF). To apply the licence, either drag-and-drop it onto the licence window, or use the Install button to navigate to where the BSLF is located.
Create the IRIS BioStore database and start the server
Follow these steps to create a BioStore database and start the server:
- Select the Configuration tab in the Primary Server Setup application
- Select Create New Database
- Select a location for the database to be saved in
- Enter Super User credentials (generally super is used for both the username and password in demo systems)
- Click Create
- To start the server, select the Control tab and click Start BioStore Server
Installing a Secondary Server
Each application that links to IRIS BioStore (including ID Print) requires a Secondary Server. The Secondary Server is another software server, performing identifications and other tasks for the application. Secondary Servers communicate with the Primary Server to look up user records and login details.
Licensing the Secondary Server
The Secondary Server can’t be licensed with the main BioStore Licence File. When a Primary Server is licensed, extra Secondary licences are generated in a BioStore Licences folder, which can be found using the Open Folder button in the Primary Server Setup application. This folder will contain Secondary licences for each available application, which can be applied to Secondary Servers. This process will then generate application licences (including IID Print licences). Either drag-and-drop the licence onto the window, or select the Install button to navigate to where the licence is located.
Setting up the Secondary Server
- Enter the Primary Server and IP address in the Link Server Connection field.
- Set the Secondary Server Port (default is 1002)
- Start the service by selecting the Control tab and Start BioStore Server.
Installing ID Manager
ID Manager is the database management interface. It runs as a client application and connects to the Primary Server via a TCP/IP connection. ID Manager provides tools for tasks such as creating user records, enrolling fingers, cards, and PINs, and managing top level permissions.
Licensing ID Manager
If installed on the same machine as an IRIS BioStore Primary or Secondary Server, ID Manager will attempt to read the licence automatically. Alternatively, the ID Manager licence can be copied from the BioStore Licences folder to a different machine, and then manually applied to ID Manager.
Setting up logins in ID Manager
Logins are required to allow programs to connect to the IRIS BioStore database. The Super User login is created when creating the database. ID Print also requires a login to be created. This is done by opening ID Manager and logging in with the Super User credentials, and then:
- Select the Logins tab and then select the Add Login button
- Enter a username and password
- From the Role dropdown menu select ID Print
- Set the Authentication to Finger with Alternative (FO)
- Under the Program Access section, select Printer Manager
- Click the OK (tick) button.
Add a user record
Generally, the IRIS BioStore database is populated using ID Gateway, which pulls down user information from a Management Information System (MIS), although records can also be manually created in ID Manager. To do this, login to ID Manager with the super user credentials and select the People tab.
- Select the Add Person button. The required fields have an asterisk (*) next to them.
- To assign a PIN to a user, select the Enrolment tab and enter the PIN in the relevant field.
- RFID/Mifare cards can also be added this way, or scanned in on a connected card reader.
- Set the user’s Access to Finger or Card or Barcode or Pin (F/C/B/P)
- The AD Logon Name needs to match the username in PaperCut. This step would normally be carried out automatically when users are imported.
Users must be included/enabled in the application. This is done by selecting the Programs tab and ticking both the Include and Enable checkboxes under the Printer Manager heading.
(Optional) Set up a card reader
Supported card readers can be configured to be used with ID Manager for scanning cards and testing card enrolments (who the card is assigned to). To assign a scanned card to a user:
- Select the user and click the Enrolment button.
- Select Card from the icon menu, highlight the RFID/Mifare field, and scan the card in.
- Click the OK (tick) button to save the number, or the cross to cancel.
If this field is disabled, the card reader has not been found.
To test who a card is assigned to:
- Select the Test Enrolment button
- Set the Authentication Mode to card, and the window will display Waiting for card
- Scan a card to see who it is assigned to. If the card has not been assigned, No Match Found will be displayed.
Installing ID Print (PaperCut Direct)
ID Print connects print servers to IRIS BioStore Secondary Servers. ID Print is generally installed on the print server itself (along with a Secondary Server). ID Print is the service which IDPoints (and IDPoint Emulators) connect to, identifying IRIS BioStore users when they scan a finger, card, or PIN.
Licensing ID Print
When a Secondary Server is licensed, application licences are generated in the BioStore Licences folder. This folder can be accessed using the Open Folder button on the Secondary Server Setup application. The print management sub-folder will contain an ID Print licence, once the Secondary Server has been licensed. Either drag-and-drop the licence onto the window, or use the Install button to navigate to the licence location. For more information, go to Install ID Print Licences.
Setting up ID Print
Enter the Secondary Server details under the Server Settings tab, along with the login that was created in ID Manager for the ID Print role.
Configuring IDPoint settings
ID Print will need to be configured to connect to an IDPoint Emulator.
- Select the Configuration tab. The list of available devices to configure will be shown (the amount shown depends on licensing allowances).
-
Enter the print server address, along with the extension to xmlrpc.
(This is generally https://<server-name>:9192/rpc/extdevice/xmlrpc)
- Enter a name (e.g. location) and connection details for the emulator. Note that the IP address for the emulator will match the computer it is running on.
- Click Apply to save the settings.
Now that the device has been configured in ID Print, it needs to be registered in PaperCut. Click the Register Devices button or the Test Devices button to register the device. Any further setup (selecting print queues etc) will need to be carried out from the PaperCut web admin tool.
IDPoint licences are created using ID Print (this is how connection details are applied to IDPoints). In the ID Print Setup application, after configuring a device (as in the steps above), select the Licence tab. Click the Save IDPoint Configuration button. For hardware IDPoints, this would be saved to a USB device, though for an IDPoint emulator the local machine can be saved to. A window will appear requesting a 4-digit PIN – this will need to be entered when licensing an IDPoint.
Start the ID Print service by selecting the Control tab and Start IDPrint.
Installing the IDPoint Emulator
The IDPoint Emulator is a software emulation of a hardware IDPoint device. The emulator will connect to the ID Print service. The emulator acts in the same way as a hardware IDPoint would, the only difference being that the IP address of the emulator is fixed to match the IP of the computer it is running on.
Any user who is registered in the IRIS BioStore database, via biometrics, smart card or PIN, can utilise an emulator connected to ID Print. The emulator can link to finger scanners and card readers attached to the computer, and has a keypad built in. Users can identify themselves using their IRIS BioStore credentials.
Licensing the IDPoint Emulator
The licence generated in the ID Print Setup application (saved as a cfg file with a 4-digit PIN) need to be applied to the emulator before it can be used. To license the emulator, open the IDPoint Emulator Setup application and select the Licence icon. Either drag-and-drop the licence file onto the licence window, or navigate to its location using the Install button. BSLF files cannot be used to license the emulator.
IDPoint Emulator Setup
Select the Settings icon to change display options. To configure a card reader, select the Card icon. Any connected card scanners will be shown in the list. Highlight a reader and click the Select button.
Go to the built-in help for more information about each option.
Waiting To Connect screen
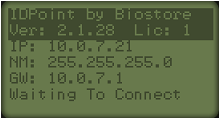
This screen is shown when the IDPoint is ready to connect, but the ID Print service has not been started or cannot connect to the IDPoint. Check that the service is started under the Control tab of the ID Print Setup application.
Main (Idle) screen
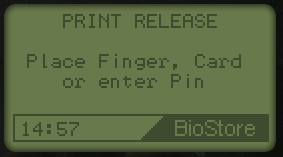
This screen appears when the IDPoint is idle. It shows the accepted methods of identification, which can be changed using the printer manager login created in ID Manager.
User Action Screen
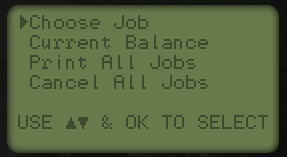
This screen appears after a user is identified by placing a finger, card, or entering a PIN.
Choose Job – If the user has a number of jobs in the queue, this option lets the user choose which one to print.
Current Balance – Shows the user’s current PaperCut balance, along with the number of jobs the user has waiting in a queue.
Print All Jobs – Prints all of the user’s jobs that are in the queue.
Cancel All Jobs – Cancels all of the user’s jobs that are in the queue.
The screen will timeout and return to the idle screen after a period of inactivity, otherwise press Esc to return to the main screen.