Bank reconciliation troubleshooting
Missing transactions
If any transactions are missing:
-
Go to Banking > Banks and select View or add Transactions for the required bank.
-
Ensure that the transactions you are expecting to see on your reconciliation are listed here. If they aren't, you'll need to recreate them. Use the audit trail report to identify anything that may have been inadvertently deleted.
-
If your transactions are listed here then move on to the next step.
Restart the Reconciliation
The main cause of a transaction not showing is if the transaction has been modified (such as amount, date, etc.) whilst a reconciliation is in progress.
-
Go to Banking > Banks > Reconcile. Select the Incomplete reconciliation from the list, then select Delete. This will abandon the current reconciliation that is in progress.
-
After this reconciliation has been abandoned, restart it by going to Banking > Banks > Reconcile, your transactions should now display. If not, then your transactions will likely be currently reconciled via another bank reconciliation method.
Start date incorrect
Your reconciliation start date is based upon the following;
-
Your last reconciliation: if you’ve reconciled before then the start date will be the day after your last reconciliation.
-
Reconciliation date: if you’ve just moved over to IRIS Elements Cashbook and have been using previous accountancy software then you’ve most likely reconciled before. You can set the date to which you have previously reconciled up to by going to the bank account details. Set the Reconciliation Date to the date that you previously reconciled up to, the start date will be the day after this.
Start Date doesn’t match your previous reconciliation end date
If you’ve found that your reconciliation start date doesn’t match the end date of your previous reconciliation that it’s likely one of the details above have been edited.
Modify your reconciliation date to be the same as the end date of your last reconciliation.
-
Go to Banking > Banks > Reconcile. From Previous bank reconciliations take note of the last reconciliation end date.

-
Go to Edit Details for the bank account. Change the reconcile date to be the same as your previous reconciliation end date.
-
Select Save Changes.
Start or reconcile date changed
If you get an error on a bank reconciliation advising that your start or reconcile date has changed, this means that the start / reconcile date in the bank account settings has been changed. Use the guidance below to correct this.
Step 1 – Take Notes
Start by finding out the date of your very first reconciliation.
-
Go to Bank > Reconcile. Below are your previous reconciliations.
-
Make sure you’re on page 1 of your previous reconciliations, if not select the Oldest link.
-
On this screen, the reconciliation at the very top of the list will be your oldest reconciliation. The starting date of that is the key piece of information you’re looking for. Write that down.
Starting balance does not match closing balance of previous reconciliation
The starting balance for a reconciled period should always match the closing balance of the previous reconciliation. If it doesn’t, then it is likely there has been a change in the data that has caused the current balance to different.
Troubleshooting the cause of the problem.
Checking the opening balance of first reconciliation.
Firstly, check that the very first opening balance amount is correct. The opening balance is calculated based of the information entered in the Bank > View or add screen prior to the start date of the account, and if there is any opening balance amount entered in the edit bank details screen.
-
Make a note of the start date and balance on the very first reconciliation.
-
Ensure that the Reconcile Date is one day before the start of your reconciliation.
-
Also, check if there is a balance in the Start Balance box. We would recommend leaving this blank and enter an opening via a journal entry.
-
Go to Banks > View or add and put in the date range of any historical day up to the start date of your first reconciliation. Check if there has been an opening balance journal entered and has set the running balance.
If this is correct, then you will need to move onto the next section for further troubleshooting.
Possible errors
-
Reconcile Date in Edit Bank details is incorrect: ensure to set it back to the day before the start of the first reconciliation.
-
If the opening balance journal is missing: you would need to enter this.
-
If there are other bank transactions entered before the start date: these should be removed before you can carry on ensuring that the opening balances match.
Checking previous reconciliation that might be showing in 'Error' or 'Incomplete'.
-
Go back to Banks > Reconcile and check all previous entries in Previous bank reconciliations to see if any are showing in Error or Incomplete.
-
Error: usually an item has been changed or deleted.
-
Incomplete: a bank reconciliation has been edited but not saved again.
-
-
If more than one reconciled period is showing in error, you will need to start from the first one and then work through them in order.
-
Click into the reconciliation and you should be presented with an error to which will help explain what the issue is.
How to correct a reconciliation showing in error
Using the above view, gain a copy of the original bank statement for this period and go through each transaction and check that everything matches, or if there is anything missing.
According to the bank statement, every transaction is correct except for one item:
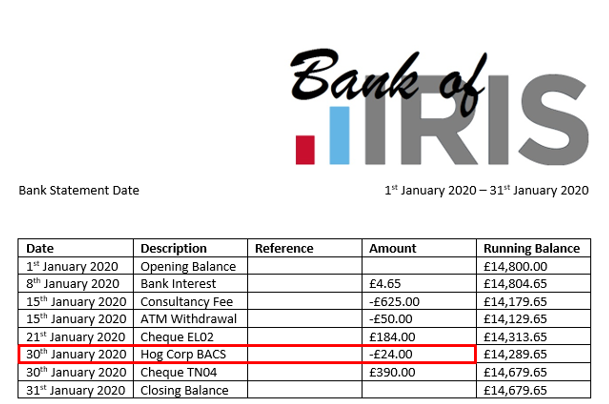
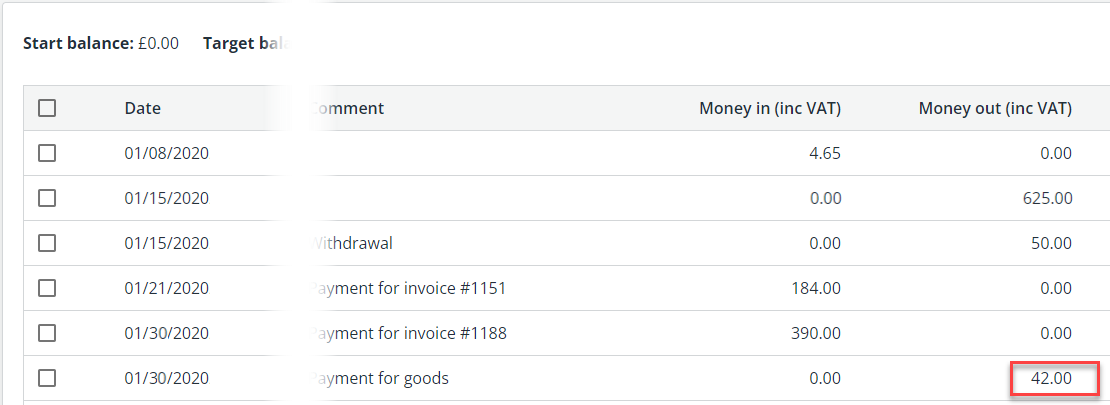
In this case, one of the entries has got a transposed number, it is entered as £42.00 when it should be £24.00.
-
Go to Banks > View or add and find the transaction and edit it so that shows correctly.
-
Go to Reconcile Statement at the top of the screen and you should now see that the bank reconciliation is now showing as Complete.
If you are not able to edit the transaction because it has been included on a VAT return, then you will need to create a new transaction coded and date, in the same way, to account for the difference.
When you go back to the reconciliation screen, select the period from the list then select Edit reconciliation to reopen the period. Once this has been ticked it should allow you to select Reconcile now.
-
Once the reconciliation has been completed, move onto the next reconciliation in error and follow the same process by checking against the bank statement for any changed or deleted items.
-
As the amendments to the previous reconciliation have now been completed, the latest Incomplete reconciliation will need to be deleted as it is still showing the wrong starting balance.
If you have followed the steps above and you are still struggling to find why the starting balance doesn’t match the closing balance of the previous reconciliation, please contact support by emailing support@kashflow.com and include as much information as you can. If you can also enable the support access from the Help menu we will be able to look at this straight away for you.
Transactions have been edited, added or deleted
If you get an error on a bank reconciliation advising that you that transactions have been edited, added or deleted since your reconciliation was completed then this will unbalance previously completed reconciliations due to the data entered no longer being applicable.
-
Go to Banks > Reconcile. From Previous bank reconciliations take a note of your latest reconciliation dates, starting balances and ending balances.
-
Compare to the View or add Transactions screen. compare the balances that are on your previous reconciliation screen to the ones listed here. Start with the latest and work backwards until you find one that matches.
-
The point where they match is the last correct reconciliation. From that point onwards something has changed. This could be that a transaction date has changed, a transaction has been edited, added or deleted.
-
You will need to abandon all reconciliations from this point onwards and re-reconcile. You can then identify the transaction that has been modified, correct it and then re-reconcile again.
The Audit Trail
You may be able to identify what transaction has been modified and when by using the audit trail.
-
Go to Home > Reports > Business > Audit Trail.
-
Set the start date to the date that you did your last reconciliation successfully and the end date to today.
-
Set it to Transactions created or edited between:and enter the dates.
-
Select Include deleted items and set the report to Include Invoice Payments, Purchase Payments and Bank Transactions only.
-
Select Run Report.
-
If you have transactions in here that are dated before your last successful reconciliation or have a change next to them, they will be culprit for the error.