Scheduled billing
Managers Partners Billers
Scheduled bills provide an option for bills to be pre-defined based on a set schedule. Scheduled bills will appear in the Job Scheduled Billing portfolio within the Billing portfolio when they are triggered.
Scheduled bills are particularly useful for larger jobs that span a longer period and multiple bills will be sent over the course of the life cycle of the job.
This example will run through how to set up the job, the billing schedule and thenhow to draft and confirm the bill. It is assumed that the process of creating a job on a client is known. It uses an Allocation type of Automatic Pro Rata when Closed. The Out of Scope Work and Automatic Options have not been used.
Setting the Job Details
-
Create a new job on a client and open the Job Details.
-
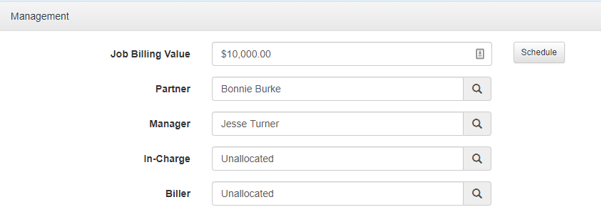
On the Management panel, enter a Job Billing Value. This will be used as the total amount to be billed across all bills in the schedule.
-
Save any changes that have been made.
-
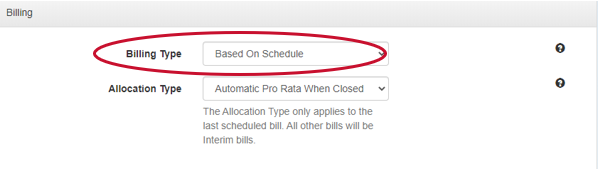
Select the Billing panel from the Job details:
-
Set the Billing Type to be Based on Schedule and select the required Allocation Type. For scheduled bills, the suggested allocation type is Automatic Pro Rata When Closed. This will provide a fairer realisation figure across all staff that have worked on the job.
-
The Billing Narrative can be entered or can be left blank as the narrative can be set on the schedule.
-
Enter any further details, that may be required. Further information on these fields can be found in the 9.7 Billing Administrators topic.
-
Save any changes that have been made.
-
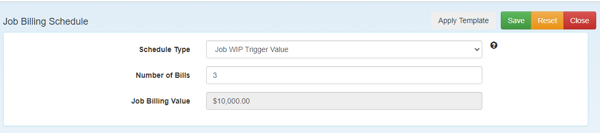
A Billing Schedule button will be displayed at the bottom of the panel.Click this to display the Job Billing Schedule page:
-
Select the Schedule Type to be used. An explanation of the schedule types can be displayed by hovering over the ?
-
Enter the total Number of Bills that will make up the schedule of bills.
-
The Job Billing value is displayed but cannot be changed. If a change to this value is required, it must be done on the Job Details pages.
-
Click Apply if any changes have been made to the top section.
-
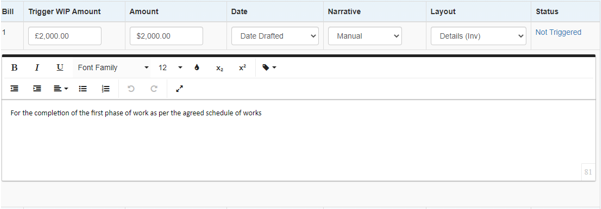
Each bill that will be included in the schedule will have a corresponding section.
-
Enter the Trigger Value (this will depend on the schedule type that has been selected).
-
Enter the Bill Amount. Select the date to be used, the narrative type and the layout.
-
If a narrative type of Job has been selected, the bill narrative on the job billing panel must be completed.
If selecting a narrative type of Bill Paragraph or Previous bill, select the required paragraph or bill paragraph to be used. If selecting a narrative type of Manual, enter the narrative into the narrative field that is displayed.
-
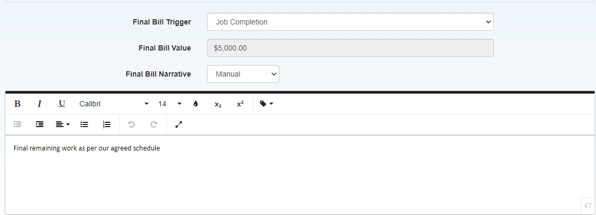
Select the Final Bill trigger from the options of Job Completion or Fixed date.
-
The Final bill amount will be derived from the Job Billing Value less any other scheduled bills.
-
Enter the narrative for the final bill and then click Save. Close the billing schedule to return to the Job details pages.
Drafting the Bills
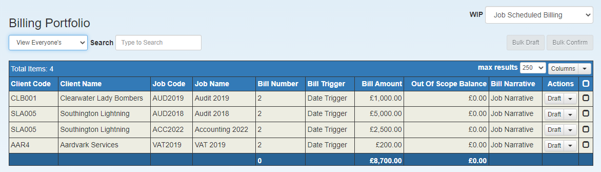
Once the schedule triggers have been met, the job will appear in the Job Scheduled Billing portfolio within the Billing portfolio.
-
Click the Draft option within the Actions menu to draft the bill. Once drafted it will appear in the Drafts as Owner/Drafts as Creator portfolios where it can be edited and confirmed as required.
-
If multiple scheduled bills are triggered at a similar time, it is possible to Combine the bills from the Job Scheduled billing portfolio. Select either Draft as Combined or Confirm as Combined from the Actions menu of the later scheduled bill. (This can be determined from the bill no.)