Submit an RTI full payment submission (FPS)
Once you have finalised the pay for the period and produced a final set of reports and payslips, you can send the RTI Full Payment Submission (FPS) to HMRC. If you use the standard BACSTEL transmission file, there is an option to generate a BACS file at the same time as you send the FPS.
The FPS is the file that contains the payment and year to date information and must be submitted at or before the point at which employees are paid. The FPS must be submitted every pay period, regardless of the frequency of the payroll.
Produce the FPS:
-
Click on the Payrun icon.
-
Go to the RTI menu and select Make Full Payment Submission.
-
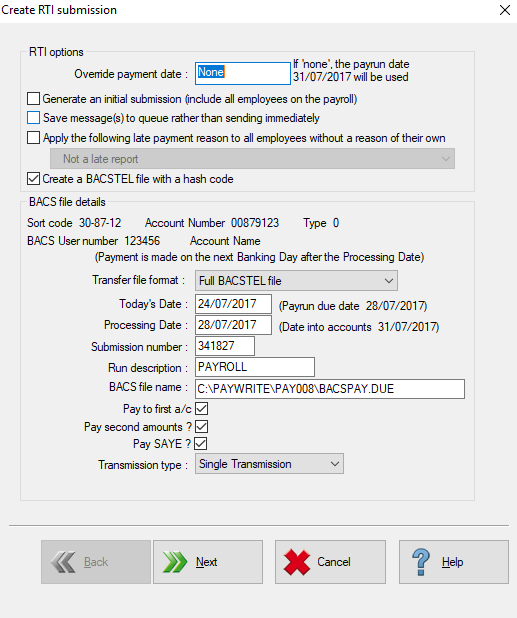
By default, the submission will use the pay date specified when the payrun was opened, however you can override this by entering a date in the Override Payment Date field.

-
If a date is entered here it will override the payrun date and will be used on the FPS. The new field is available for both main and supplementary payruns. The function is of particular use when the FPS is being sent from a supplementary run as this would normally report the payment date based on the main payrun - therefore the data may appear to have been submitted to HMRC after the payment was made to the employee.
For example, the payment date for the main run is the 25th of April and this is also the date used for the supplementary run. An additional payment is made to an employee on the 2nd of May and the FPS is sent on this day without using the override. This will appear to HMRC to be a late report. Enter the actual date the employee was paid with the FPS being sent on the day the payment is made and the submission would be regarded as having been made on time
-
If this is the first ever FPS you are submitting for this PAYE scheme, you should check the Generate an Initial Submission flag.

-
This will create a combined alignment and payment submission. You should ensure it is unchecked for subsequent transmissions.
-
If you wish to submit several FPS files in bulk, the Save messages to a Queue flag must be ticked.

-
This will create the file for submission but will not send the data to HMRC. The submission will then need to be made from the Bulk Transmissions option in the E-filing module.
-
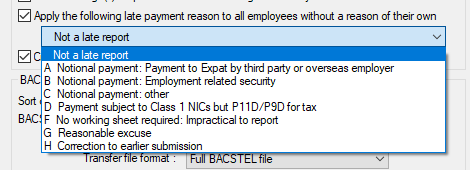
Late submissions to HMRC must have a reason code applied to each employee before transmission. You can use the Apply following Late Payment Reason option box to apply a reason code to all employees included in the submission.
-
If you are making a late submission, check the box and select the reason from the list below. A list of reasons are shown in the screenshot above.
-
If you wish to create a BACSTEL submission file along with the FPS, check the Create a BACSTEL file with hash code box.

-
You can see the file BACS file location and parameters in the fields below:
You may amend these parameters if you wish although you should not need to. The location into which the BACS file will be saved is in the BACS File Name field.
-
Click Next to continue.
-
If this is the final submission for the tax year, the Is this the final submission for the year? box should be ticked.

-
If the PAYE scheme is to cease after this submission, you should check the final submission flag and then also check the Is this a cessation return flag.
This will inform HMRC of the cessation, you must also enter the Cessation date in the field to the right of the cessation flag.

-
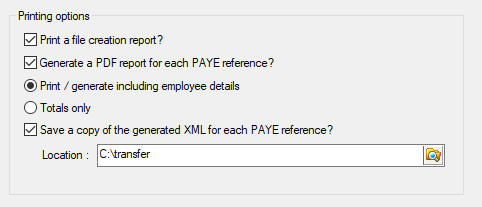
You should now set the printing options.
-
The Print a file creation report box, when ticked, creates a report listing the contents of the submission. We would recommend that this report is produced as it provides an easy way to check what is being submitted. There are two options for this report:
-
All employee details
-
Totals only
You can set this using the radio buttons a couple of lines below the flag.
The Generate a PDF Report for Each PAYE Reference check box should be used when submitting in a batch; it will produce an individual report for each PAYE scheme you are submitting for and save them to separate PDF files.
The Save a copy of the generated XML box forces IRIS Payrite to save a copy of the actual XML file which is submitted to HMRC to a specific location.
We would recommend that this is ticked so in the event of HMRC contacting you regarding the submission, you will be able to easily identify the figures you submitted.
-
-
Click Next to continue.
-
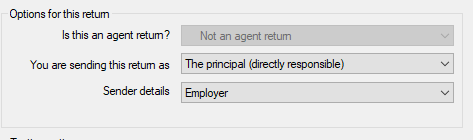
The following screen shows whether you are sending this return as an agent and – if not – who is submitting the return.
-
Is this an agent return – will be greyed out unless agent details have been entered in system setup. If you usually send submissions as an agent but – in this case – are transmitting data that is unconnected to the agent details on file, you should select Not an Agent Return from this drop-down.
-
You are sending this return as – details under what capacity you are sending the return:
-
The principal (directly responsible)
-
An intermediary (e.g. an Agent or Bureau)
-
A witness
You would normally use The Principle if you are sending the return as the employer or An Intermediary for bureau or agent submissions
Sender details – defines who the submission details refer to. This defaults to Employer but alternative options are available from the drop-down:
-
Employer – employer submitting PAYE forms
-
Acting in Capacity – representatives acting on behalf of the submitter
-
Individual – individual submitting SA return
-
Agent – body representing an individual or employer
-
Bureau – body submitting returns on behalf of an organisation/employer
-
Partnership – partner submitting SA return for a Partnership
-
Trust – trustee submitting SA return for a Trust
-
Company - company submitting Company Tax return
-
Government – submission made by a government department
-
Other – to be used if the other options are not relevant
If you are unsure which option to select, please contact the HMRC Helpdesk. Do not contact the IRIS Payrite Helpdesk as FMP Global staff will be unable to help.
-
-
Click Next to continue.
-
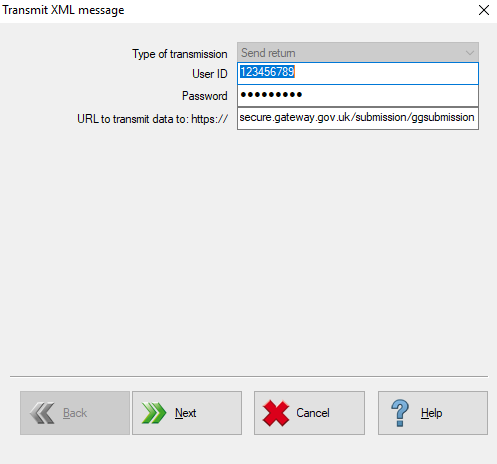
This screen shows the employer details that will be used to submit the return.

User ID and Password are the details which will be used to access to government gateway. These must be entered or the submission will be unsuccessful.
If you have made any RTI submissions previously, these will already be completed.
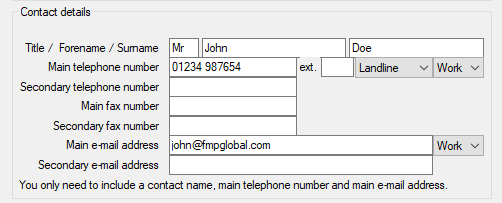
The Contact Details section allows you to amend the details of the principle contact in the company. You should check that these details are correct before you submit.
If the contact has changed, you should amend the details accordingly.
-
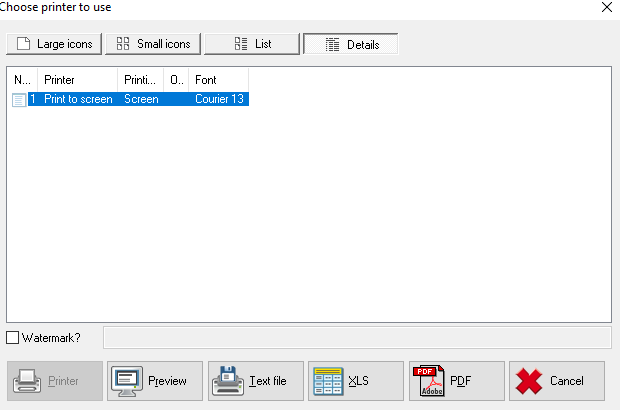
Click Finish. IRIS Payrite will now print the FPS file creation report.
-
Select the preferred printing method to generate the report.
-
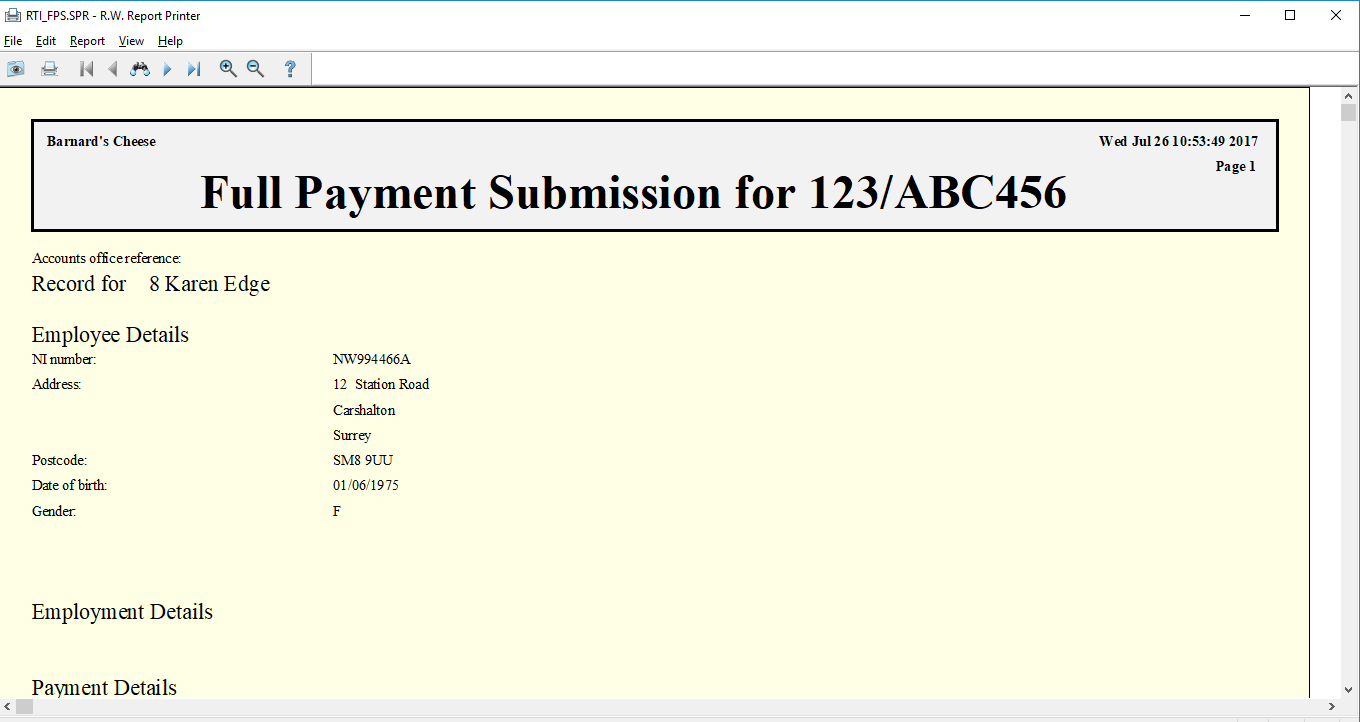
The report can be checked prior to submission to confirm the correct totals are being submitted.
-
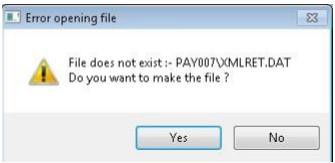
If this is the first FPS you are submitting for this payroll, you will see a warning message.
-
Click Yes to continue. The file will now be generated.
- Click Next at the following screen to continue.
-
At the next screen, click Transmit to send the file to HMRC.
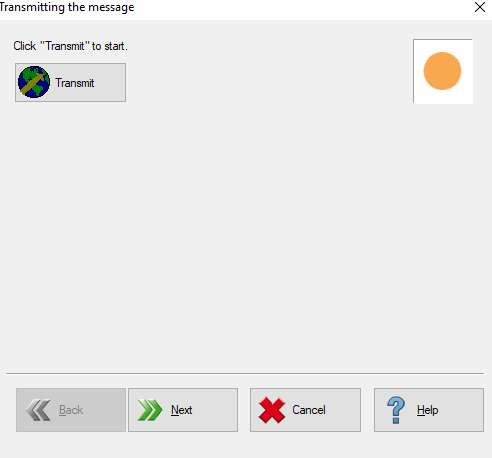
The system may take a few minutes to submit if HMRC are experiencing a busy period so please be patient.
If the submission has been successful you will see a series of green ticks on the confirmation screen. If there are any red crosses then the submission will have been rejected, the reason code will be displayed next to the cross.
HMRC have not released a copy of error codes and explanations. We request that you contact HMRC in the first instance, should you receive an error that you are unsure of. If an error is presented and you are unable to get further guidance from HMRC please contact the IRIS Payrite Helpdesk - it may be that they have been made aware of a resolution to an error code but we would ask for your patience whilst this is established.
-
Click Finish to exit the screen.