Manually enter OSP history
You can enter OSP history manually or Manually enter OSP history .
-
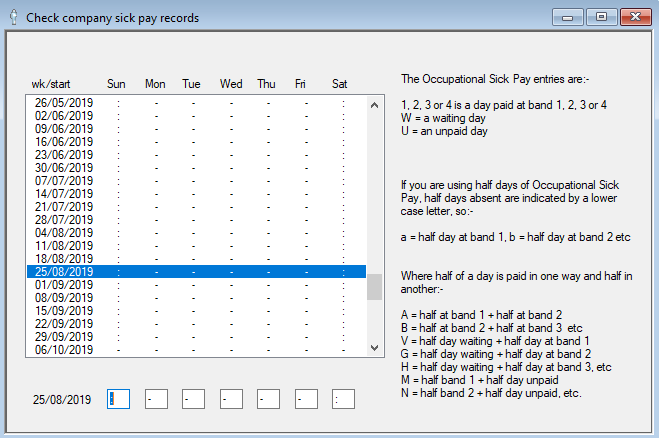
Click Absence.
-
On the Data menu, click Occ. Sick Pay Calendar.
-
Select a week then enter the absence history values in the boxes at the bottom of the dialog. Choose from the following codes:
-
Full day at band 1, enter 1
-
Full day at band 2, enter 2
-
Full day at band 3, enter 3
-
Full day at band 4, enter 4
-
Waiting day, enter W
-
Unpaid sick day, enter U
-
Non-working day enter :
-
Working day (not sick), enter -
-
Half day at Band 1, enter a
-
Half day at Band 2, enter b
-
Half day at Band 3, enter c
-
Half day at Band 4, enter d
-
Half day at Band 1 and half day at Band 2, enter A
-
Half day at Band 2 and half day at Band 3, enter B
-
Half day at Band 3 and half day at Band 4, enter C
-
Half waiting day and a half day at Band 1, enter V
-
Half waiting day and a half day at Band 2, enter G
-
Half waiting day and a half day at Band 3, enter H
-
Half waiting day and a half day at Band 4, enter I
-
Half day at Band 1and a half day unpaid , enter M
-
Half day at Band 2 and a half day unpaid, enter N
-
Half day at Band 3 and a half day unpaid, enter O
-
Half day at Band 1 and a half day unpaid, enter P
Monday - Friday at band 1 looks like this:

If the employee was still sick on Monday and Tuesday the following week but returned on Wednesday, it looks like this:

If the employee has run out of pay at band 1 and uses sick pay at band 2 on the Thursday, it looks like this:

-
-
Fill in the weeks that the employee has been sick over the period covered by your sick rules.
-
Click Save. You can now repeat the process for other employees.
Import OSP history
If you have a lot of OSP history, you can import it. You need an import file in a format that IRIS Payrite can read.
Set the parameters in the Import / Export module. When creating your import file, note the following:
-
You can only enter periods of up to 31 days. If the OSP history record you want to import is longer, you'll need to split it into multiple records.
-
You must specify the number of days in the period on the setup screen first. All records should be the same length, so if you specify 21 days as a record length, all rows on the import file must be 21 days long, even if you only want to record a single day of absence for one of the employees on the file.
-
You must use consistent characters in the file. All paid days at an OSP band should use a uniform character, such as 1 for days paid at OSP band 1 or 2 for days paid at OSP band 2 etc. Make sure you have uniform characters for unpaid days and non-qualifying days.
-
Each part of the pattern must be in a different, consecutive field on the import file. If you're importing from a CSV, there must be a comma between each part. For example, three weeks of OSP on a five-day work pattern with twelve days paid at band 1 and three days at band two would look something like this:


These import files demonstrate the information you need to import the patterns; you can use different layouts for your import file as long as the OSP pattern section is in the correct format.
Set up the parameters
-
Click Import/Export.
-
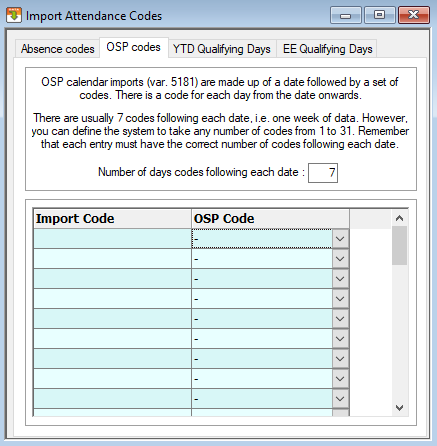
On the Import Codes menu, click Attendance Import Codes.
-
Select the OSP Codes tab.
-
In the Number of days codes following each date box, enter how long each OSP history record will be.
We recommend that you input the history in records of 7 days in length, however you can specify any number of days from 1 to 31. Note that each OSP history record must match the length specified here, even if the employee only has one day of history to record.
-
On the Import Codes menu, click Attendance Import Codes.
-
Select the OSP Codes tab.
- Specify the codes you are going to use to import the OSP history
-
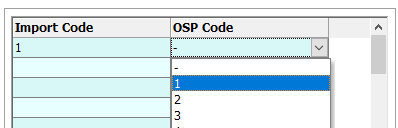
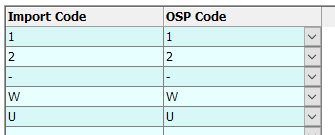
For a paid day at OSP band 1, in the Import Code column enter 1. Then, on the OSP Code list, click 1.
For a paid day at OSP band 2, in the Import Code column enter 2. on the OSP code list click 2 .
For a non-qualifying day, enter a dash (-) and on the OSP code list click - .

For waiting days enter W and on the OSP code list click W.
For unpaid days, enter U and on the OSP code list click U.
-
Click Save.
Create the import template
Here, you can create an import template for OSP history.
Complete the Data Importing training course for information on the variables in the Import / Export module.
-
Click Import/Export.
-
Click + or double-click New Layout.
-
In the Import title box, enter a name for the template.
-
On the Type of file list, select the format of the file you're importing.
-
Select the Does CR or LF end record? check box,
-
On the Inverted Commas list, click Around text fields.
-
The Salary figure as value does not need to change (you won't import any salary details on this kind of import).
-
Set the Time fields as and Date Format to match the formats in your import file.
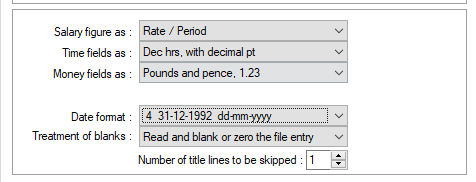
Choose Dec hrs with decimal point for hours expressed as decimal. Choose 4 for DD/MM/YYYY format dates.
-
On the Treatment of blanks list, click Read and blank or zero the file entry.
-
In the Number of title lines to be skipped box, specify the amount of header lines in the import file.
You can ignore Payrun entry file?, Add unmatched employees?, Records to use and Audit print type fields as they are not required when importing the OSP history.
-
On the Variables Layout tab, on the Base file list, click Employee. Leave the Coded file type as Non-coded.
-
Map out the template by setting the variables according to their position in the file.
In this example, the only fields needed are the employee code and the history pattern. The variable 5181 is used for the import.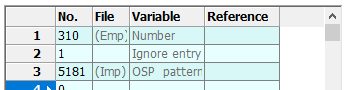
Despite the pattern in the import file covering twenty-two entries in the import file, IRIS Payrite treats them as one.
-
Click Save.