About File type
This tab sets the parameters of the import and is split into short sections. The first two fields are Import Title and Disk File Name.

You should enter a title for the import, you cannot save the template unless you do so. We advise that this title be descriptive so you can easily identify it when you wish to run or edit it in the future.
The Disk File Name contains the location and filename of the file you are importing. You can leave this blank if you wish as there is an option to specify the file name when you run the import.
If you are editing an existing template, this field will contain the location and filename of the last file imported with the template.
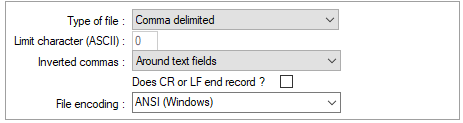
The Type of File setting allows you to control the import file format.
-
Comma Delimited is the most common import file format. Also known as CSV files, they have a comma separating each field on the import file.
-
Fixed Field files (also known as flat files) are one continuous row of data with no delimiters, instead there is a fixed amount of space in the row for each field – for example, Employee number may run from position 1 to position 6, surname from position 7 to position 44, first name from position 45 to position 65 and so on.
-
Tab Delimited should be used where fields are separated by tab. These often have the extension .tab.
-
Defined Limit Char allows you to specify what character is being used for the file delimiter. This is useful for some rarer file types, such as space or pipe ( | ) delimited.
When using this option, you can set the delimiter that your file uses with the Limit Character setting (see below)
The Limit Character option is only available when you select a file type.
This allows you to specify which character is being used as a delimiter on the file you are importing. You should enter the ASCII character value of the delimiter here, instead of the character itself. If you are unsure what the ASCII character value for the delimiter you require, please refer to the table at the back of this manual.
The next setting is entitled Inverted Commas. This allows you to specify whether inverted commas (or double-inverted commas) are used around text fields in the import file – a feature often employed by Microsoft Excel when a csv file is saved with a comma (,) in one of the cells.

This field is defaulted to Around Text Fields, it is recommended that this be left as default.
The Does CR or LF End Record option should usually be checked when setting up import files. CR or LF (standing for Carriage Return and Line Feed respectively) refers to ways that a system will denote the end of a text line. Checking this box enables IRIS Payrite to recognise most common end-of-row text markers.
The File Encoding controls what encoding method the import file was created with. This will almost always be ANSI (Windows) which is set to be the default. Almost every file created in a Windows application will use this encoding.
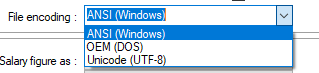
The other options are OEM (DOS) or Unicode (UTF-8) which you can select if your import file is encoded in these formats.
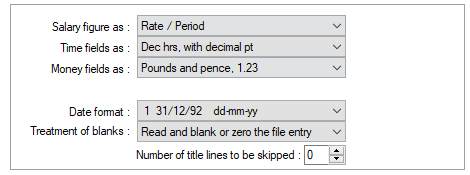
When importing salary information, IRIS Payrite will calculate the salary for you depending on which value you provide. This is controlled by the Salary Figure As setting.
-
If you are importing the Annual Salary, it should be set to Rate / Period (as IRIS Payrite will calculate the period salary from the imported value).
-
If you are importing the Period Salary, you should instead use Rate / Annum (as IRIS Payrite will calculate the annual salary from the imported value).
If you are not importing salary values or only importing hourly rates, then you do not need to set this option.
The Time Fields As option dictates how the import file will treat time fields. This setting works for the whole import file, so you cannot mix time formats within the same import file. The available options are:
-
Dec Hrs, with Decimal Pt – time values are expressed as a decimal value, so an hour-and-a- half would be 1.5
-
Hours : Minutes – time values are expressed in hours and minutes, so an hour-and-a-half would be 1:30
-
Minutes – time values are expressed in minutes only, so an hour-and-a-half would be 90
-
Dec hrs, 2 Places Assumed – time values expressed as decimal, with an assumed precision of two decimal places
-
Dec hrs, 4 Places Assumed – time values expressed as decimal, with an assumed precision of four decimal places
-
HoursMinutes, no divider – time values expressed in hours and minutes, but with no divider, so an hour and a half would be 0130
Money Fields As sets how fields with monetary values are dealt with. It has two settings:
-
Pounds and Pence uses the format £0.00, including the decimal point. The currency symbol is optional, and IRIS Payrite will import the field whether it includes it or not
-
Pence uses the format 0000, with no decimal point – so a value of 123 would be imported as
£1.23
The Date Format specifies what format the date fields will be imported in, so you should choose the one that matches the date format in your import file. This format is applied to the whole template, so you can’t mix formats in the import file. The date formats available are:
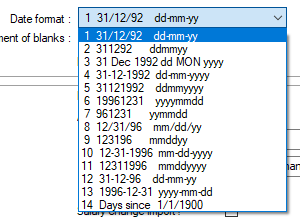
The most common format is number 4 – DD/MM/YYYY – which is the usual format for most applications, so the one you will likely use most often. If you are importing data exported from Microsoft SQL Server, then you may need to use format number 13 (YYYY/MM/DD).
If you select the wrong format, then it is likely that IRIS Payrite will either import dates incorrectly or not import dates at all.
Although the examples in the drop-down often use a dash (-) as date separators, IRIS Payrite will accept a forward slash (/) in its place.
The Treatment of Blanks option decide what IRIS Payrite should do when it encounters a blank entry in the import file. There are two options:
-
Read and blank or zero the file entry - this will import the blank into IRIS Payrite, overwriting the existing value.
-
Ignore – keep the existing file entry – selecting this option will mean that IRIS Payrite does not import the blank from the import file, instead keeping the existing field value.
Lastly for this small group of options is the Number of title lines to be skipped. This controls how many header lines are at the top of the import file before a line of data is reached.

Enter the amount of header lines by either typing directly into the box or using the scroll arrows to increase or decrease the number accordingly.
You should take care that the correct amount of header lines are specified, otherwise you may miss data lines (if there are too many lines specified) or import undesired records (if there are too few lines specified).
The final section of options deals with what type of import template you are creating.
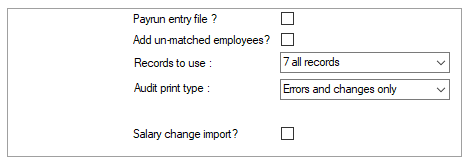
The top two options are independent of each other, and both CANNOT be selected at the same time.
-
Payrun entry file should be selected if the import files contains hours and pay values to be imported into an open payrun.
-
Add unmatched employees will create a new employee record when the import record contains an employee number that does not exist in the database. When using this import type, it is important that the employee numbers in the import file are accurate.
If this option is not selected for an import into base data, any unrecognised employee numbers will be ignored and not imported.
Select the option that is appropriate for your import file.
When you use a Payrun entry file import type, another option appears:
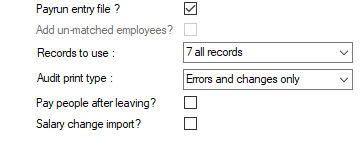
Pay people after leaving allows the import of hours or pay values for employees that have left and is only available on the Payrun entry file option. When checked, if an import contains a record for an employee that has left, IRIS Payrite will bring them into the payrun, set the tax code to 0T and set the NI table letter to A as well as import the payrun values for them.
The last checkbox on the screen is entitled Salary change import. This should be set if you are importing salary changes, checking it will automatically move the current values to the ‘Old’ values before overwriting the current values with those on the import file. If you also provide a Salary Change Date, IRIS Payrite will pro-rata the salary using this date when you open the payrun.
The final items to look at on this tab are the Audit File options:

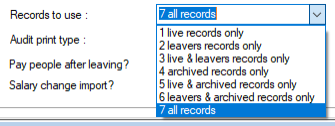
Records to use allows you to select which records to allow importing into. It is strongly recommended that you leave this set to 7 All Records (its default value). Other options are:
Audit print type sets the details to be printed on the audit file which is created when the import is run. The default is Errors and Changes Only, which will print the details of any changes imported from the import file and any records that contain errors.
Other options available are:
-
All Entries – shows all entries from the import file, regardless of whether it is a change or not, plus any errors.
-
Errors Only – only shows records that contain errors.