Defining Import Codes
There are four categories of code you can define:
-
Absence codes – these allow you to import periods of absence.
-
OSP codes – allows the import of OSP history into IRIS Payrite.
-
YTD Qualifying days – this should be used when you wish to import year-to-date OSP / SSP qualifying days.
-
EE Qualifying days – use this option to import employee SSP work patterns.
When you are importing these patterns, the data on the file needs to be in a specific format. These will be detailed in each section.
EE Qualifying Days
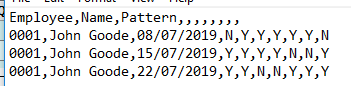
This option is useful when you wish to import employee SSP work patterns (also known as Qualifying Day patterns), the variable used to import is 5183. When you are importing these, you should provide the number of weeks in the pattern followed by an entry for each day of the pattern to flag whether it is a qualifying day or not.
When creating the import file, you need to bear a few things in mind:
-
You must use a consistent character – all qualifying days should use a uniform character (such as Y), and all non-qualifying days should use a different uniform character (such as N).
-
When specifying the qualifying days, remember that the first day of the pattern will be a Sunday.
-
Each part of the pattern must be in a different ‘field’ on the import file – if you are importing from a CSV, this means there must be a comma between each part. For example, a one-week pattern with qualifying days of Monday to Friday would look something like this:


Setting up qualifying and non-qualifying day codes
Before you can import patterns, though, you must first set up the characters that you will be using for qualifying and non-qualifying days. This is done in the Import Attendance Codes section of the module.
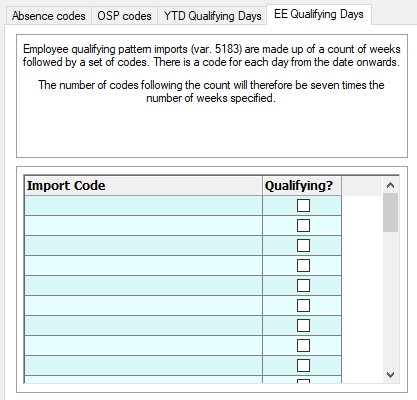
Within this screen, there is a tab for each of the attendance codes you can specify, when setting codes for SSP working patterns we need to go to the last tab, EE Qualifying Days. When you go to this tab, you will see space for several codes going down the screen, plus a check box labelled qualifying. You should set up entries here for qualifying days and non-qualifying days as they appear on your import file – in the file we looked at earlier, Y signals a qualifying day with N used for non-qualifying days.

Therefore, we need to reflect this in the import codes.
-
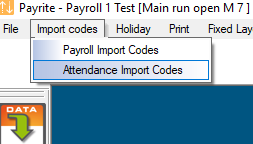
Click on the Import / Export icon.
-
Go to the Import Codes menu and select Attendance Import Codes.
-
Select the EE Qualifying Days tab.
-
We are going to set up Y as a working / qualifying day and N as a non-working / non- qualifying day, to reflect the values used on our import file.
-
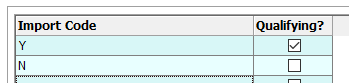
Click in the first line of import codes, and enter Y.

We want Y to be a working / qualifying day, so you should put a tick in the Qualifying box.

-
On the line underneath, enter N. This will be a non-working / non-qualifying day, so you should leave the Qualifying box unticked.
-
Click Save.
When we import the working pattern information, IRIS Payrite will now treat Y as a working / qualifying day, and N as a non-working / non-qualifying day.
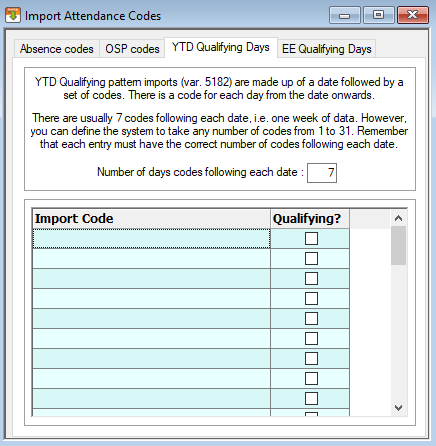
YTD qualifying days
This option is used when you wish to import historic SSP qualifying days. It is useful for recording historic SSP working days for employees with variable shift patterns or employees that have changed working patterns several times over a period.
When creating the import file, you need to bear a few things in mind:
-
You must use a consistent character – all qualifying days should use a uniform character (such as Y), and all non-qualifying days should use a different uniform character (such as N).
-
You can only enter periods of up to 31 days. If the qualifying days record you wish to import is longer, you will need to split it into multiple records. You MUST specify the number of days in the period on the setup screen first. All records should be the same length, so if you specify 21 days as a record length, all rows on the import file must be 21 days long, even if you only wish to record one weeks’ worth of qualifying days for one of the employees on the file.
-
Each part of the pattern must be in a different ‘field’ on the import file – if you are importing from a CSV, this means there must be a comma between each part. For example, a one-week pattern with qualifying days of Monday to Friday would look something like this:

Set up qualifying and non-qualifying day codes
Before you can import qualifying day history, you must first set up the characters that you will be using for qualifying and non-qualifying days. This is done in the Import Attendance Codes section of the module.
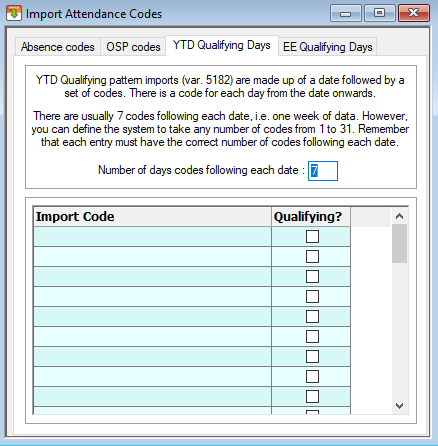
When setting codes for YTD qualifying days, we need to go to the third tab, YTD Qualifying Days. When you go to this tab, you will see space for several import codes going down the screen, plus a check box labelled qualifying. You should set up entries here for qualifying days and non-qualifying days as they appear on your import file – in the file we looked at earlier, Y signals a qualifying day with N used for non-qualifying days.
Therefore, we need to reflect this in the import codes.
You should also enter the length of the records in this section. You may import records up to 31 days in length.
-
Click on the Import / Export icon.
-
Go to the Import Codes menu and select Attendance Import Codes.
-
Select the YTD Qualifying Days tab.
-
Firstly, we need to tell IRIS Payrite how long each record will be. It is recommended that you input the history in records of 7 days in length, however you can specify any number of days from 1 to 31. Please bear in mind that each record must match the length specified here, even if the employee only has a YTD pattern of seven days to record.

In our example, the records are 7 days in length, so we will set the length to 7 accordingly.
-
We are going to set up Y as a working / qualifying day and N as a non-working / non- qualifying day, to reflect the values used on our import file.
-
Click in the first line of import codes, and enter Y.
We want Y to be a working / qualifying day, so you should put a tick in the Qualifying box.
-
On the line underneath, enter N. This will be a non-working / non-qualifying day, so you should leave the Qualifying box unticked.
-
Click Save.
When we import the YTD qualifying day information, IRIS Payrite will now treat Y as a working / qualifying day, and N as a non-working / non-qualifying day.
OSP codes
OSP (or Company Sick pay) codes are used primarily to import a history of OSP payments into IRIS Payrite. You may wish to import the OSP history this when you are first starting to use the OSP element of the absence module to ensure that the sick payments calculate correctly – if history is not entered, IRIS Payrite could possibly allocate too much sick pay to employees, or pay sickness at the wrong band.
When creating your import file, please consider the following:
-
You can only enter periods of up to 31 days. If the OSP history record you wish to import is longer, you will need to split it into multiple records. You MUST specify the number of days in the period on the setup screen first. All records should be the same length, so if you specify 21 days as a record length, all rows on the import file must be 21 days long, even if you only wish to record one day’s absence for one of the employees on the file.
-
You must use a consistent character in the file – all paid days at an OSP band should use a uniform character, such as 1 for days paid at OSP band 1 or 2 for days paid at OSP band 2 etc. You should also have uniform characters for unpaid days and non-qualifying days.
-
Each part of the pattern must be in a different ‘field’ on the import file – if you are importing from a CSV, this means there must be a comma between each part. For example, three weeks of OSP on a five-day work pattern with twelve days paid at band 1 and three days at band two would look something like this:


Set up OSP codes
Before you can import OSP history, you must first set up the characters that you will be using for paid OSP days, unpaid days, and non-qualifying days. This is done in the Import Attendance Codes section of the module.
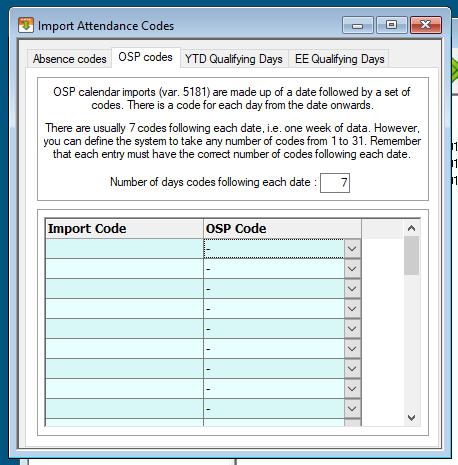
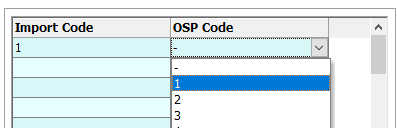
OSP codes are set up in the second tab of this screen, labelled OSP Codes. When you go to this tab, you will see space for several import codes going down the screen, plus a drop-down list containing the OSP code applicable. The codes available are:
-
W – waiting day
-
U – Unpaid day
-
- (dash) – non-qualifying day or day when OSP is not due
-
1 – OSP day paid at band 1
-
2 – OSP day paid at band 2
-
3 – OSP day paid at band 3
-
4 – OSP day paid at band 4
-
5 – OSP day paid at band 5
-
6 – OSP day paid at band 6
You only need to specify import codes for the amount of OSP bands in your scheme. For example, if your OSP scheme has two pay bands (full pay and half pay, for example), then you only need to specify import codes for 1 and 2.
Import codes should be created to match those used on your import file. For more information on OSP bands, please refer to the user guide for the Absence module.
You should also use this screen to specify how many days of history will be included in each record.
-
Click on the Import / Export icon.
-
Go to the Import Codes menu and select Attendance Import Codes.
-
Select the OSP Codes tab.
-
Firstly, we need to tell IRIS Payrite how long each OSP history record will be. It is recommended that you input the history in records of 7 days in length, however you can specify any number of days from 1 to 31. Please bear in mind that each OSP history record must match the length specified here, even if the employee only has one day of history to record.

In our example, the records are 21 days in length, so we will set the length to 21 accordingly.
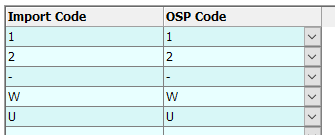
4. Next, we should specify the codes we are going to use to import the OSP history. We are going to set up 1 as a paid day at OSP band 1 and 2 as a paid day at OSP band 2, as per our import file.
Click in the first line of import codes and enter 1.

We want 1 to be a paid day at OSP band 1, so you should select 1 from the OSP Code drop-down list.
-
On the line underneath, enter 2. This will be a paid day at OSP band 2, so select 2 from the OSP code list.
-
Next, we should specify the code for a non-qualifying day. In the import file it is entered as a dash (-), so we can set this up on the row underneath.

- This time, we will select – from the OSP code list, as this signals a non-qualifying day.
- Lastly, set up values for waiting days (if required) and unpaid days. The latter is required to show days where the employee is not being paid OSP as they have run out of entitlement.
-
These are not shown on our example file; however, I will set them up as W and U respectively.
- Click Save.
When we import the OSP history, IRIS Payrite will recognise these codes as valid entries.