Open ID Connect Integration
If your organisation uses Microsoft Entra ID or another similar system, your home directory can be federated with IRIS Identity using Open ID Connect (OIDC).
Before Federating your Directory with IRIS Identity
Before federating your directory with IRIS Identity, contact your IRIS account representative to discuss options. Directory integrations are assessed case-by-case and subject to conditions. If agreement to federate your directory is given, they will provide you with a technical contact to share the details required for the process.
Prerequisites
To be able to federate your directory:
-
All employees must be using a common email domain or domains, such as acme.com, that are owned by your company
If your organisation uses generic email domains, such as Gmail, federating does not work. To discuss available options, contact your IRIS account representative.
- The tasks in this integration guide must be performed by a technical user with administrative permissions in Microsoft Entra ID to create and modify applications
Open ID Connect Integration Guide
To federate your directory with IRIS Identity, complete the steps in the integration process.
Some of the processes are completed in third-party software, and therefore, label names or locations of sections may not be exact or could be out of date. If you need further help, please refer to the latest documentation available from the software provider.
Create an IRIS Application in your Microsoft Entra ID Directory
- Open Microsoft Entra ID in the Azure cloud portal.
- From the left menu, select App Registrations.
- Select New Registration.
- Enter the name of the application, for example, IRIS Identity OIDC.
- Leave all other fields and settings as the default
- To save, select Register.
Configure Basic Open ID Connect
When configuring Open ID Connect, unless otherwise stated in the instructions, leave the settings as the default.
- From the left menu, select Authentication.
- Select Add a Platform.
- From the menu, select Web.
- Enter the default redirect URI as https://identity.iris.co.uk/oauth2/v1/authorize/callback
-
To enter the required additional URIs, select Add URI.
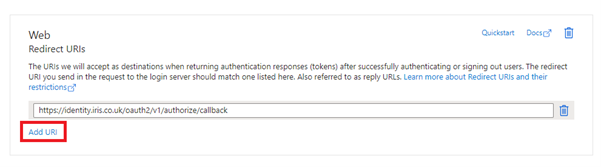
- Add the additional redirect URIs required from the following:
- You must add https://iris.okta.com/oauth2/v1/authorize/callback
- If integrating with a North American application, also add https://identity.irisglobal.com/oauth2/v1/authorize/callback
- If integrating with Staffology Payroll, also add https://identity.payroll-app.com/oauth2/v1/authorize/callback
- In Front-Channel Logout URL, enter https://identity.iris.co.uk/login/signout
-
For the token selection, only select ID Token.
Do not select Access Token.
- Select Save.
Create a Client Secret
- From the left menu, select Certificates & Secrets.
- Select Client Secrets.
- Select New Client Secret.
- Enter a name for the secret.
-
Choose an expiry.
For expiry, Microsoft recommend 6 months but to minimise maintenance, we would recommend something longer, for example 1 or 2 years.
To prevent interruption of service, you are responsible for tracking the expiry of your client secret and providing an updated client secret to IRIS Software Group in a timely manner.
-
Copy the value of the secret to share with IRIS Software Group later.
Configure Permissions
- From the left menu, select API Permissions.
- In Configured Permissions, select Add a Permission.
- From the menu, select Microsoft Graph.
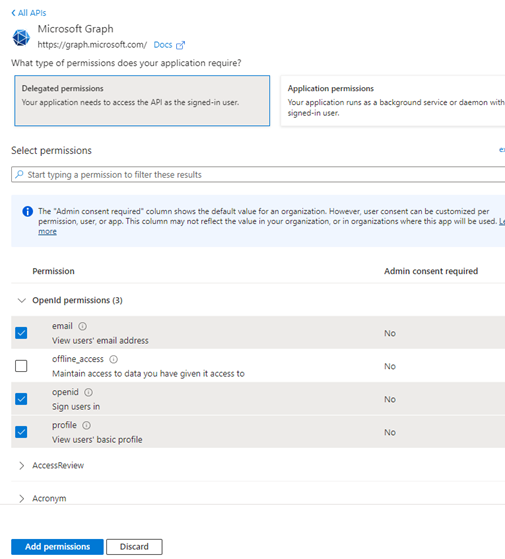
- Select Delegated Permissions.
- If not already displayed, search for OpenID Permissions.
- Select the openid, email, and profile permissions.
-
Select Add Permissions.
Add Optional Claims
- From the left menu, select Manage, then Token Permissions.
- In the Token Permissions screen, select Add Optional Claim.
- In the Token type section:
- Select ID.
From the Claim list, select family_name and given_name.
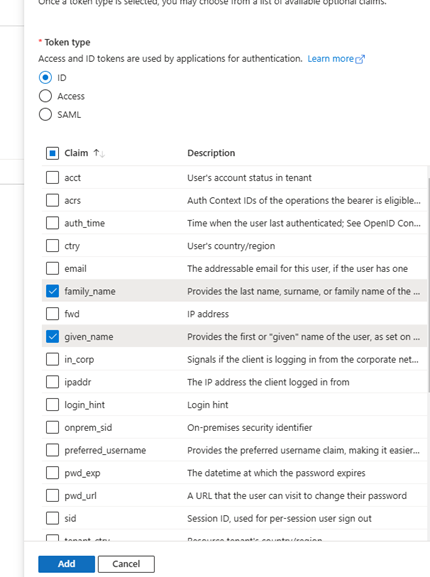
- Select Add.
- If asked to, grant the app permissions to use the Graph API.
Add Users
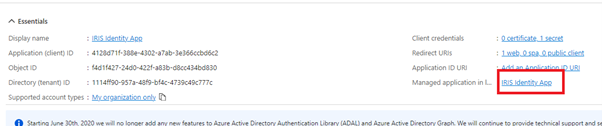
- From the left menu, select Overview.
-
In the table, find and select the Managed Application link.
- On the application settings page, from the left menu, select Users & Groups.
- Add the individual users or groups of users you want to allow to log into IRIS Software Group applications using the federated directory option.
Share Integration Details with IRIS Software Group
When you have set up the required details for integration, to complete and test the set up, you must share the required integration details with IRIS Software Group:
- Go back to the app registration settings.
- From the left menu, select Overview.
- In the table, copy the Application (client) ID.
-
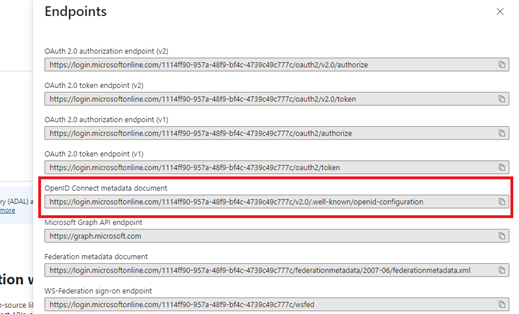
Then, select Endpoints.

-
For IRIS Software Group to get the details of the other endpoints required, copy the OpenID Connect metadata document.
- Send the following details to your technical contact at IRIS Software Group:
- The IRIS Software Group applications and products your organisation uses
- Your organisation's email domains suffixes
- The Application (client) ID
- The Client Secret
- The OpenID Connect metadata document
Test Logging Into an IRIS Software Group Application
Your technical contact at IRIS Software Group uses the details you provide to set up the directory integration. When they contact you to confirm integration is complete, you must test logging into an IRIS Software Group application.
To prevent errors being displayed during testing, the account used must also already have an account set up for the IRIS application you want to use for testing.
- For the IRIS application you want to use for the test, go to the login page.
- Enter the email address of the test account, then select Next.
- You are redirected to your tenant's Microsoft Entra ID login screen, enter the required details to log in.
- When logging in for the first time, if prompted to consent to IRIS Identity having access to your profile data, give the consent.
- You are redirected to the IRIS application.
If no error messages other than the user does not have an account (which the wording may vary by application), or unusual behaviours happen during testing, the federation has been successful.
During testing, if any other error messages, other than the user does not have an account (which the wording may vary by application), are displayed or any other unusual behaviours happen during testing, share the details with your technical contact at IRIS Software Group.