Create and submit an expense - employee
Step 1: Create an expense entry| Step 2: Add a receipt or document to an expense | Step 3: Submit an expense | Step 4: View an expense status
On your Expense screen, you can:
-
Add new expense entries/batches and submit them for approval.
-
View the status of your expenses, including any which you have not yet submitted, ones which are pending and ones which have been approved.
-
Examples of expense types include accommodation, meals and/or travel.
Create an expense entry
-
Sign in to IRIS HR Professional.
-
Go to My Details > Expense
-
Select Add Expense.
A row displays.
-
Complete the expense details, using this table as a guide:
Field Detail Type Select the expense type from the list. Type 2 If your organisation uses Type 2 expenses, select the appropriate option from the dropdown menu. Type 3 If your organisation uses Type 3 expenses, select the appropriate option from the dropdown menu. Date Enter or select the date the expense was incurred. Zone Select the country/currency applicable for the expense. For example, GBP. Units Units is typically used for mileage expenses and is usually unavailable when adding other expense types.
Mileage expensesEnter the number of miles you travelled.Total Enter the full expense amount.Mileage expenses-
If your admin has set the tax for the expense, the Total, NET and Tax should populate automatically.
-
The sum of the Net amount and the VAT equals the total amount, including tax.
Net The system automatically calculates the Net.
Mileage expenses
-
This field should auto-populate.
-
The Net amount is the value without tax.
Tax The Tax is the calculated VAT. This field should auto-populate.Rate Enter the appropriate tax rate if you know it.
This may auto-populate if your admin has added the tax for the expense.
-
-
Select Save to only add this entry or to create another entry to the batch:
-
Select Add Expense to add another row with the same information.
-
To add another blank row, select Save > Add.
-
-
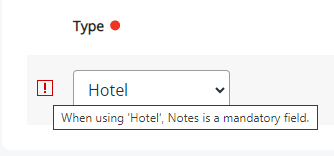
If any information is missing or incorrect, a red exclamation mark (!) will appear next to the entry. Hover over the icon for details about the warning.
Hover over the icon to view the reason for the warning.
-
Repeat these steps until you have added all your expense items.
Add a receipt or document to an expense entry
-
In Expenses Recorded, locate the the entry you want to add a receipt or document to.
-
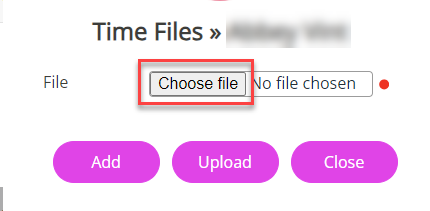
In the Document column, select Attach.

-
Choose Create New.
-
Select Choose file, browse to, and select the document.
-
Choose Upload and Close the screen.
The Expense entry within the Expense Recorded section of the Expense tab should have now updated with a paperclip icon, showing that you have uploaded a document to support your entry.

Submit an expense
-
Select the tick box beside each entry you want to submit, or choose Select All.
-
Choose Submit.

-
The Expense Submitted section of your Expense tab updates showing the submitted entry.
Your approver will now receive an notification to either approve or decline the entry.
View an expense status
-
Sign in toIRIS HR Professional.
-
Go to My Details > Expense.
-
In Expense Submitted, from the Status list, select , Pending, Approved, Declined or select the blank option to view all expense statuses.
-
Beside the entry you want to view, select History.
The entry you created and submitted displays, showing the status.

-
A coloured flag that indicates the batch status:
Colour Status Yellow Pending Black Cancelled Green Approved Red Declined - Approver’s name
-
Date requested
-
Date Actioned
-
Stage (if your organisation uses multi-stage approval)
-
-
If you want to:
-
Re-request a pending expense, select the re-request option.
-
Re-process a declined expense, select Re-Process.
-