Adding a Bulk Import Pay
-
Navigate to Payroll > Processing > Bulk Import Pay.
The Bulk Import Pay screen shows a list of all historical imports and acts as an audit trail.
-
To begin a new Bulk Import, select either Add New Bulk Import Pay or Clone an existing record. By cloning an existing one, all settings will be carried over, but these can be amended in the next screen if needed
Here we have chosen Add New Bulk Import Pay. On the Main screen, use the options given to customise your import. These options are explained in the table on the next page.
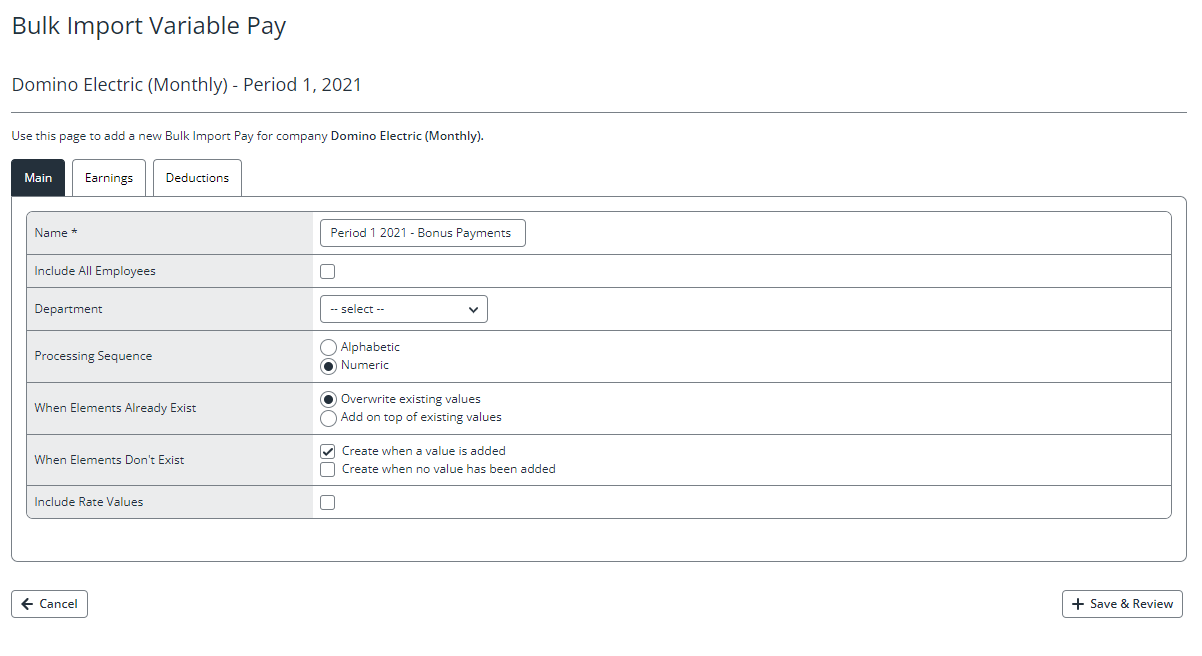
|
Field |
Description |
|
Name |
Enter a Name for your import. This will help you to identify the import when it shows in the bulk import list screen |
|
Include All Employees |
Tick this box to include all employees from the payroll company/frequency in the import |
|
Department |
If you have not ticked Include All Employees, use this drop-down list to select the department you wish to include in the import |
|
Processing Sequence |
Choose whether you would like the Excel spreadsheet containing the import details to be ordered alphabetically, or numerically |
|
When Elements Already Exist |
Choose whether the values you import should overwrite any current values, or whether they should be added to any current values held against the pay elements |
|
When Elements Don’t Exist |
Choose whether pay elements should be assigned to employees as part of the import where they don’t already have them assigned |
| Include Rate Values | Tick this box if you want to include rate values, so you can update the rates against any unformulated rate element |
-
Once you are happy with these settings, select the Earnings tab.
-
On the Earnings tab, select all pay elements you wish to include in the import. Repeat this on the Deductions tab, selecting any deductions you wish to include.
-
Once you have selected all pay elements you want to include, select Save & Review.
-
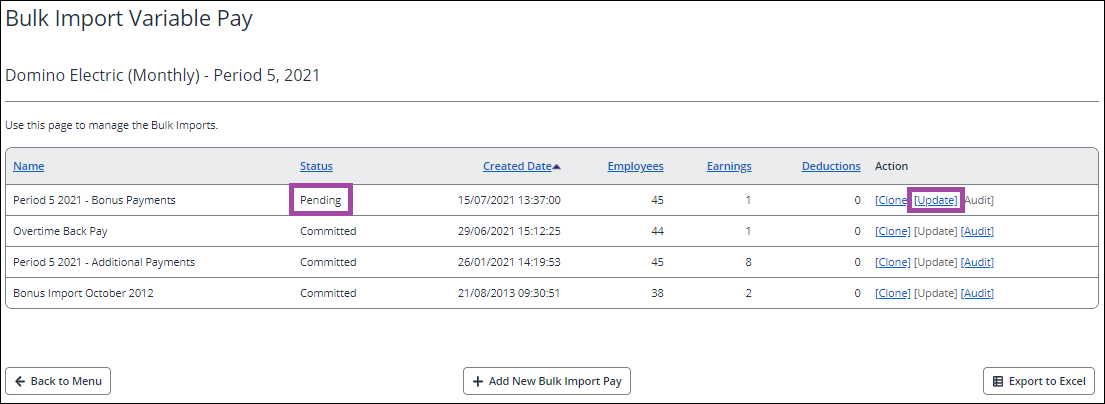
The import is now saved and can be re-visited at any time. To exit the import, select Cancel. To re-visit the import, from the Bulk Import Pay menu and select Update against the record.
-
To continue with the import, select Export to Excel. This downloads the grid shown on the screen into an Excel spreadsheet.
-
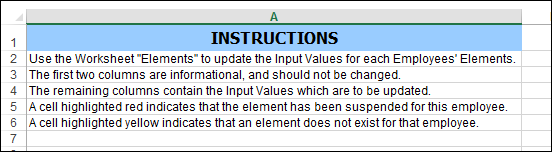
Open the spreadsheet and read through the Instructions. This explains how to update the spreadsheet
-
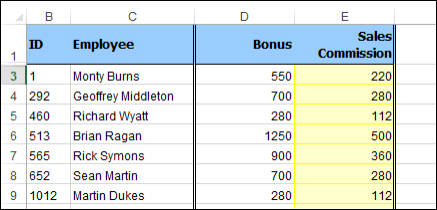
Select the Elements worksheet and following the instructions, enter any values you wish to import against the employee and pay element in the grid.
If it’s a variable element, you add in the value you want to pay the employee and where it’s a rate element, you add in the number of hours / units the employee needs to be paid. The system calculates the amount based on the hourly rate set in the system.
-
Once you have completed the spreadsheet, save the sheet somewhere on your computer or network that you can access again.
-
In IRIS Cascade, navigate back to the import record (if you are not there already) by selecting Update against the pending record shown in the list.
-
On the next screen, select Save & Review to confirm the settings chosen earlier.
-
On the screen, select Update from Excel and then Choose File to browse for the spreadsheet saved earlier. Once you have selected your spreadsheet, select Upload.
-
The values from the spreadsheet will now appear in the grid on the screen. If you are happy to commit the values to your employees’ pay elements, click Commit. If you wish to add to this import or further revise it, select Cancel and re-visit when required.
-
Once you have selected Commit, select OK to confirm that you wish to commit the data.
-
You are immediately taken to the audit report for the bulk import. The Status column will display Inserted where the element has been assigned to an employee or Updated, where the value was updated. This audit can be filtered using items in the pink filter bar and exported to Excel by clicking Excel Export.
-
Click View against any of the audit rows to be taken to the employee’s INPUT VARIABLE PAY screen in the Input area.
-
To return to the Bulk Import Pay screen, select Back to Bulk Import Pay.
-
On the Bulk Import Pay List screen, you now see that the status of the import has changed from Pending to Committed meaning no further changes can be made. The update button is also greyed out.
-
To access the audit at any time, select the Audit option.
Best practice tips
Where an employee already has multiple instances of an element against their record, the import will update all of them with the results of the import.