Create your own new starter wizard
To create employee records, you need to include the following fields in your New Starter wizard:
- Employee ID
- Forename
- Surname
- Start Date
- Cont. Service Date
Do not remove these fields.
Wizard Configuration
-
Go to Admin.
- From the General Settings section, select Wizards
- On the Wizard Configuration screen, the current New Starter wizard appears by default, marked as Active. You cannot delete or edit this wizard.
- Only one New starter wizard can be active at any time.
Create a new starter wizard
- Beside the current New Starter wizard, select Clone.
- Type a name for the new wizard.
- Type a description of the new wizard.
- Select Save.
- Select Design. A new browser tab opens the wizard in Design Mode.
- From the available screens on the left-side, add or remove fields, as required.
- Select Preview to see how your wizard displays.
- Select Inactive. This prompts you to confirm you wish to activate this wizard. Select OK to make this the active wizard, you see the Action column updates to show Active. This action sets the previous wizard to Inactive.
The following additional actions are available for new wizards:
|
Action |
Description |
|
Clone |
Copies the selected wizard with all fields and settings |
|
Edit |
Enables you to edit the wizard name and description |
|
Design |
Opens a new browser window with the wizard in Design Mode. Refer to Designing Wizards for more information about designing wizards |
|
Delete |
Deletes the selected wizard (only available for inactive wizards) |
|
Preview |
Displays the wizard as end users see it. You can add data when previewing, but you cannot save it |
|
Inactive/Active |
Sets the wizard to be used when users select Enter a New Starter in the Action menu |
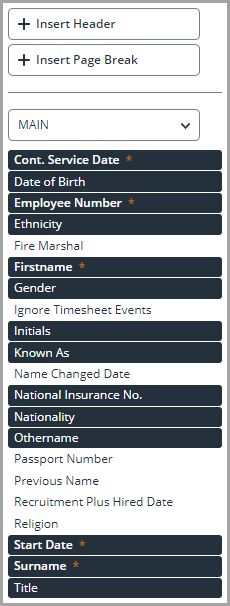
Designing wizards
When designing wizards, you can:
- Add and remove fields from any custom screens that you have created in IRIS Cascade, and/or from a list of standard IRIS Cascade screens
There is no limit to the number of fields or sections you can include in a wizard.
- Select Insert Page Break to add pages to a wizard, page breaks specify when users need to select Next in the wizard
- Change the names of fields without affecting the original screen name
- Move fields by dragging them up and down using the handle icon on the left-hand side
- Select Insert Header to insert headers. You can add headers (title bars) anywhere on a page. You can use multiple headers. Header length is limited to 150 characters, including spaces
Adding and configuring fields
On the Wizard Designer screen, you can select screens from the drop down menu in the left-hand pane, along with the fields corresponding to that screen. Fields highlighted by a grey box are already in place in the wizard.
Any fields displayed with an asterisk * System Required fields. This means that IRIS Cascade needs these fields to create records. If you add any other field from that screen, IRIS Cascade also adds system required fields. This also applies in reverse; if you remove any system required fields, IRIS Cascade also removes all fields from that screen.
Field properties
You can set properties for all fields in the wizard. To do this, select the cog icon on the right-hand side of the field listing.

When you select the icon, you see a new screen. The details that you need to complete on this screen depend on the type of field selected. Use this table to help you complete the Properties section of the screen.
| Field | Description |
|
Display Label |
The name of the field that end users see. You can change field names in the wizard by selecting the pen icon that displays when you hover over the field listing.
This not change the original field name on the screen |
|
Screen |
The screen the field appears on |
|
Field |
The original name of the field, as set in the database |
|
Hidden |
When ticked, allows the field to be hidden in the wizard. If you want to hide fields, they must have a default value. If you do not set a default value, you see a warning message |
|
Mandatory |
A red asterisk is displayed on the right-hand side beside fields on a screen marked as mandatory using Screen Designer. Users must then add data before they can save the wizard |

Validation rules
Use this table to help you complete the Validation Rules section of the Properties screen (all possible options).
|
Option |
Description |
|
Numeric Check |
The data entered must be whole numbers only |
|
Max Length |
The total number of characters allowed. The default values are taken from the field properties and cannot be increased past this |
|
Min Length |
The minimum number of characters allowed |
|
Decimal Check |
The number entered can have a decimal point |
|
Required |
An additional mandatory option. The field may not be mandatory on the screen but can be made mandatory for the purposes of the wizard. If the field is mandatory on the screen, you cannot change this |
|
NI Format |
When ticked, only allows the standard UK NI format to be used |
|
Default Value |
When you add data to a field in Design Mode, this data then becomes the default value when the new starter wizard is used. When users access the New Starter Wizard, these default values are added automatically. However, if required, you can still change default values when adding new starters, as they are not hidden. |
Hidden and default values
If you use the Hidden and Default Value properties together, IRIS Cascade can add data automatically without any user action. For example, if you have the IRIS Cascade Payroll module, one of the first things you should do when adding new starters is mark them to be included in payroll. You can add the Include in Payroll field to the wizard, give it a default value, and then hide it from users.
You can use this functionality to set other system or employee-specific settings.
Job & Salary Reason field
The Job & Salary Reason field is now visible. You can use this field to set the reason for new starters’ job records. You need to unmark it as hidden and then move it into place, if needed.
After Setup
When you have set up your new wizard, do not forget to revisit your New Starter workflow and remove anything that the wizard has processed.