Email design
You can use IRIS Cascade to design emails to send when creating system workflows. IRIS Cascade can merge information from standard and custom employee screens into any email templates you create.
To view your existing email templates, go to Admin > General settings > Email design
The Email design area also holds the standard IRIS Cascade email templates, which cannot be deleted or have their names changed.
Access to this area is set in the Role the logged in user has been given. If you don't see this option, speak to your HR admin.
NEW: Ability to add your own fields to an email
It is now possible (from May 2026) to add your own fields to an email template.
So, for example, if you've created a new custom employee screen, those fields will be available on the Fields tab. Only field types that return employee data will be visible, e.g. a document control.
When adding your fields, depending on the screen type, you can set what data is returned using the Record setting.
-
Single screen (MAIN, BANK etc) - Single, no options available as there's only one set of data.
-
List screens (ABSENCE, HOLIDAY etc) - Various options depending on the screen. Those options are listed lower down.
If multiple fields from a list screen are used, they will all use the same Record setting. The system will automatically change any other fields. It is not possible to have fields from the same list screen with different Record settings.
Create a new email template
-
At the bottom of the Email template list click New email template.
-
Name: enter a unique name relating to the content/context of the template.
-
Description: It is recommended that you add some information about the template to explain what data the merge fields are returning. This will help others understand what is supposed to be happening.
-
In Use: Yes, means it will be visible when creating an email task in workflow. No, means it won't be visible in workflow.
-
Fields: On this tab you can add the merge fields you will need for the Email tab. When you create a new email, default fields are added as standard. These fields cannot be removed. Any fields added to the Email tab also cannot be deleted.
-
Field - shows the name as seen on the employee screen.
-
Screen - Shows the screen name.
-
Record - Shows which record will be picked up.
-
Used in the email - Displays Yes or No if the field is being used on the Email tab.
-
Actions - Only shows the Delete button. This will be disabled if the field is added to the Email.
-
-
Email: On this tab you can add the text that will be seen by the recipient(s) of the email and also insert the merge field(s) you need.
-
Data Field - Shows a list of all fields added on the Fields tab.
-
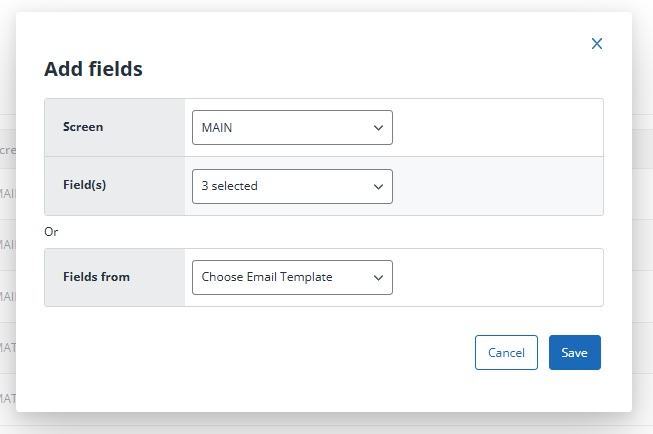
Adding fields to a template
On the Fields tab, you can add any field that will display data, to an email or select a group of fields from a current email.
-
Screen - Shows all the employee screens you can add fields from.
-
Field(s) - Shows the list of fields from the above screen. When a field is added it will disappear from the list.
-
Fields from - This allows you to add fields from another current email template.
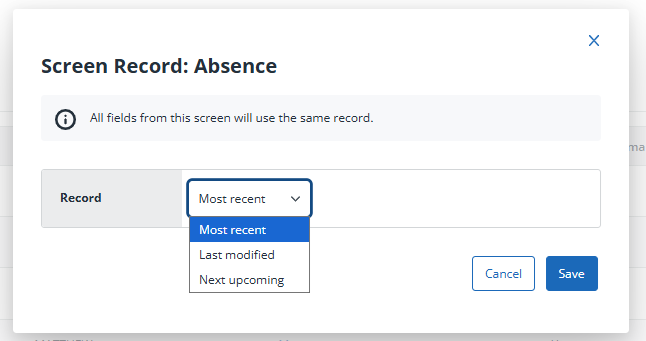
Setting the Record from a list screen
When fields from an employee list screen are added to an email you have options to decide which record will be picked up.
-
Record - The options seen here can vary depending on the screen selected.
-
Most recent - Returns the most recently added record.
-
Last modified - Returns the last record to be edited/modified.
-
Next upcoming - Returns a future record, if available, based off the Start Date. If there's multiple records it returns the Next record.
-
Standard Cascade templates have the Record set and these fields cannot be changed so no option will be visible.
Amend an email template
Email templates can be edited/amended at any point. New fields can be added and text changed.
Note: When a workflow runs it takes the current, saved email template and uses those merge fields to return data.
Upgrade an email template
The introduction of the ability to add your own fields to an email means some older email templates will need to be upgraded to allow this to happen. The upgrade updates the background code to allow new fields to be added.
It is also possible to add new fields to upgraded legacy email templates. Legacy email templates are any emails created before this new feature was added.
Templates that can be upgraded will show this message on the General/Fields tabs explaining this can be done. Once upgraded the Add fields button will be enabled.

When a legacy template is upgraded, the Record option on the Fields tab will default to Legacy Setting. This means it will use whatever was set up when the original email dataset was created. The upgrade process doesn't know what the original criteria was against a field. This setting can be changed if needed.
Note: Any email template for the Training module cannot be upgraded as there's no link to an employee, only delegates.
Technical notes
Fields can be added to an email template with the following special characters in the name. Your field names can be edited in screen designer if you need to change it.
! " £ $ % ^ & * ( ) _ + - = [ ] { } ; ' # : @ ~ , . / < > ? ` ¬ \
The following character cannot be in a field name.
| vertical line (Pipe).
Note: The service desk will no longer be creating or adding new fields to legacy email datasets. This feature, the ability to add your own fields, allows you to now do this.
Fields that won't be seen are;
-
Document controls
-
Form separators
Any tick box fields will display either Yes (ticked) or No (unticked).