Creating data destruction schedules
Data Destruction schedules use rules based on date fields, so you can’t create rules / schedules to delete data for current employees from screens that don’t have a date field.
Schedules that delete data for leavers always use the Left Date field on the Leaver screen. This option is pre-set, and you cannot change it.
You can create schedules that delete data from:
- Multiple screens, or from certain fields on multiple screens. The rules in these schedules are always based on the Left Date from the Leaver screen.
- A single screen, or data from fields on that screen. You can also use these schedules to delete data from current employees’ records.
Create a multi-screen schedule
-
Go to Admin.
- From the Interfaces and Diagnostics section, select Data Destruction Schedules.
- At the bottom of the screen, select + Add New Schedule.
- Select the Settings tab.
-
Complete the screen, using this table as a guide. Fields marked with an asterisk * are mandatory, and you must complete them.
Field
How to complete
Name*
Type a descriptive name for the schedule (100 characters maximum, including spaces)
Description*
Type information about what the schedule does (200 characters maximum, including spaces)
Options
Select Multiscreen (Based on Left Date)
Screen
This field is disabled for multiscreen schedules (as multiscreen schedules are always based on the Left Date from the Leaver screen)
Rule
Use this field to specify the data deletion rule. The available time periods are Days, Weeks, Months and Years
Active
Tick the box to make the schedule active and set it to run according to the settings in the Configuration area
- Select the Screens/Fields tab.
-
In the Selected column, tick the box beside the first screen you want to delete data from. You will see a 0 Field(s) link in the Selected Fields column.

-
If you want to delete data from all fields on the selected screen, tick the box in the Delete Record(s) column as well as the box in the Selected column.

- If you want to delete data from certain fields on the selected screen only:
- Select the 0 Field(s) link in the Selected Fields column. (If you cannot see this link, untick the box in the Delete Record(s) column).
TheField Deletions screen appears, listing the fields from that screen. - In the Clear column, tick the box beside each field that you want to clear data from.
- Select the 0 Field(s) link in the Selected Fields column. (If you cannot see this link, untick the box in the Delete Record(s) column).
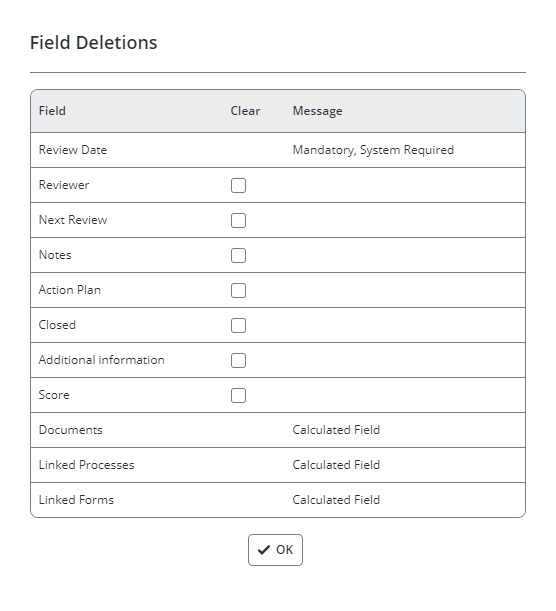
- If data cannot be deleted from a field because it’s in one of the following categories, you’ll see a warning in the Message column:
- Mandatory: if you want to make a mandatory field non-mandatory, you can do this in Screen Designer.
- System Required: this means that Cascade needs the field to keep the record. The only way to remove this data is to delete the record completely
- Calculated Field: this applies to any other field that data can’t be deleted from, for example, document controls and any field created by Cascade and marked as an FX field
-
Select OK. The link in the Selected Fields column updates to show the number of fields you have selected.

- Repeat as required for each screen you want to clear data from.
- Select Save.
Create a single screen schedule
-
Go to Admin.
- From the Interfaces and Diagnostics section, select Data Destruction Schedules.
- At the bottom of the screen, select + Add New Schedule.
- Select the Settings tab.
-
Complete the screen, using this table as a guide. Fields marked with an asterisk * are mandatory, and you must complete them.
Field
How to complete
Name*
Type a descriptive name for the schedule (100 characters maximum, including spaces)
Description*
Type information about what the schedule does (200 characters maximum, including spaces)
Options
Select Single Screen. When you select this option, the Screen field is enabled, so that you can select the appropriate screen
Screen
Use the dropdown menu in this field to select the screen that you want this schedule to delete data from. The menu only lists screens that include a data field. This field is disabled if you select Multiscreen in the Options field
Rule
Use this field to specify the data deletion rule, based on any date field. The available time periods are Days, Weeks, Months and Years. The options in the After drop-down menu depend on the selected screen. Active
Tick the box to make the schedule active and set it to run according to the settings in the Configuration area
- Select the Screens/Fields tab.
-
In the Selected column, tick the box beside the first screen you want to delete data from. You will see a 0 Field(s) link in the Selected Fields column.
-
If you want to delete data from all fields on the selected screen, tick the box in the Delete Record(s) column as well as the box in the Selected column.
-
If you want to delete data from certain fields on the selected screen only:
-
Select the 0 Field(s) link in the Selected Fields column. (If you cannot see this link, untick the box in the Delete Record(s) column).
-
You will see the Field Deletions screen, listing the fields from that screen
-
In the Clear column, tick the box beside each field that you want to clear data from.
-
-
If data cannot be deleted from a field because it’s in one of the following categories, you’ll see a warning in the Message column:
-
Mandatory: if you want to make a mandatory field non-mandatory, you can do this in Screen Designer.
-
System Required: this means that Cascade needs the field to keep the record. The only way to remove this data is to delete the record completely.
-
Calculated Field: this applies to any other field that data can’t be deleted from, for example, document controls and any field created by Cascade and marked as an FX field.
-
-
Select OK. The link in the Selected Fields column updates to show the number of fields you have selected.
- Select Save
Examples
The settings in the screenshot below will create a schedule to delete disciplinary records one day after they have expired:

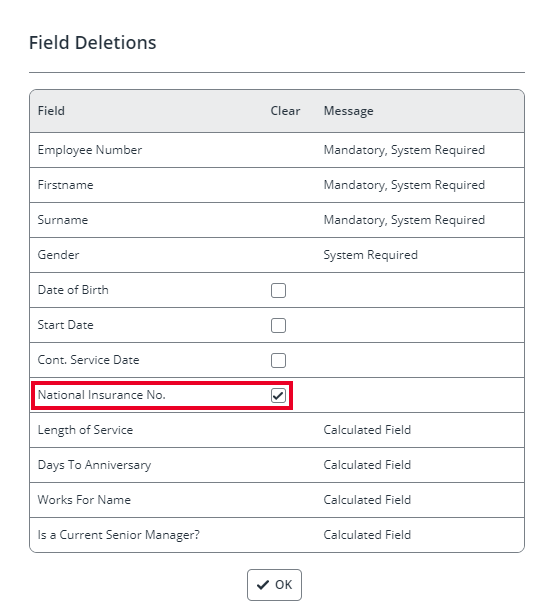
These settings create a schedule to delete the National Insurance number only. 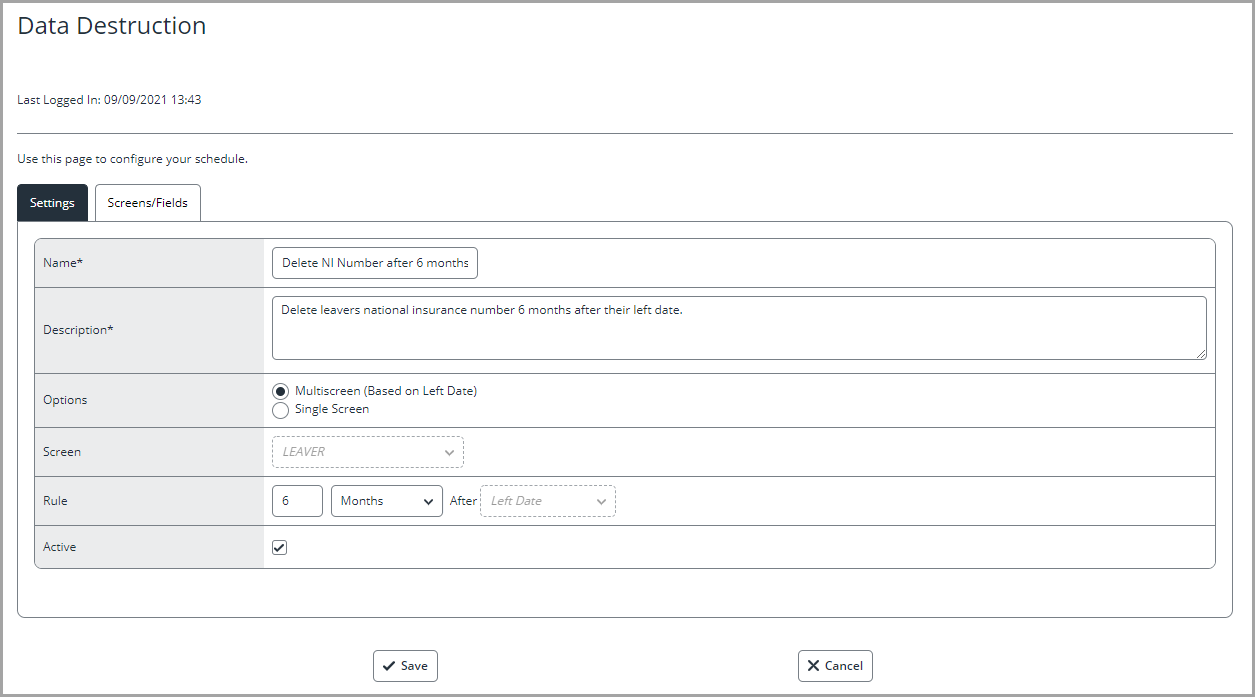
On the Screens/Fields tab, tick the box to select the Main screen, and then select the 0 Field(s) link in the Selected Fields column.

On the Field Deletions screen, tick the box to select the National Insurance No field and then select OK.
Invalid Fields
If a field that is used in a schedule is removed from a screen, you’ll see an Invalid Field message beside the schedule in the schedules list.

If this happens, the schedule remains active, but will not run.