Giving Read Only Access to Auditors
This guidance is only for IRIS Financials Version 7.0.2103 or earlier. If using version 7.0.2223 or later, go to View Only Access for Documents.
You can allow auditors to remotely access your establishment/organisation's PS Cloud environment from their own offices. This can be useful if the auditors are unable to visit your establishment/organisation's office.
If you would like to set up access for auditors to access your PS Cloud environment, they need a PS Cloud licence. To check if you have any available licences or to swap an assigned licence, you can contact our support team using the Submit a Request link on our Community.
When your establishment / organisation's auditors have been given a PS Cloud login, they are able to access your establishment / organisation's PS Cloud environment using the same remote desktop connection shortcut (RDP) that you use. Refer to Downloading a new RDP Shortcut for more information.
You need to set your auditors up as a user on IRIS Financials with read-only access (this prevents them from posting anything).
It is recommended you allow your establishment / organisation auditors to access to your IRIS Financials system with read only access, so that they can access all of your data. Read only access prevents the risk of any data being inadvertently amended.
Only the person within your establishment / organisation who administers the system, can provide access to IRIS Financialsfor the auditors.
Giving read only access to auditors consists of the following:
- Create User Group and User(s)
- Application Access
- Security Roles
- Document Security
- Menu Security
- IRIS Financials Purchasing Access
- IRIS Financials Purchasing Document Access
Create user group and user(s)
You need to create a new user group and audit user in order for them to access the IRIS Financials software.
- Select Admin Modules > Administrator from the main menu.
-
Enter the applicable Server name.
-
Enter your
If you do not have system administrator login details, please speak to the person within your establishment/organisation who administers your system, who can do this for you.
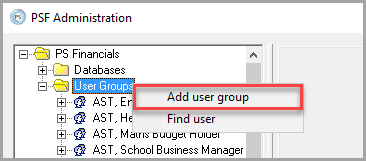
- The PSF Administration dialog is displayed. Select Expand (+) for the User Groups folder, right-select on the User Groups folder, then select Add User Group.
- A <new> user group is displayed in the left-hand panel and automatically selected. Enter the user group name in Name, then enter a title to help identify the user group in Title, for example, AUDITOR and Auditor Access - Read Only.
- You do not need to set Password expiry or Expiry warning. Select Apply to save the details.
- Next, to create and add a user for the auditor, right-select the auditor user group you created in the left-hand panel, then select Add user.
- A <new> user displayed in the left-hand panel for the user group and automatically selected. Enter the user name in Name, then enter a title to help identify the user in Title, e.g. AUDITOR and Auditor.
- You do not need to enter an Email address but can if required.
-
Enter a Password, then select Active. Select Apply to save the details.
The auditor user are asked to change their password when they first log in to any IRIS Financials application.
Next, you need to provide the user group with access to the IRIS Financials applications.
Application access
The audit user group you need to be given access to the applicable IRIS Financials applications.
- On the PSF Administration dialog, select Expand (+) for the Databases folder, then select the database for which you want to provide auditor access, then select the Security tab.
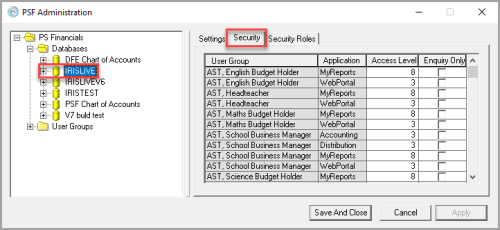
- Scroll to the bottom of the list, then select the blank User Group field, then select the Auditor user group from the drop-down list.
- Select Accounting from the Application drop-down list to provide access to IRIS Financials.
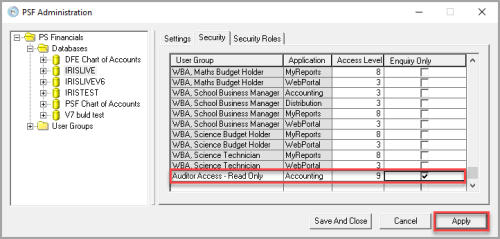
- Enter 9 in the Access Level field to ensure the auditor has access to all closed periods, nominals, and accounts.
-
Select the check box in the Enquiry Only field, then select Apply to save the settings.
Giving auditors Enquiry Only access does not provide access to all menus. If the auditors require access to specific menus, access must be provided separately.
- Repeat the process for any additional auditor user groups that require access.If the auditors also require access to IRIS Purchasing, follow the previous steps but select WebPortal from the Application drop-down list. You also need to assign the auditors a licence for IRIS Purchasing and access to the applicable document types. For more information, please see IRIS Purchasing Access and IRIS Purchasing Document Access.
Next, you need to provide the auditors access to the system security roles.
Security roles
Security roles are used to restrict access to the ways in which data can be maintained, i.e. whether data can be viewed, modified, or posted. Typically, auditors require unlimited access to your establishment / organisation data. The following process explains how to provide auditors with access to all security roles so they can access the information they need in the most efficient way.
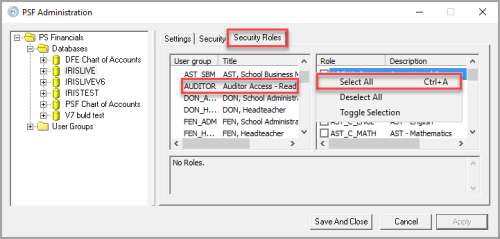
- On the PSF Administration dialog, with the database to which you gave the auditor application access selected, select the Security Roles tab.
- Select the auditor user group from the User Group panel. Right-select in the Role panel on the right-hand side, then select Select All from the pop-up menu.
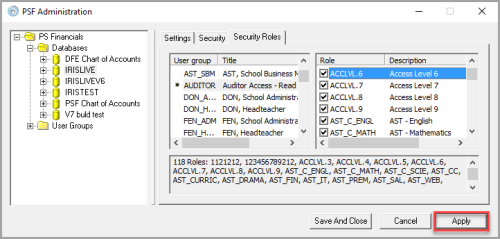
- All the security roles are selected and displayed in the bottom panel. Select Apply to save the settings.
Next, you need to provide the auditor with access to document types.
Document security
Auditors need access to specific document types in order to see posted transactions in IRIS Financials. Document access is provided using the Security module.
-
Select Documents, then select UDI Settings from the menu.
-
The UDI Settings window is displayed with the General tab displayed by default. Select the required document type from the left-hand panel, select the Input Forms tab, then select EDIT.
- Select the input form for which you want to set user group access from the Title panel, then select the required user groups from the right-hand panel. When you have selected the required user groups, select SAVE. In the following example, the Customer Refund input form has been selected, and the AUDITOR - Auditor Access - Read Only user group has been selected to have access.
If you are not able to see the user group you want for which you want to give access to document input types, check to make sure they have access to the required application.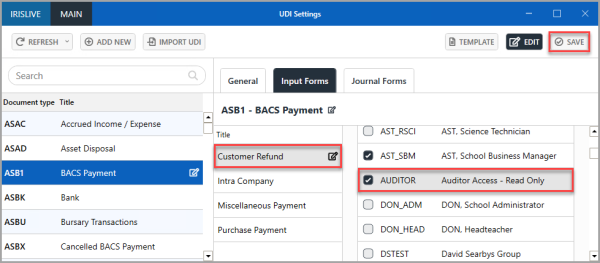
- An Update complete message is displayed. Select OK to close the message and return to the previous window.
IRIS Purchasing Access
If auditors require access to IRIS Purchasing, they need to be assigned a licence and given access to the IRIS Purchasing document types.
- Login to IRIS Purchasing using the CUSTADMIN login.
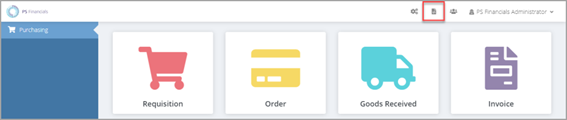
- From the IRIS Purchasing toolbar, select the Licences icon.
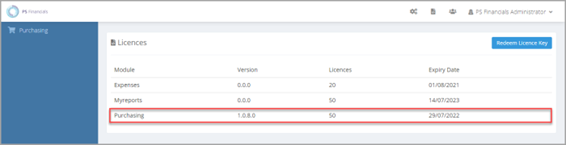
- The Licences page is displayed with the module, version, number of licences, and licence expiry date listed. In the following example, 50 licences have been purchased. Select Purchasing, as shown in the following graphic.
- The Named users for Purchasing window is displayed with active users who have been added to the system in the Administrator module for IRIS Financials listed. The total number of licences assigned and available is displayed in the top right-hand corner. Users with a green Tick icon have been assigned a licence and those with a red Cross icon have not.
If you do not have any unassigned licences, you need to remove the licence from an existing user and re-assing the licence to the auditor user. Alternativly, please contact your account manager to purchase additional licences. Select the user from which you want to remove the licence, then select the auditor user to assign the licence. - Select the auditor user to assign the licence. The green Tick icon is displayed against the user, select Save.
IRIS Purchasing Document Access
-
Select Windows Start > PS Financials > Distribution.
-
The PSF Distribution Logon is displayed. Enter you login details, then select OK.
-
The PS Distribution window is displayed. Select Masters > Workflow > Document Types from the top menu.
-
The Document Type Maintenance dialog is displayed. Select the required document type, e.g. PORD from the left-hand panel, then select Workflow....
The following process needs to be carried out for the auditor user group for PORD, GRN, and INV document types. -
The Document Workflow dialog is displayed. User groups who already have access to the document type are displayed in the left-hand panel. If the required user group is not displayed, select Add User Groups....
-
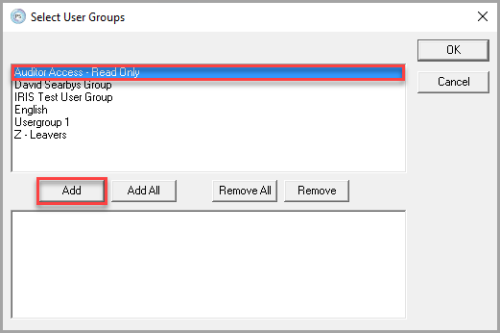
The Select User Groups dialog is displayed. Select the Auditor user group from the top panel, then select Add.
-
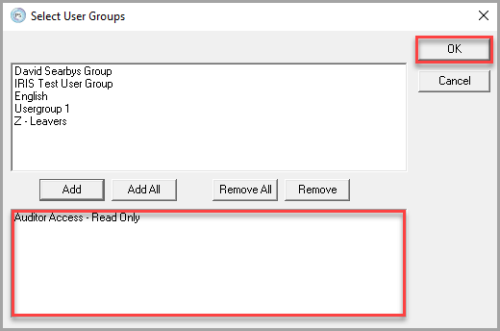
The selected user group(s) is displayed in the bottom panel, select OK to confirm your selections.
-
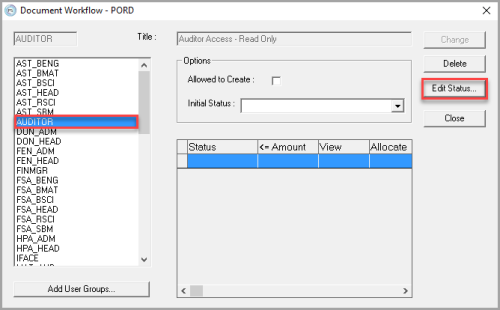
On the Document Workflow dialog, select the AUDITOR user group from the left-hand panel, then to select the document statuses for the user group, select Edit Status....
-
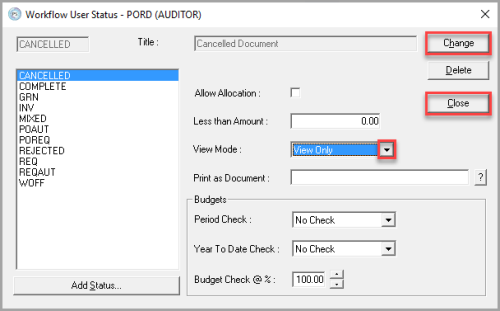
The Workflow User Status dialog is displayed. Select Add Status....
-
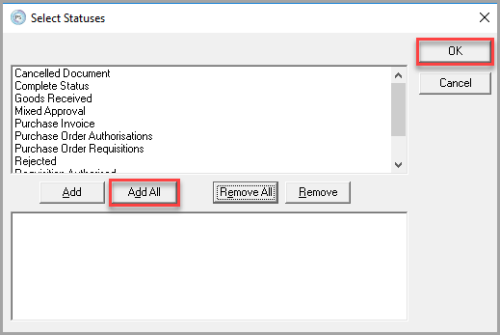
The Select Statuses dialog is displayed. Select Add All, then select OK to return to the Workflow User Status dialog.
-
Select the first document status, e.g. CANCELLED. Select View Only from the View Mode drop-down list. Repeat the process for all the listed statuses, then select Change to save the settings. This gives the audit user view only access to the document type at each stage.
-
Select Close to return to the Document Types Maintenance dialog. Repeat the process for the other required document types for which auditors need access.